The Zapier Webhooks Add On connects your Paid Memberships Pro site to over 5,000 apps, allowing you to automate workflows, sync data, and streamline your membership management.
What You Can Do with Zapier Webhooks
- Sync membership data with CRMs like HubSpot, Salesforce, or ActiveCampaign.
- Automate email marketing by sending new member details to your ESP of choice.
- Track membership data by logging new orders in Google Sheets, QuickBooks, or Airtable.
- Trigger actions in external apps when members join, renew, or cancel their membership.
- Create custom workflows without writing a single line of code.
How it Works
This Add On is available as a legacy option if you want to automate your membership site using webhooks. We strongly recommend using the PMPro’s native Zapier App as an alternative to this Add On. Using the built-in Zapier integration allows multiple events for each action and trigger, which you cannot do using the webhook methods in this Add On.
The Add On version provides Zapier triggers to send data when membership events occur (such as new orders or level changes) and Zapier actions to receive data and update membership details.
With built-in webhook support, you can integrate your membership site with any Zapier-compatible app, automating tasks that would otherwise require manual effort.
Note: using webhooks with Zapier requires a monthly subscription (view Zapier pricing). The native Zapier integration in core Paid Memberships Pro has no fees for zaps that qualify for the Free Zapier plan.
Installation
You must have the Paid Memberships Pro plugin installed and activated to use this Add On.
- Navigate to Memberships > Add Ons in the WordPress admin.
- Locate the Add On and click “Install Now“.
- Or, to install this plugin manually, download the .zip file above.
- Upload the compressed directory (.zip) via the Plugins > Add New > Upload Plugin screen in the WordPress admin.
- Activate the plugin through the Plugins screen in the WordPress admin.
Send Data to Zapier (Triggers)
Making a Zap
Zapier uses the term ‘zap’ to refer to the basic connections that automate a process for you. A Zap is a trigger with an event, and the triggers available in this integration are listed below:
Triggers
- Changed Membership Level:
pmpro_after_change_membership_level - New Order:
pmpro_added_order - Updated Order:
pmpro_updated_order - After Checkout:
pmpro_after_checkout
Setting Up A Webhook In Zapier
Triggers are used to activate the Zap, in our case we will use the webhook option. This option is used for all Zaps that the Zapier Integration for Paid Memberships Pro uses.
- Log in to your Zapier Account or create a new account with Zapier.
- Select Create > Zaps located at the top left of the screen.
- Click “Trigger“, to view and select “Webhooks“.
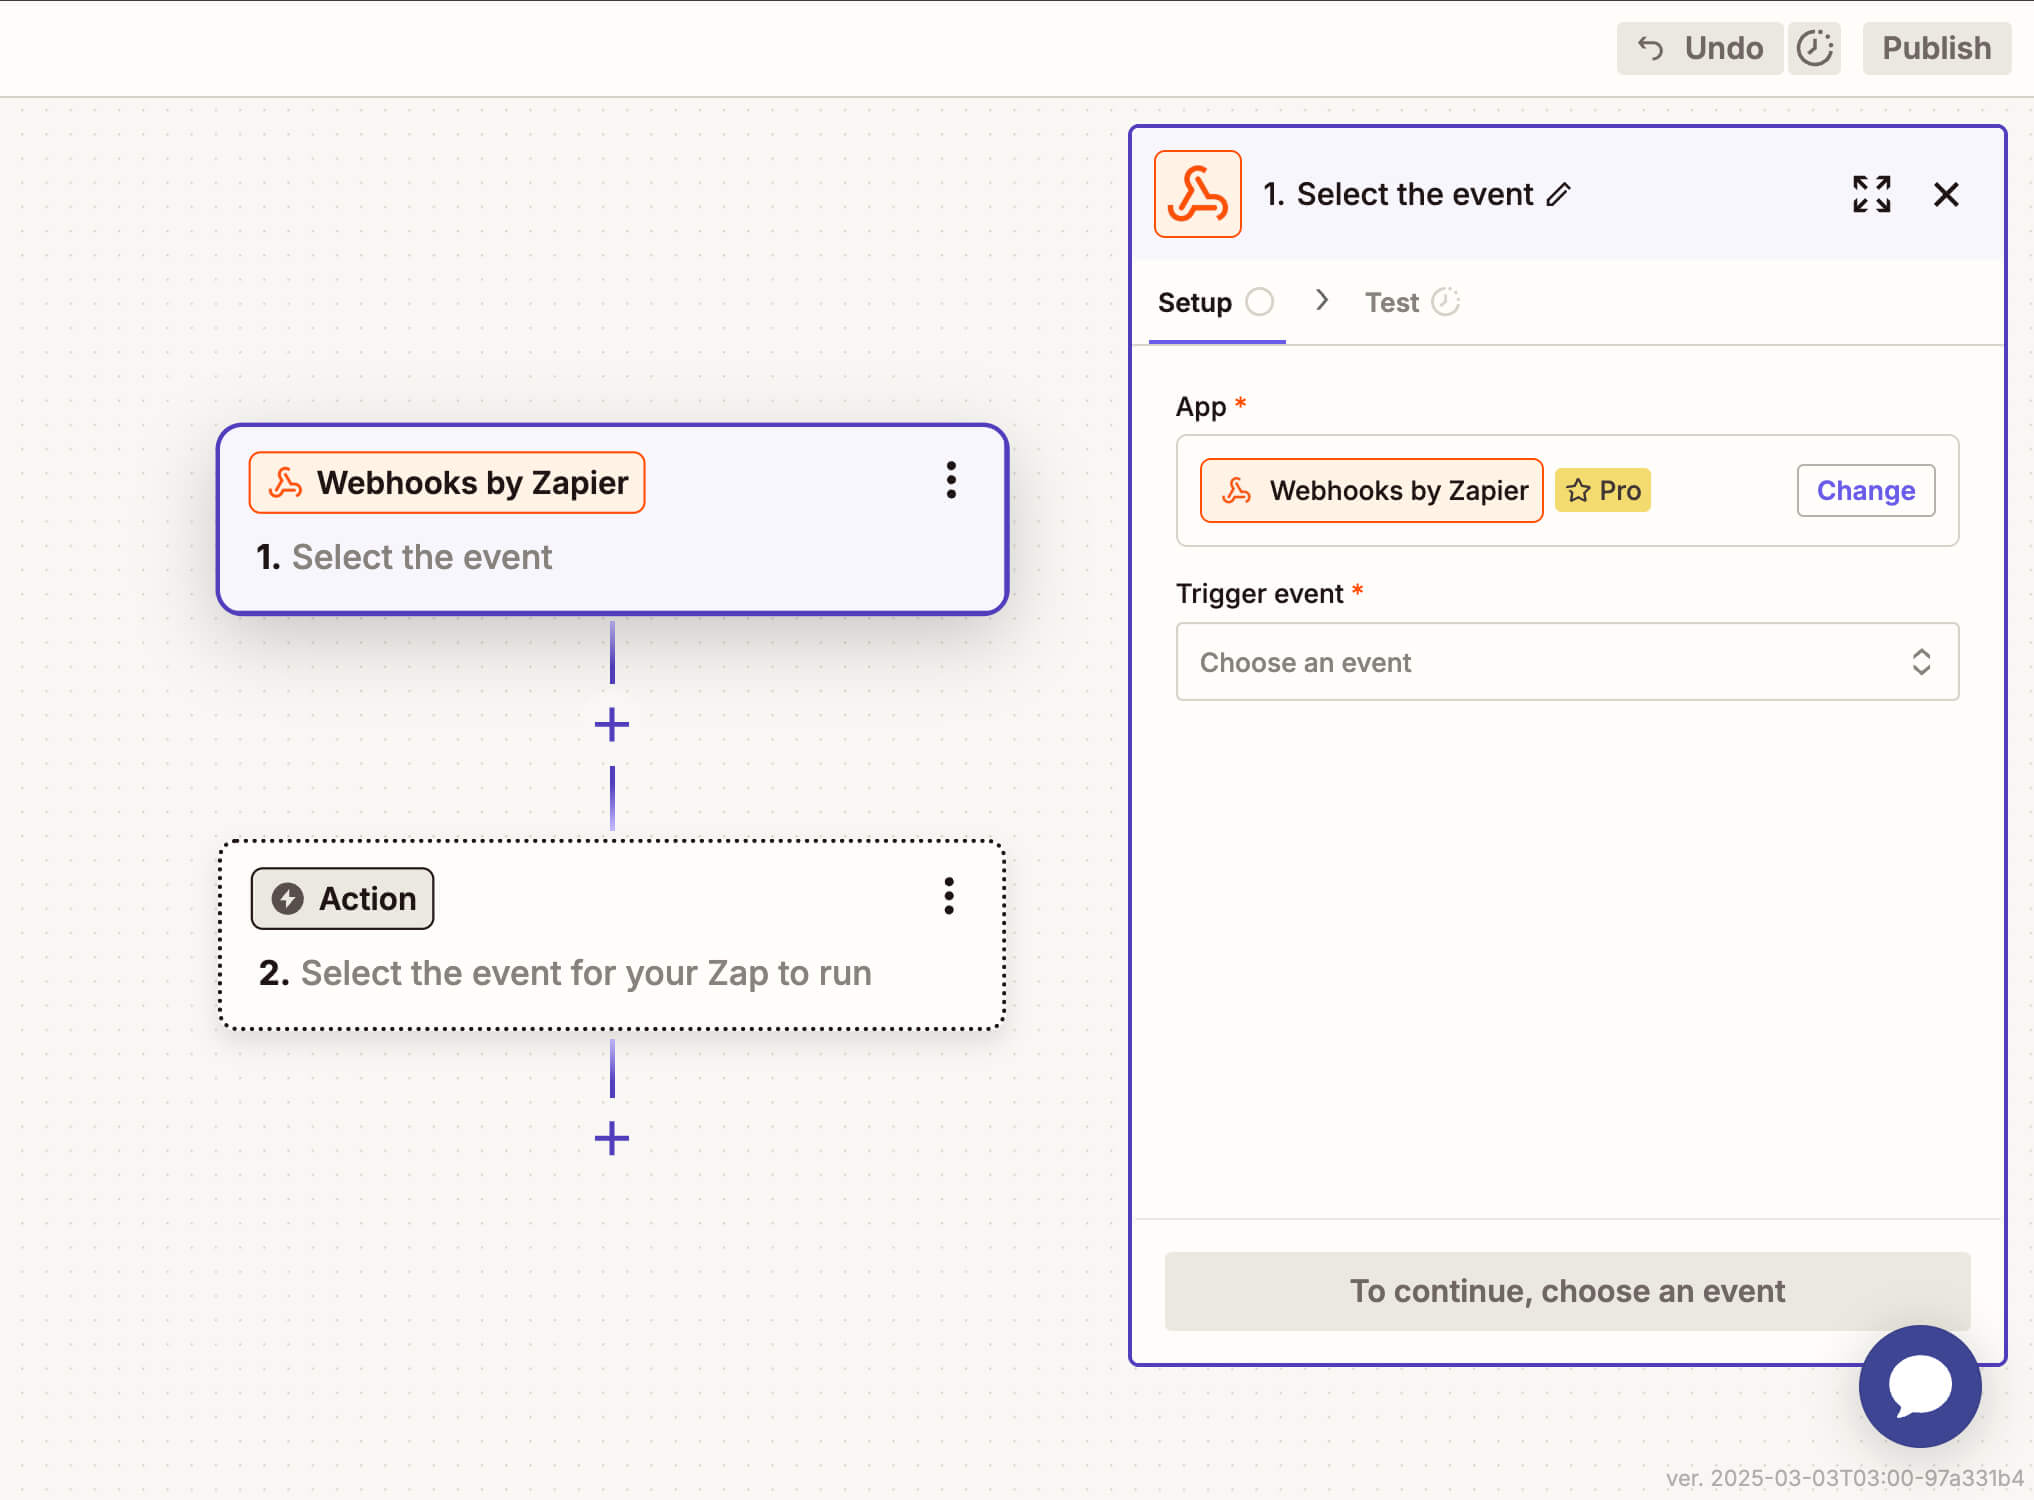
- Select the Trigger Event “Catch Hook“. Then click “Continue.”
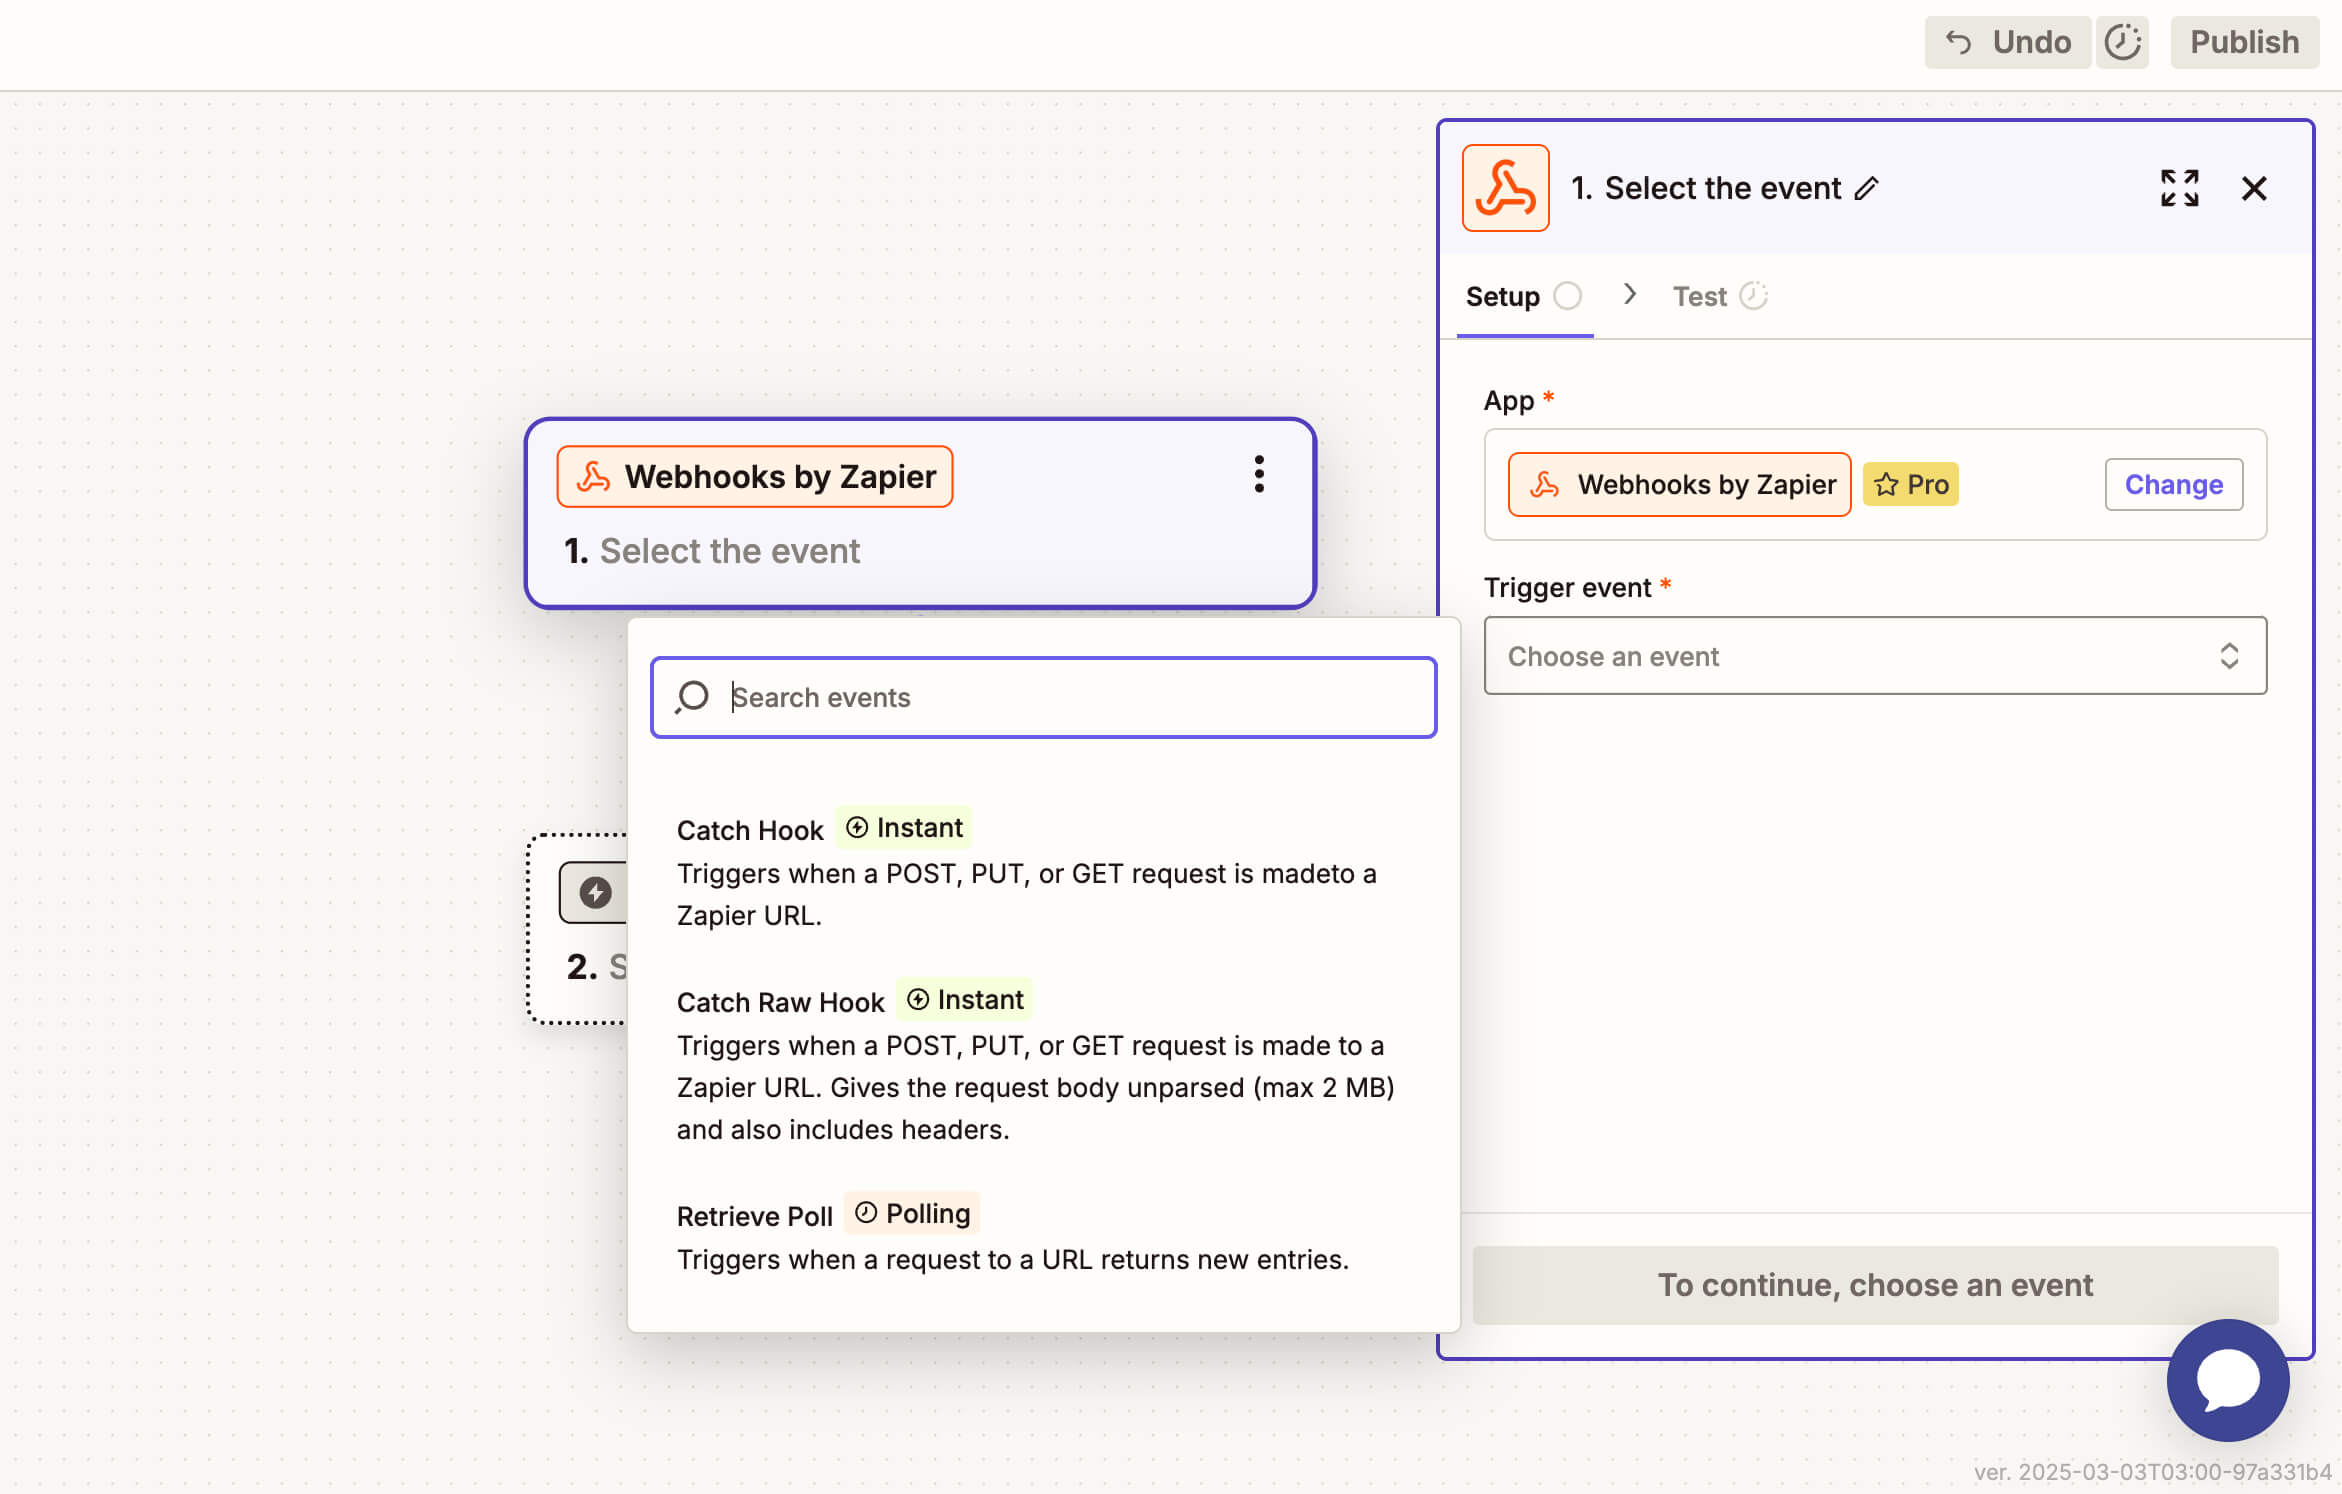
- On the next screen, leave the “Pick off a Child Key” field blank. Click “Continue“.
You have successfully created a custom webhook URL. Copy the webhook URL to your clipboard using CTRL + C or CMD + C. This is the value that will be pasted into the Memberships > PMPro Zapier settings page in your WordPress dashboard.
Configuring Paid Memberships Pro to Use Your Webhook
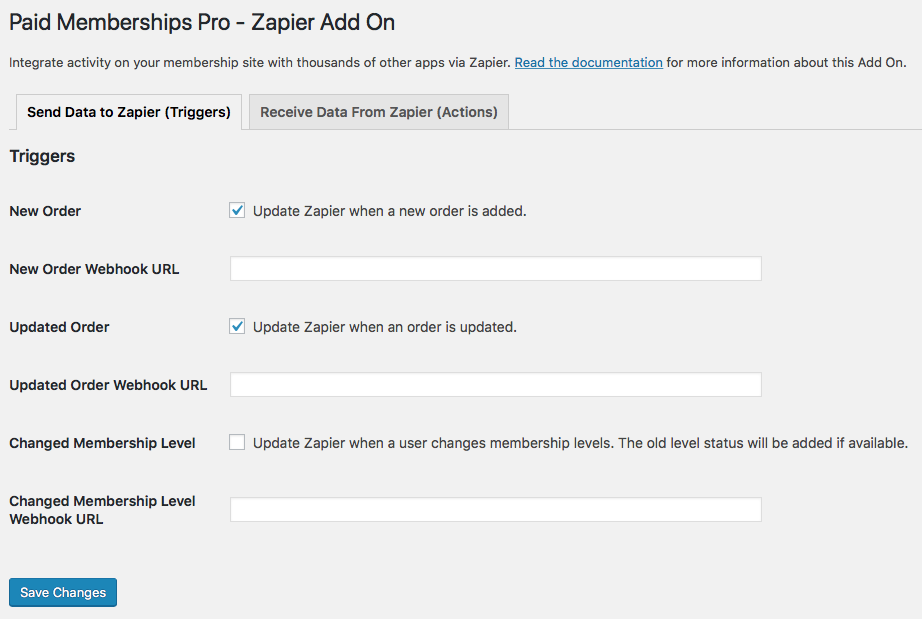
There are four triggers you can use to allow integration with Zapier: “New Order,” “Updated Order,” “Changed Membership Level” and “After Checkout”. Triggers can be configured on the Memberships > PMPro Zapier settings page in your WordPress dashboard.
- Check the box next to the Trigger(s) you would like to use for this Zap.
- Paste the “Custom Webhook URL” created in the steps above into the Webhook URL field for the Trigger(s) you would like to use for this Zap. Only paste the Webhook URL into the Triggers this Zap needs to use. If your Zap needs more than one Trigger, you may use the same Webhook URL for more than one field. You can also use a different Webhook URL for each Trigger to integrate into three different applications.
- After pasting the Webhook URL into the appropriate field, click “Save Changes”.
Now, Zapier will run a test to confirm that the Webhook is working. In order to complete the test, you must make a change on your site that would initiate the appropriate trigger. An easy way to do this for each Trigger is:
- Changed Membership Level: Edit a user and change their membership level.
- New Order: Add a new order via the Memberships > Orders page in your WordPress dashboard.
- Updated Order: Edit an existing order via the Memberships > Orders page in your WordPress dashboard.
- After Checkout: Send data to Zapier after a member completes checkout.
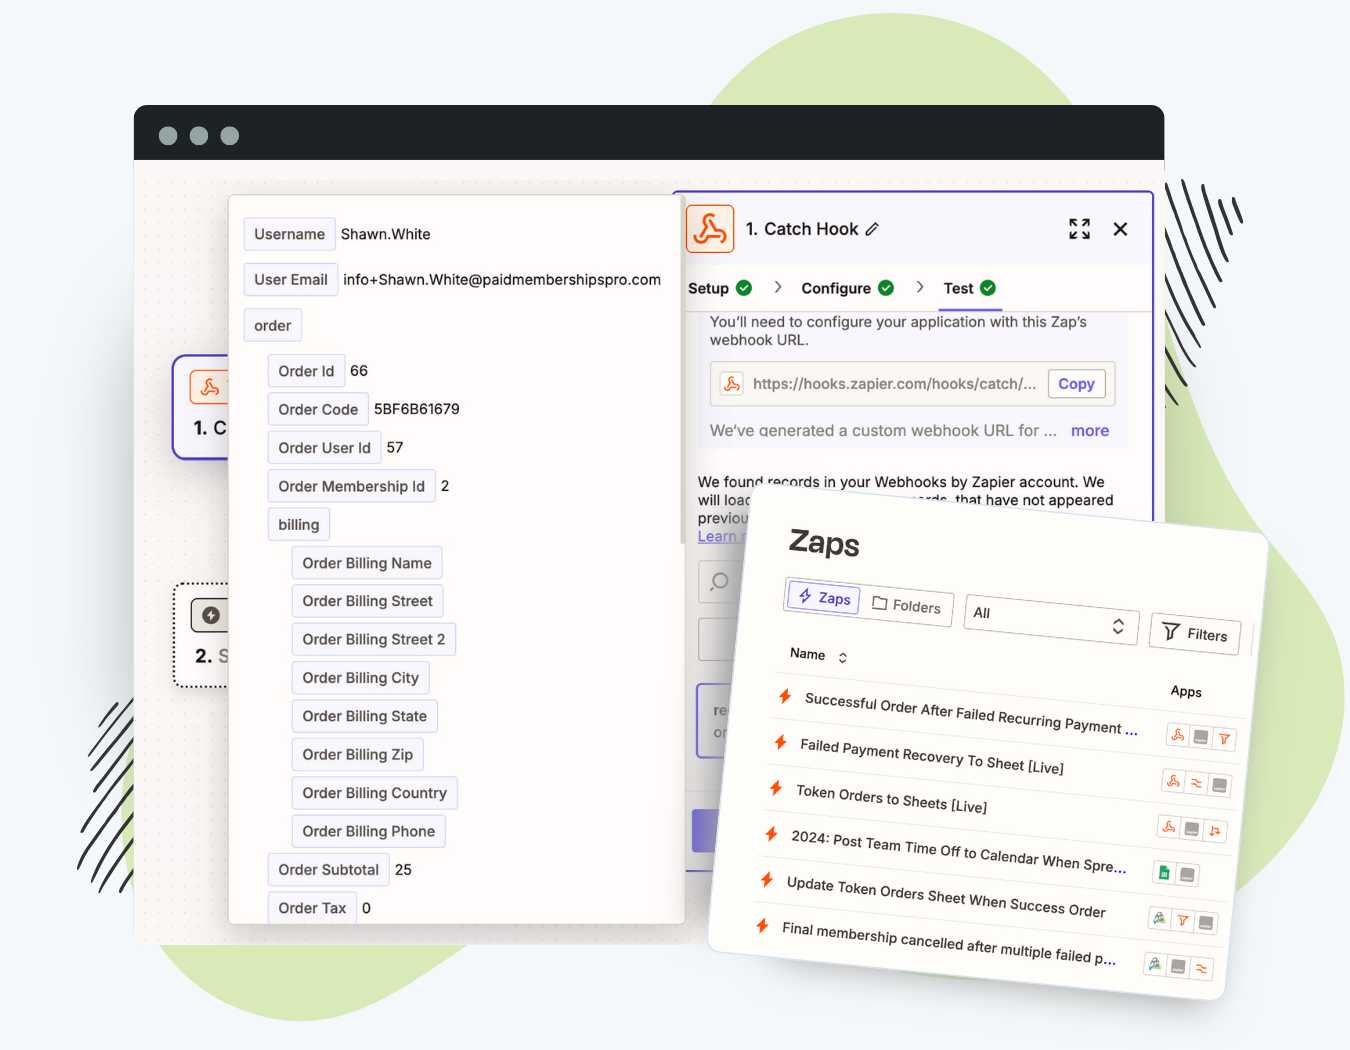
If your test is successful, you can click the “view your hook” to ensure the data is correct and also preview what data will be available for your Actions.

Testing Your Connection
After saving the settings in your Paid Memberships Pro Zapier settings page, you should test that the connection is working properly. Navigate to your Zapier account to test the webhook.
- To test a “New Order” trigger, perform a checkout on your membership site.
- To test an “Updated Order” trigger, change the status of an order to “refunded”.
- To test a “Changed Membership Level” trigger, edit a user record and modify the membership level.
- To test an “After Checkout” trigger, complete a checkout on your membership site.
You do have the option to skip this step in Zapier, although it is a very good idea to test at this time so that you can ensure your integration is working properly.
Setting Up The Action
Zapier offers over 1,000 services that you can integrate with. For this example, we are going to create a log of data using the “Changed Membership Level” trigger and populate a Google Sheet. You may browse and select a different service based on your needs.
- Click “Action” on the flow chart screen, select “Google Sheets“.
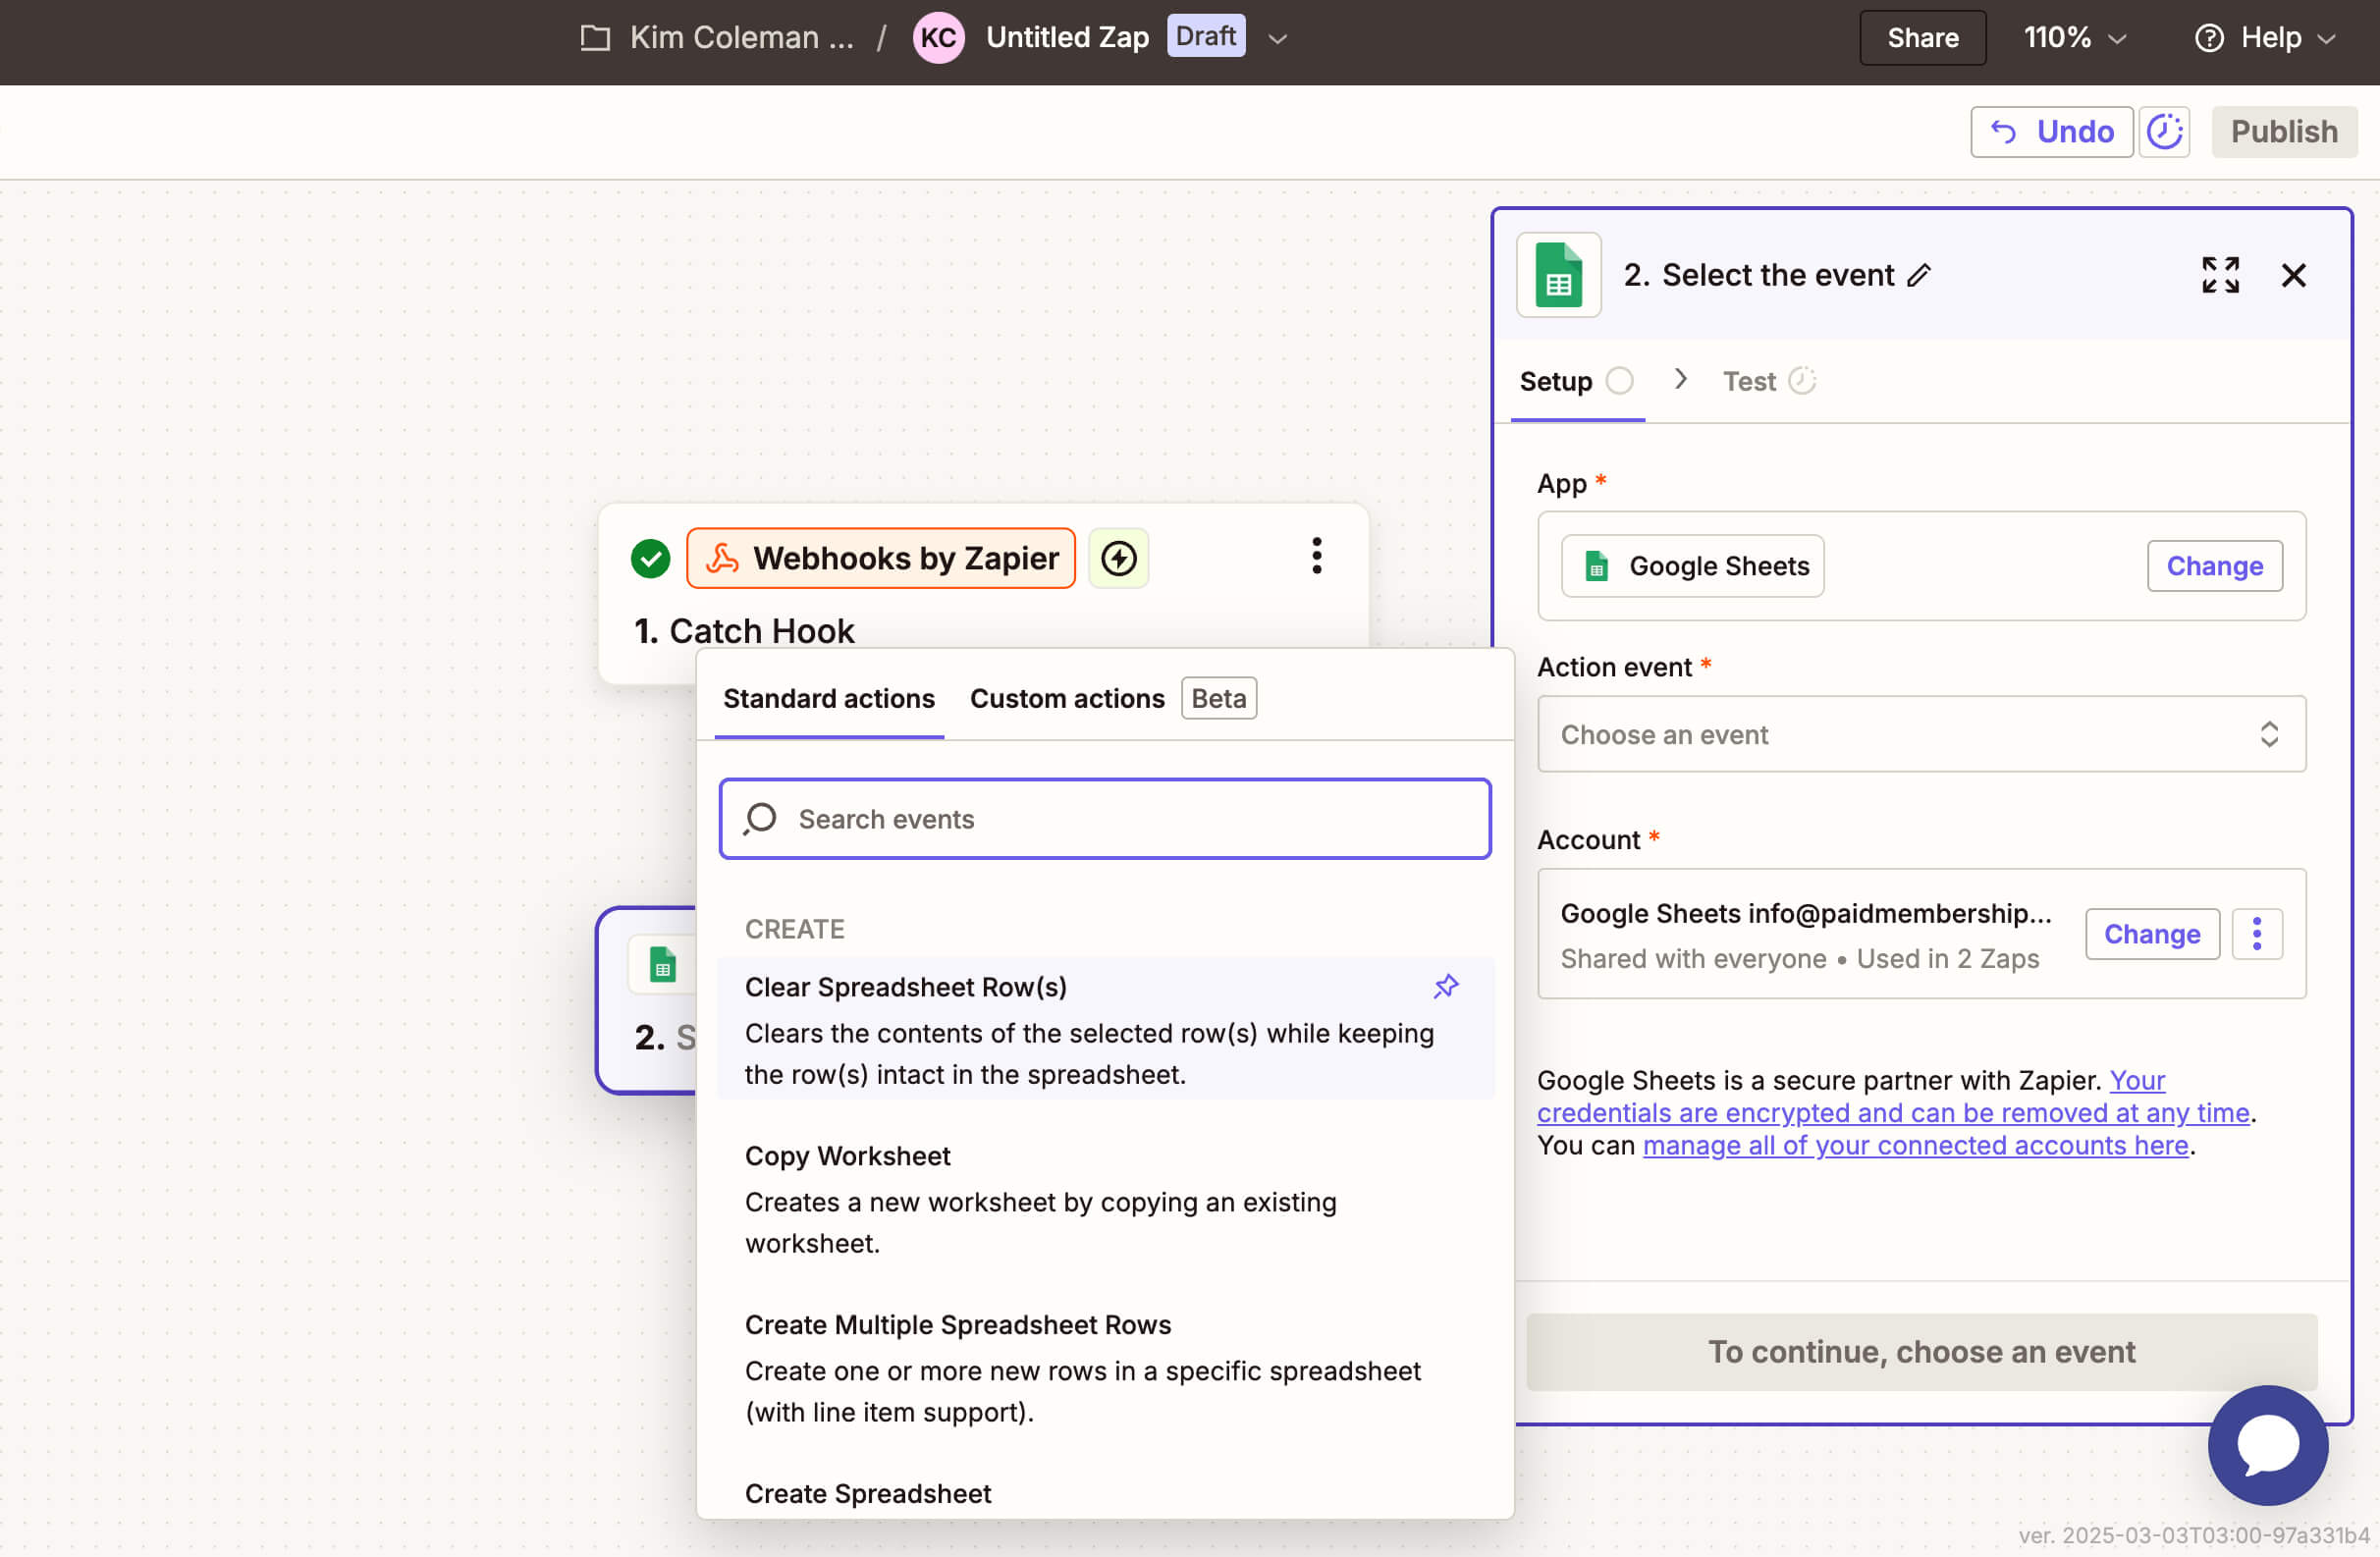
- Select “Create Spreadsheet Row” and continue.
- Connect your Google Sheets Account to your Zapier Account.
- In Google Sheets, create a new Google Sheet to send this data to. You must add column labels in your sheet. These labels will correspond to the data you want to capture during the set up process in Zapier. Data can grouped and added a single column or each piece of data can be added to a unique column.
- In Zapier, you must select the “Spreadsheet” for this Trigger as well as assign spreadsheet columns to the data available in your Trigger.
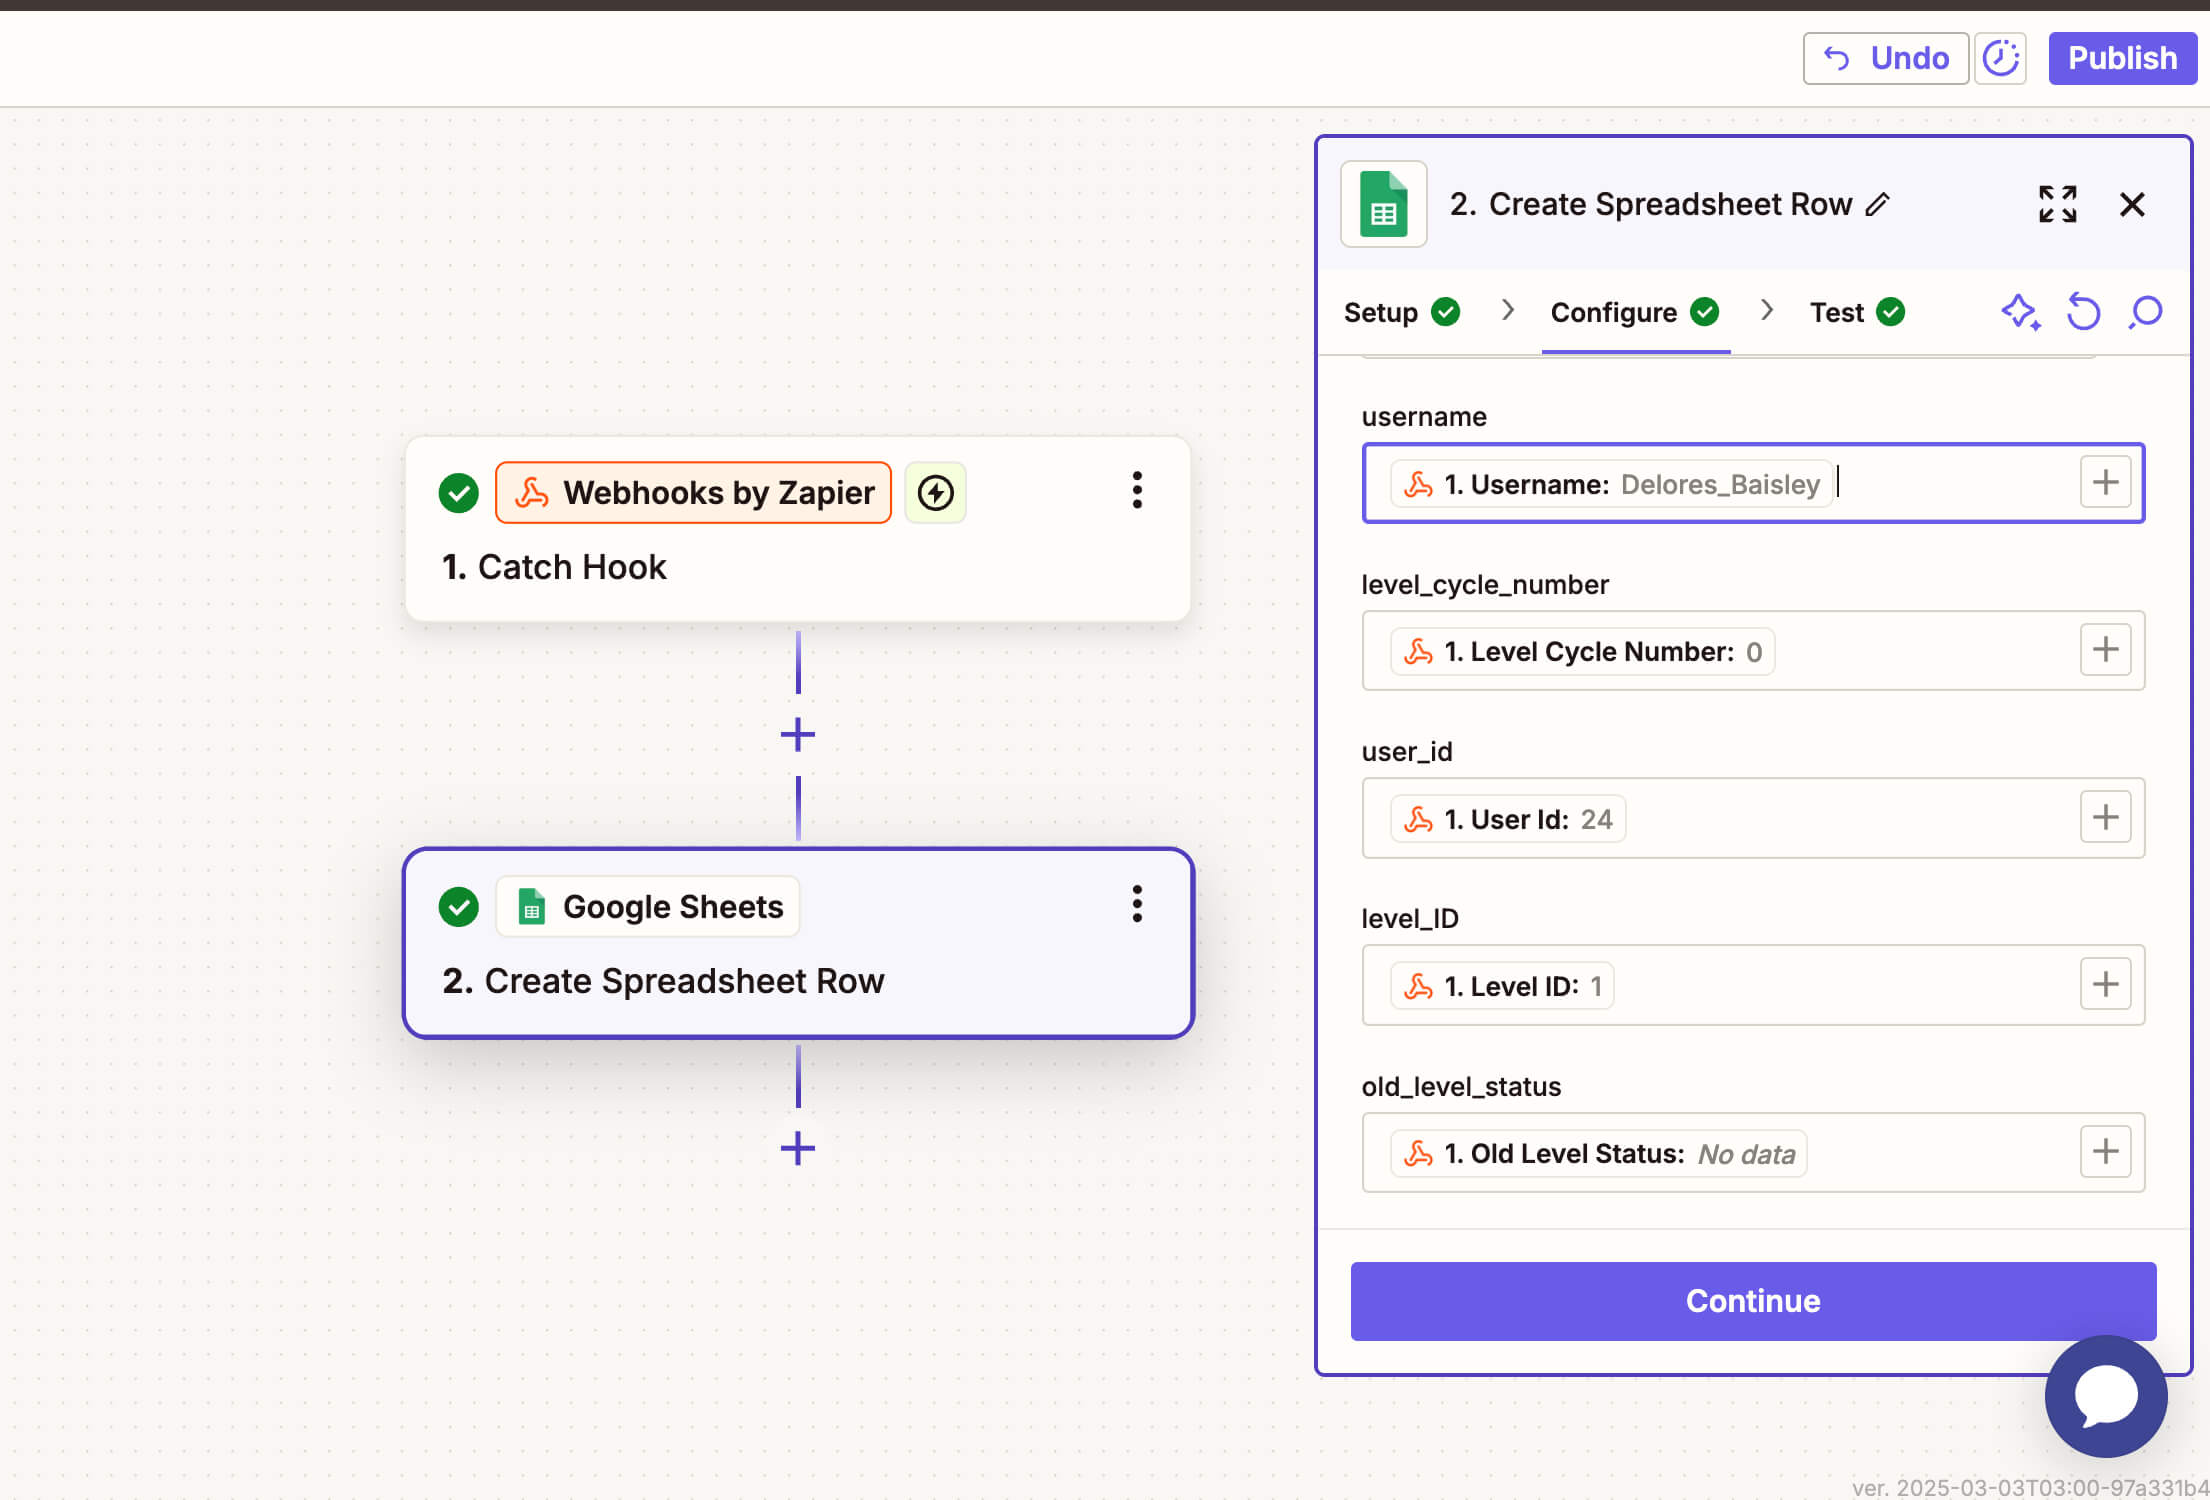
- The following data is available via the “Changed Membership Level” Trigger:
usernamelevel_cycle_numberuser_idlevel_trial_limitlevel_trial_amountlevel_expiration_number
level_IDlevel_enddatelevel_initial_paymentlevel_nameold_level_statuslevel_startdate
level_billing_limituser_emaillevel_billing_amountlevel_cycle_periodlevel_expiration_period
- Run a test to send data to your spreadsheet. Confirm the data populated on the spreadsheet.
- If your test is successful, select “Publish“.
Receive Data from Zapier (Actions)
Receiving Data into Your Membership Site
As with the triggers, this integration can also receive data from a Zap and make changes to your Membership site. This means that external applications can send updates to your Paid Memberships Pro member data.
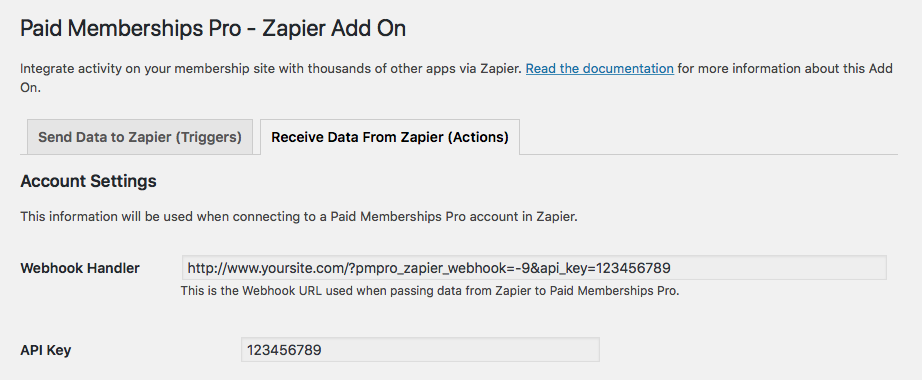
Navigate to Memberships > PMPro Zapier to locate your Webhook Handler URL and API Key. This information will be used when connecting to a Paid Memberships Pro account in Zapier.
Setting Up The Zap to Receive Data
Many apps can send data to your PMPro-powered site. In this example, we are going to set up a Zap that adds a member when a new spreadsheet row is added to a Google Sheet.
The step-by-step instructions are listed below the video.
Create a New Zap
- Log in to your Zapier Account or create a new account with Zapier.
- Navigate to Create > Zaps at the top left of the screen.
- Select “Google Sheets” under “Trigger” in the flow chart screen.
- Select the “New Spreadsheet Row” trigger event.
- Follow the steps to authenticate your Google Sheets Account with Zapier
- Once authenticated, select the Spreadsheet you will be populating with member data and the specific “Worksheet” that contains this data. (This is usually Sheet1 unless otherwise named in your spreadsheet.)
- You can test the connection, if desired, by modifying the Spreadsheet directly in your Google Sheet then return to Zapier and click “Get More Samples”. This should update with the new data added to your sheet, thereby confirming the connection is working.
- Next you must add an “Action” to your Zap.
Add an Action to Your Zap
- Select “Webhooks“. This is listed as a “Built-In Tool” or can be located by the search field.
- Select “Fire off a single GET request with optional query strings.” as the Action event.
- Locate your Webhook URL under Memberships > PMPro Zapier > Receive Data from Zapier (Actions). Copy and paste the webhook URL into the “URL” field in Zapier.
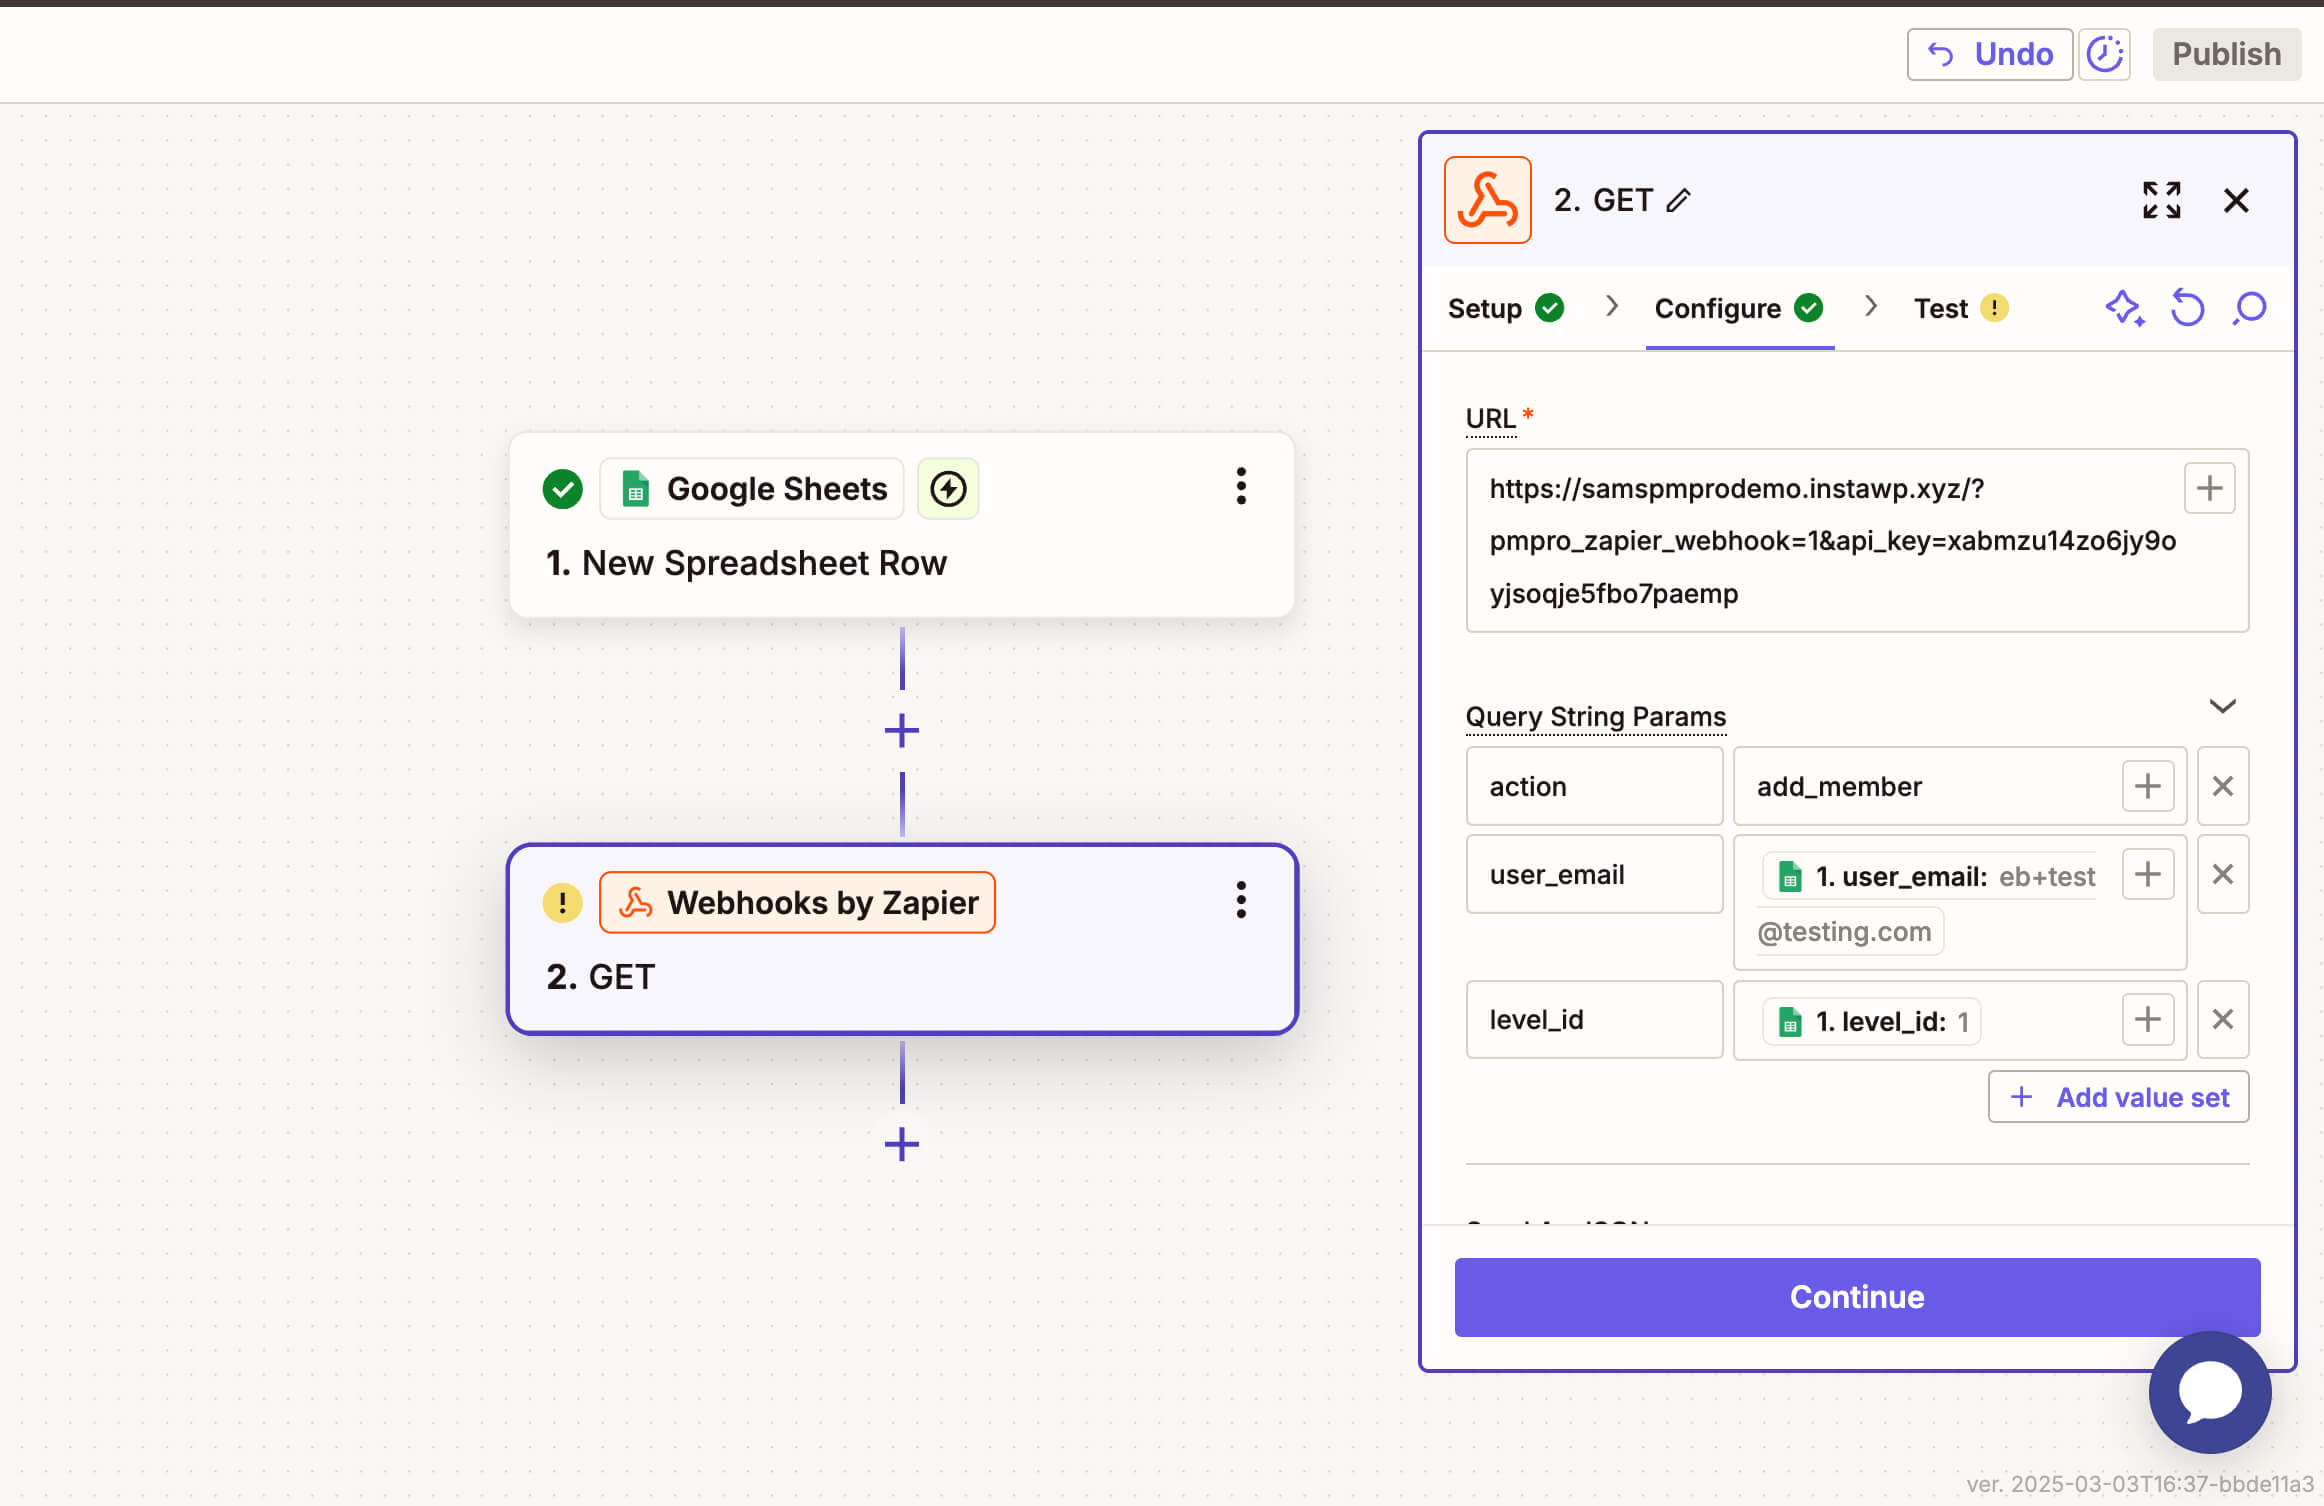
- In the “Query String Params” section, add a parameter with the name
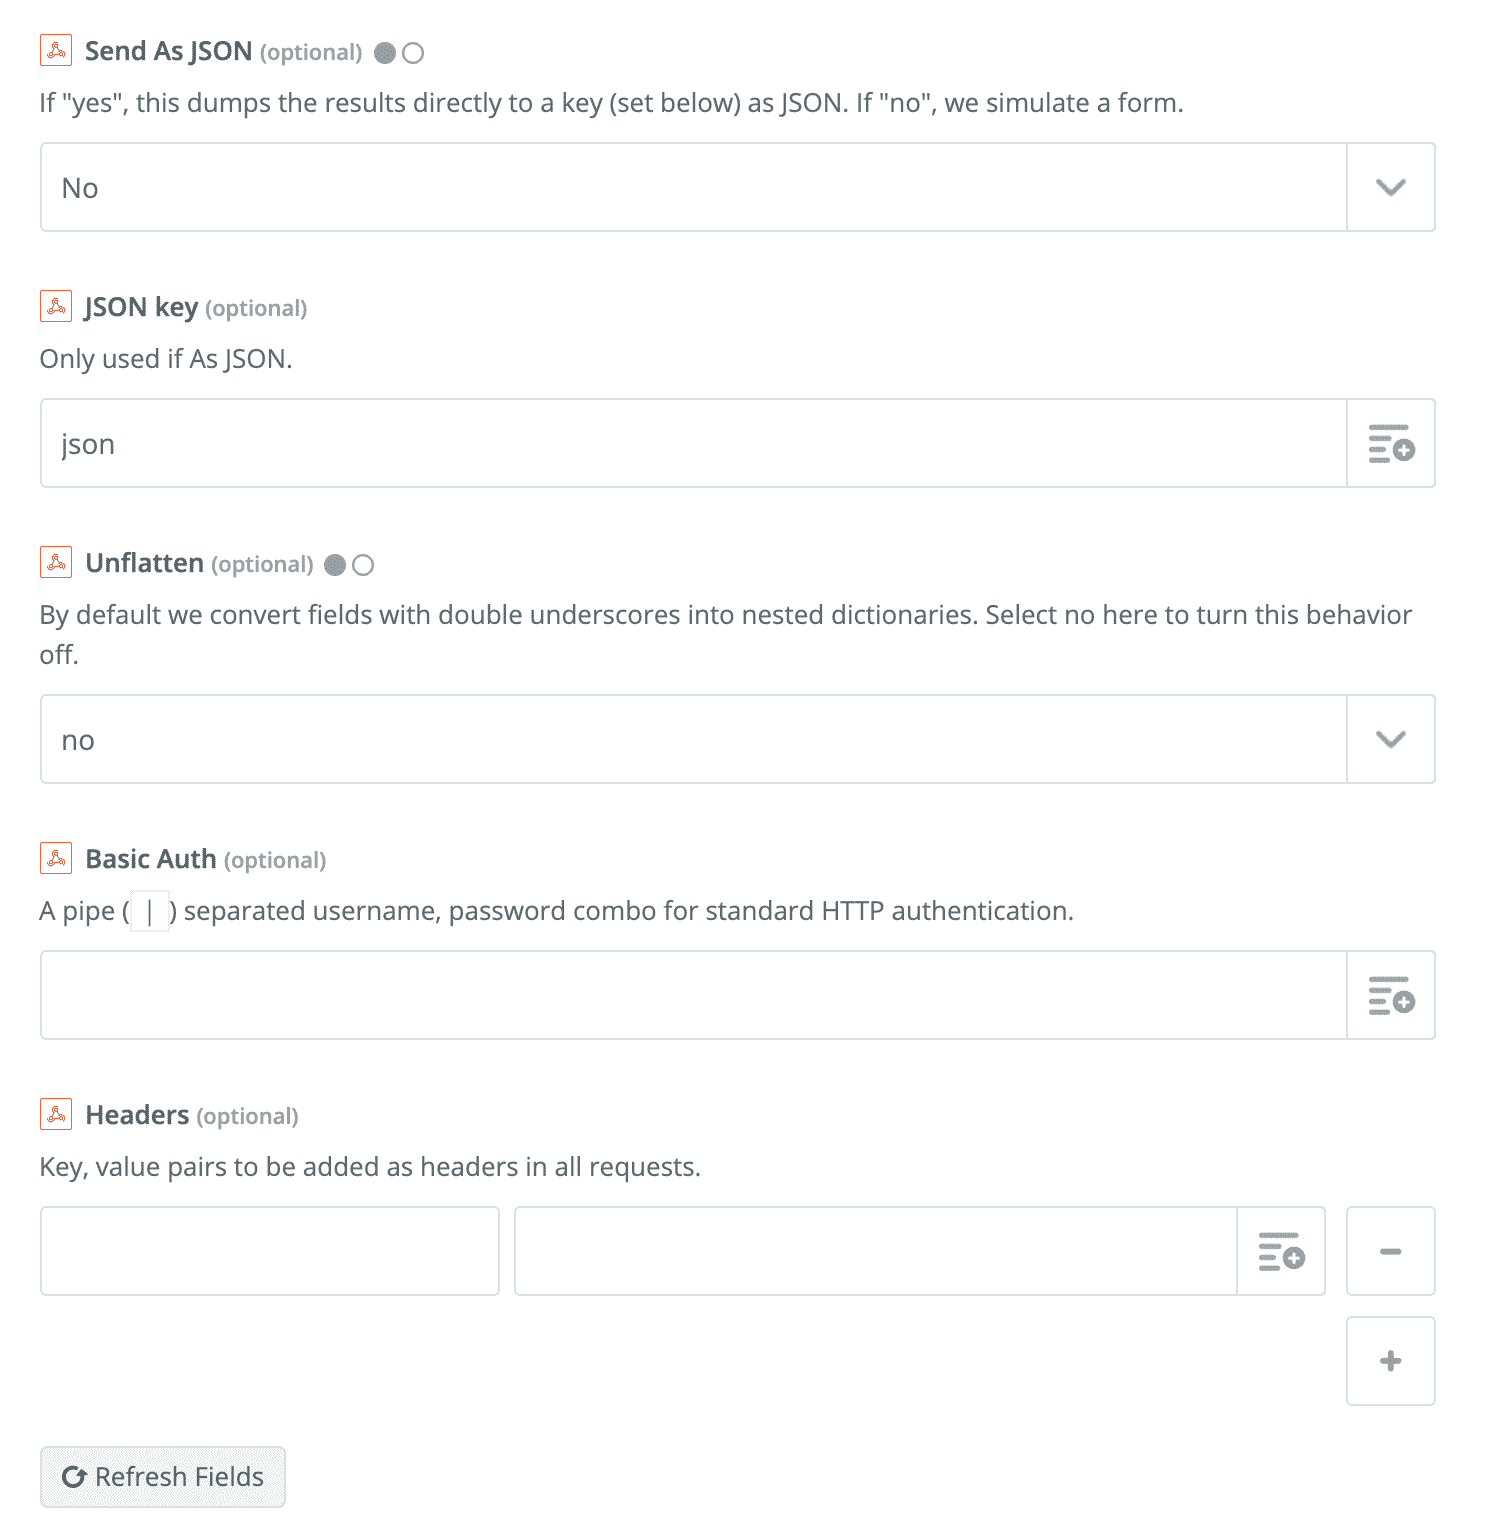
actionand the valueadd_member. Other available Actions for this integration are listed separately in this documentation. - Add query string parameters to send data from the spreadsheet to your membership site. Available parameters for the action must correspond to a column of data in your spreadsheet. Use these parameters with the
add_memberaction:- user_email (required)level_id (required)user_loginfull_namefirst_namelast_name
- In the “Additional Action Settings” section, you should set “Unflatten” to “No“.
- The next step will test your Zap. Click “Test Step”. Note that the
add_memberaction will only work if there is no existing User in the WordPress site with that matching email address. - If the zap is successful, the membership site will create a new member. This Action can add a membership level to an existing member OR simultaneously create the user record with the membership level.
Actions Available When Receiving Data From Zapier
add_member
The following parameters can be passed into the add_member Action:
- user_email (required)
- level_id (required)
- user_login
- full_name
- first_name
- last_name
Note that user_email and level_id are required parameters; you must also pass in at least one of user_login, full_name, first_name, or last_name.
change_membership_level
The following parameters can be passed into the change_membership_level Action:
- user_id
- user_email
- user_login
- level_id (required)
Note that level_id is a required parameter; you must also pass in at least one of the following user identifiers is also required: user_id, user_email, or user_login.
add_order
The following parameters can be passed into the add_order Action:
- billing_phone
- user_id
- user_email
- user_login
- level_id
- subtotal
- tax
- couponamount
- total
- payment_type
- cardtype
- accountnumber
- expirationmonth
- expirationyear
- status
- gateway
- gateway_environment
- payment_transaction_id
- subscription_transaction_id
- affiliate_id
- affiliate_subid
- notes
- checkout_id
- billing_name
- billing_street
- billing_city
- billing_state
- billing_zip
- billing_country
update_order
The following parameters can be passed into the update_order Action:
- billing_phone
- order, order_id, code, or id (required)
- user_id
- user_email
- user_login
- level_id
- subtotal
- tax
- couponamount
- total
- payment_type
- cardtype
- accountnumber
- expirationmonth
- expirationyear
- status
- gateway
- gateway_environment
- payment_transaction_id
- subscription_transaction_id
- affiliate_id
- affiliate_subid
- notes
- checkout_id
- billing_name
- billing_street
- billing_city
- billing_state
- billing_zip
- billing_country
has_membership_level
The following parameters can be passed into the has_membership_level Action:
- user_id
- user_email
- user_login
- level_id (required)
Note that level_id is a required parameter; you must also pass in at least one of the following user identifiers is also required: user_id, user_email, or user_login.
Integrate With Other Third Party Automation Services
Make (formerly Integromat) offers similar functionality to Zapier. As an alternative to Zapier, you can also use Make with this Add On. You can use this Zapier Integration and connect the same webhooks with an automation in either of these services. Advanced developers should also consider direct integration via the REST API methods documented here
Action and Filter Hooks
The following actions and filters are available in this Add On depending on the trigger in use.
apply_filters( 'pmproz_added_order_data', array $data, MemberOrder object $order, int $order>user_id );
Filter the data sent to Zapier after a successful membership checkout, allowing customization of user, level, and order details before transmission.
apply_filters( 'pmproz_updated_order_data', array $data, MemberOrder object $order, int $order->user_id );
Filter the data sent to Zapier when a membership order is updated, allowing modifications to order details and user information before transmission.
apply_filters( 'pmproz_after_change_membership_level_data', array $data, int $level_id, int $user_id, int $cancel_level );
Modify the data sent to Zapier when a user’s membership level changes, allowing adjustments to user details, level information, and cancellation status before transmission.
apply_filters( 'pmproz_after_checkout_data', array $data, int $user_id, object $level, MemberOrder object $order );
Modify the data sent to Zapier after a user completes checkout, allowing customization of user details, membership level information, and order data before transmission.
apply_filters( 'pmproz_prepare_request_webhook', $options[ $hook . '_url' ], $data );
This hook can run multiple Zaps on one trigger. Check the $hook_url attribute and run conditional logic for the trigger you are filtering.
apply_filters( 'pmproz_prepare_order_for_request', MemberOrder object $prepared_order, MemberOrder object $order );
Modify the order object before it is sent to Zapier, allowing customization of order details, payment information, and metadata.
This is a Free Add On.
Create a free account or log in to gain access to downloads and documentation.

