The Testimonials Add On allows you to collect member testimonials and provides tools for managing, organizing, and displaying user-submitted testimonials, including:
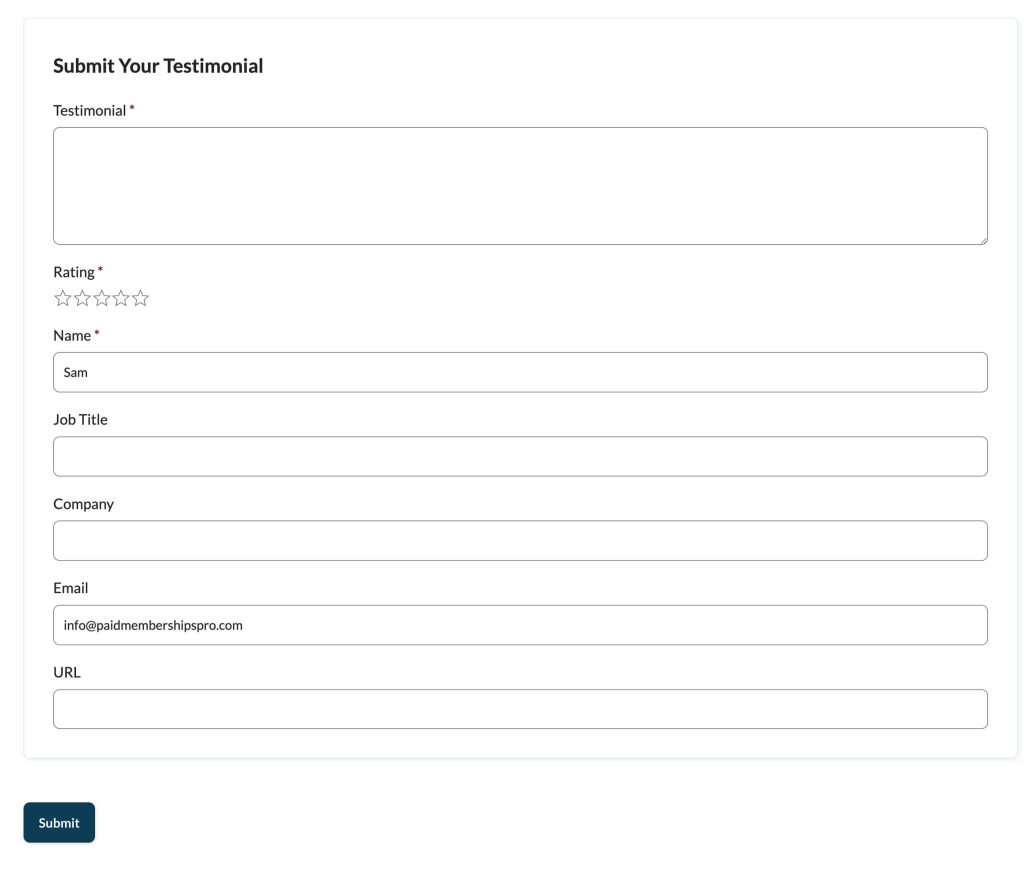
- Capture Testimonials: Allow users to submit testimonials via a frontend form, including their testimonial, star rating, name, and more.
- Categorize and Tag Testimonials: Organize testimonials using categories and tags to target specific levels or other features of your site.
- Approve and Publish: Testimonials submitted via the form will be set to “Pending” status and must be reviewed and published by an admin.
- Display Testimonials: Use shortcodes to display testimonials anywhere on your site with customizable filters.
Installation
You must have the Paid Memberships Pro plugin installed and activated with a valid license type to use this Add On.
- Navigate to Memberships > Add Ons in the WordPress admin.
- Locate the Add On and click Install Now.
- To install this plugin manually, download the .zip file above, then upload the compressed directory via the Plugins > Add New > Upload Plugin screen in the WordPress admin.
- Activate the plugin through the Plugins screen in the WordPress admin.
Testimonials Settings
Navigate to Testimonials > Settings to complete the initial basic setup of the Testimonials Add On, including:
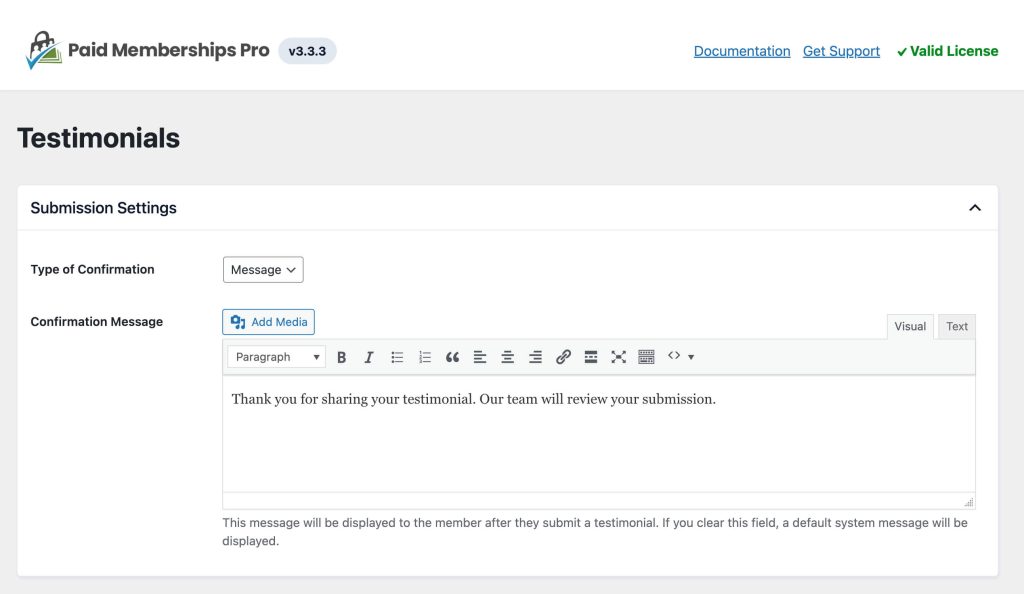
Submission Settings
Customize the submission flow for how you collect member testimonials.
- Type of Confirmation: Choose how members are notified after submitting a testimonial:
- Message: Display a confirmation message on the same page.
- Redirect: Redirect the user to a specific page after submission.
- Select Redirect Page: If “Redirect” is selected, you can choose the redirect page from the dropdown list.
- Confirmation Message: If “Message” is selected, you can enter the message displayed after a testimonial is submitted.
- This field supports rich text formatting (bold, italic, links, etc.) using the built-in WordPress editor.
- If left blank, a default system message is displayed: “Thank you for sharing your testimonial. Our team will review your submission.“

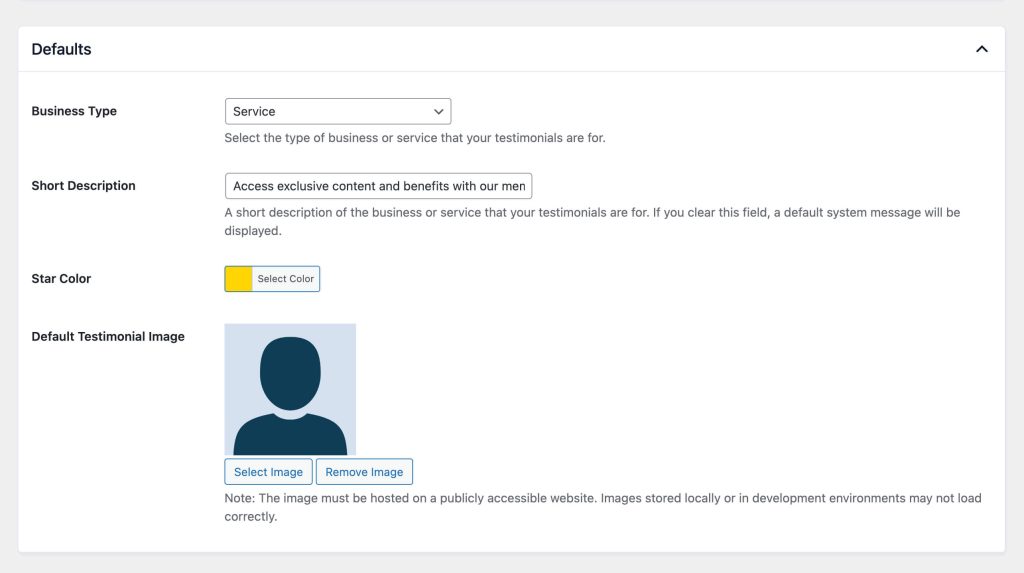
Default Settings
Configure global settings for testimonials, including
- Business Type: Select the schema type that best represents your business or service. Options include:
- Service
- Organization
- Educational/Occupational Program
- Media Subscription
- Short Description: Provide a brief description of your business or service. This is only shown in the schema markup of your page.
- Star Color: Customize the color of the star rating using the built-in color picker. Default:
#ffd700(gold). - Default Testimonial Image: Set a fallback image to display when no featured image or Gravatar is available. Note: Images must be hosted on a publicly accessible website. Locally stored or development environment images may not load correctly.

Managing Testimonials in WordPress
The Add On creates a Testimonials section in the WordPress admin menu, where you can:
- View All Testimonials: Review submitted testimonials. Use the Bulk Actions menu to publish, unpublish, or delete.
- Add New Testimonial: Create testimonials manually with fields for name, job title, company, email, star rating, and content.
- Categories and Tags: Organize testimonials using hierarchical categories and tags for improved display control.
Testimonial Fields
- Name: Name of the person providing the testimonial.
- Job Title: Optional field to add context to the testimonial.
- Company: Name of the company the user is associated with.
- Rating: A 1-5 star rating for their feedback.
- Testimonial Content: The main text of the testimonial.
- Email: Used to fetch the user’s Gravatar, if available.
- Categories and Tags: Organize testimonials by adding relevant metadata.
Testimonial Categories and Tags
The Testimonials Add On allows you to manage categories and tags in a way that best fits your website.
- Categories: Found under Testimonials > Categories. Use these to create a hierarchy for organizing testimonials. Categories are ideal for grouping testimonials by broad topics like membership levels, services, or offerings.
- Tags: Found under Testimonials > Tags. Use tags to add keywords that further organize and filter testimonials. Tags allow for more granular organization, making it easy to pull in specific types of testimonials based on attributes like course topics, instructors, or product features.
We intentionally designed our Testimonials Add On to not be tied to specific membership levels. This provides you with the most flexibility in how you manage and display them. For example:
- Collect reviews for video courses, live webinars, or one-on-one coaching sessions.
- Highlight testimonials for specific instructors, workshops, or online events.
- Use categories like “Beginner Level,” “Advanced Training,” or “Success Stories” to group testimonials based on your offerings.
- Apply tags like “Customer Support,” “Ease of Use,” or “Transformational Results” for more targeted filtering.
Categories and tags can be applied based on user selections or forced via shortcode attributes. You can also display testimonials for a specific subset of categories and tags using shortcode attributes.
Approving Testimonials
Testimonials are set to “Pending” status by default and must be manually published by an admin. You can manage a testimonial’s status from the Edit Testimonial screen:
- Navigate to All Testimonials in the WordPress admin.
- Edit the testimonial you want to change. Testimonials in a pending state will show a status of Pending next to the name.
- On the right-hand sidebar, locate the blue Publish button to publish the testimonial.

The testimonial will now show up in any appropriate spots that use the [pmpro_testimonials_display] shortcode (based on shortcode attributes).
Frontend Form to Collect Member Testimonials
You can collect member testimonials from the frontend by using the [pmpro_testimonials_form] shortcode. Place this shortcode on any page or post to display a submission form.
Shortcode Attributes for Submission Form
- categories: Specify default categories for the submission (comma-separated slugs).
- tags: Specify default tags for the submission (comma-separated slugs).
- required_fields: Comma-separated list of additional required fields (the form will always require name, testimonial, and star rating).
- category_dropdown: Set to
trueto allow users to select categories. If you do not show this field, the testimonial will either have no categories or will inherit the default categories from the shortcode attribute. - tag_dropdown: Set to
trueto allow users to select tags. If you do not show this field, the testimonial will either have no tags or will inherit the default tags from the shortcode attribute.
Example Testimonial Submission Form Shortcode
[pmpro_testimonials_form categories="standard" required_fields="company"]

Displaying Testimonials
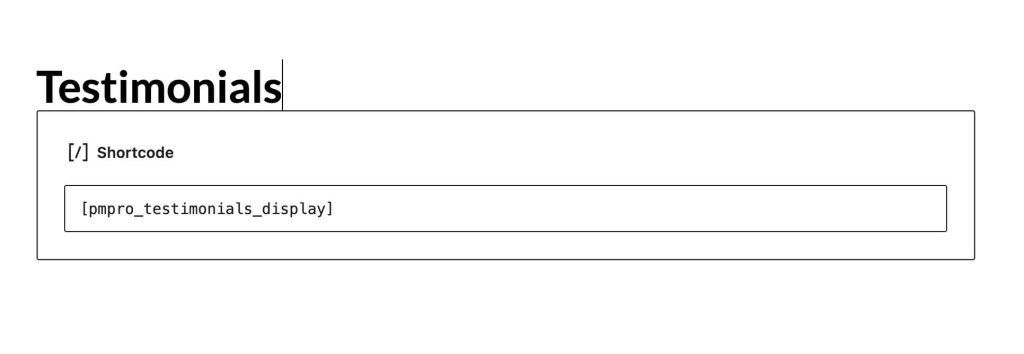
Use the [pmpro_testimonials_display] shortcode to display testimonials on your site. The shortcode supports various attributes to control layout, filtering, and design.

Shortcode Attributes for Display
- testimonials: Comma-separated list of IDs for the specific testimonials to display.
- testimonial: ID of a single testimonial to display.
- categories: Filter testimonials by categories (comma-separated slugs).
- tags: Filter testimonials by tags (comma-separated slugs).
- limit: Limit the number of testimonials shown.
- order: Display testimonials in ascending (
ASC) or descending (DESC) order. - orderby: Sort by
title,name,rand, ordate. - style: Use a predefined design style.
- layout: Define a custom layout for the testimonial display.
- elements: Specify which elements to display (e.g.,
name,rating,testimonial).
Example:
[pmpro_testimonials_display categories="success" limit="5" order="DESC"]
Custom Layouts
Use [pmpro_testimonials_display_custom] as a wrapper for advanced layouts, and pair it with sub-shortcodes for granular control. The follow sub-shortcodes are available when using a custom layout:
[pmpro_testimonial_rating]: Displays the numeric rating (e.g., 4 out of 5) of the testimonial.[pmpro_testimonial_star_rating]: Displays a star-based rating (filled and unfilled stars) for the testimonial.[pmpro_testimonial_content]: Displays the content/body of the testimonial.[pmpro_testimonial_image]: Displays the avatar or default fallback image of the testimonial author.[pmpro_testimonial_name]: Displays the name of the testimonial author.[pmpro_testimonial_job_title]: Displays the job title of the testimonial author.[pmpro_testimonial_company]: Displays the company/organization of the testimonial author.[pmpro_testimonial_url]: Displays the URL provided in the testimonial.
Example Custom Testimonial Display
[pmpro_testimonials_display_custom testimonial="123"]
[pmpro_testimonial_content]
[/pmpro_testimonials_display_custom]
Avatar Integration
When a user submits a testimonial with their email address, the Add On fetches their Gravatar (if available) and displays it alongside their testimonial. This feature adds a personal touch to testimonials, increasing trust and authenticity.
Here is how the Add On determines which avatar to show with the testimonial:
- Featured Image: If a featured image is set for the testimonial post, it will take precedence and display as the avatar.
- Gravatar: If no featured image is available, the Add On will automatically fetch and use the Gravatar associated with the user’s email address. If you are using a custom avatar plugin, the member’s custom avatar will override the Gravatar.
- Default Fallback Image: If neither a featured image nor a Gravatar is available, the Add On will use a default fallback image as defined on the Testimonials > Settings screen in the WordPress admin.
Important Notes About Avatars and Testimonials
- The fallback image must be hosted on a publicly accessible website. Images stored locally or in development environments may not load correctly.
- Ensure the featured image or fallback image aligns with your site’s design and branding for a consistent user experience.

Action and Filter Hooks
The Add On includes several filters and actions for developers to use when customizing how the membership site collects member testimonials:
do_action( 'pmpro_testimonial_success' );
Triggered after a testimonial submission is successfully processed and stored in a pending status, allowing developers to execute custom actions such as sending notifications or logging the event.
apply_filters( 'pmpro_testimonials_query_args', $args );
Modify the arguments used in the query for retrieving testimonials.
apply_filters( 'pmpro_testimonials_cite', $cite_html, $testimonial );
Modify the HTML structure of the testimonial citation. This includes elements such as the author’s name, job title, company, URL, and image.
apply_filters( 'pmpro_testimonials_allowed_star_html', $allowed_html );
Modify the list of allowed HTML tags and attributes used when sanitizing SVG star ratings with wp_kses. This ensures the retention of custom styles or classes for SVG elements in star ratings.
apply_filters( 'pmpro_testimonials_star_svg', $svg );
Allows developers to modify the SVG markup used for displaying stars in the testimonial rating output.
This is a Standard Add On.
Standard membership includes all Standard Add Ons, unlimited premium support, automatic updates, and additional benefits.


