This code recipe tutorial offers two methods to enhance the Membership Checkout process by adding a checkbox field that allows members to checkout for additional membership levels in a single transaction.
By simply checking a box on the checkout form, users can opt-in to include extra membership level(s). Once the checkout is complete, these selected levels are automatically added to their base membership, giving users more flexibility and access to tailored content.

About the Code Recipe
The best way to understand the usefulness of this code is through an example.
You offer a paid premium membership level with several protected categories of content. You could certainly give everyone all of the content, but that won’t give you much in terms of member analytic data.
With this code, you can offer additional protected categories of content as bonus selections on the user’s default membership. These categories are free to join for anyone with another active paid level.
At checkout, this code gives users the option to add on additional categories (linked to free membership levels) to include with their premium membership. With this approach, you as the admin get better visibility into which members are choosing to add which content. You can filter your members list by users that chose to add on each additional content type (level).

This method also means that you can leverage all the features of our email marketing integrations for subscriber tagging as well as advanced automations where the user’s membership level is used to check access.
Members can adjust their preferences and “added levels” on the frontend Member Profile Edit screen.
Method #1
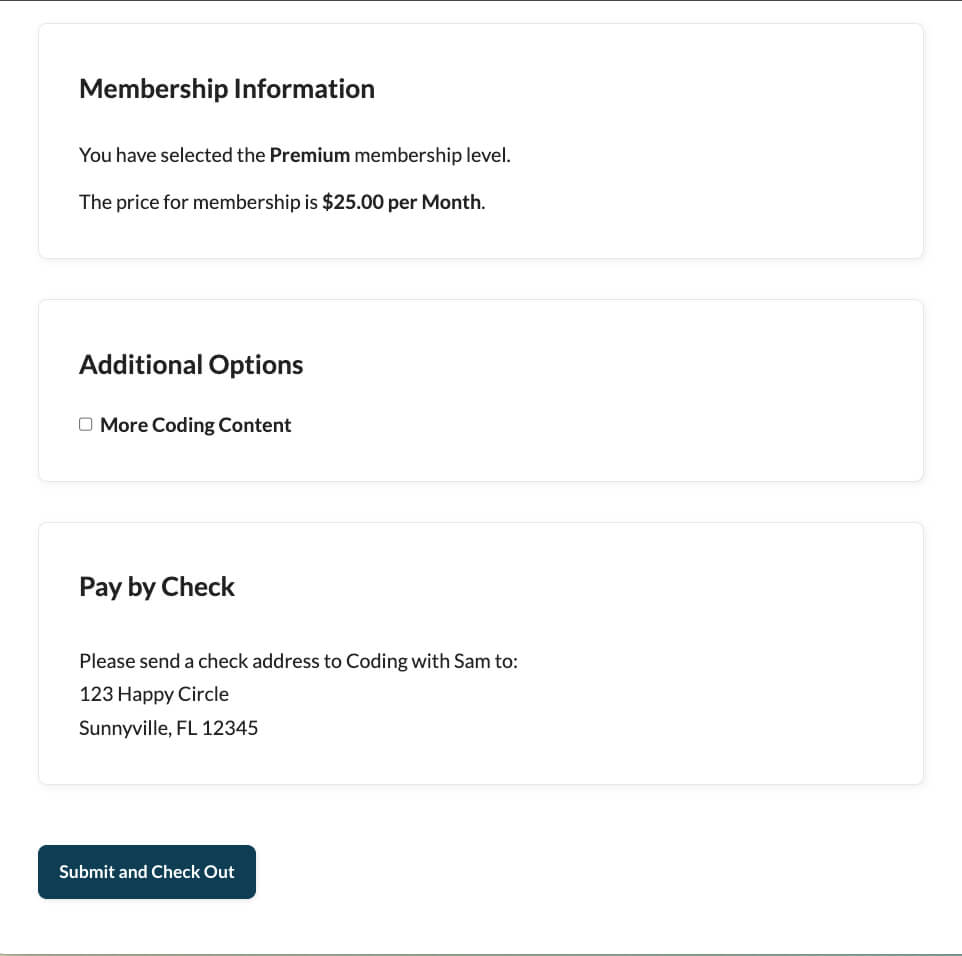
This code recipe is designed to add a checkbox to let any user add a specified membership level as an option at checkout, in addition to the base membership level they have chosen to purchase.
The code recipe includes two separate functions:
- The first function adds the checkbox field with a customizable label. Customization to define the field(s) will be within the code recipe. The user’s selection is stored in user meta just like any custom user profile field.
- The second function confirms or denies if the membership level should be added to the user. In this function, the free membership level is added to the user if they have selected the box at checkout. Additionally, if the member updates their user profile and unchecks the box, the level will be removed.
The Code Recipe
Customizations
- On line 32, you can adjust the label of the check box field.
- Adjust the level IDs throughout the recipe for your needs. In this code, the example level that gets added is ID 2. This ID is set in several places within the recipe and user field unique name. You can find your level IDs by navigating to Memberships > Settings > Levels.
Method 2
This code recipe requires two steps.
Step 1: Create a User Field
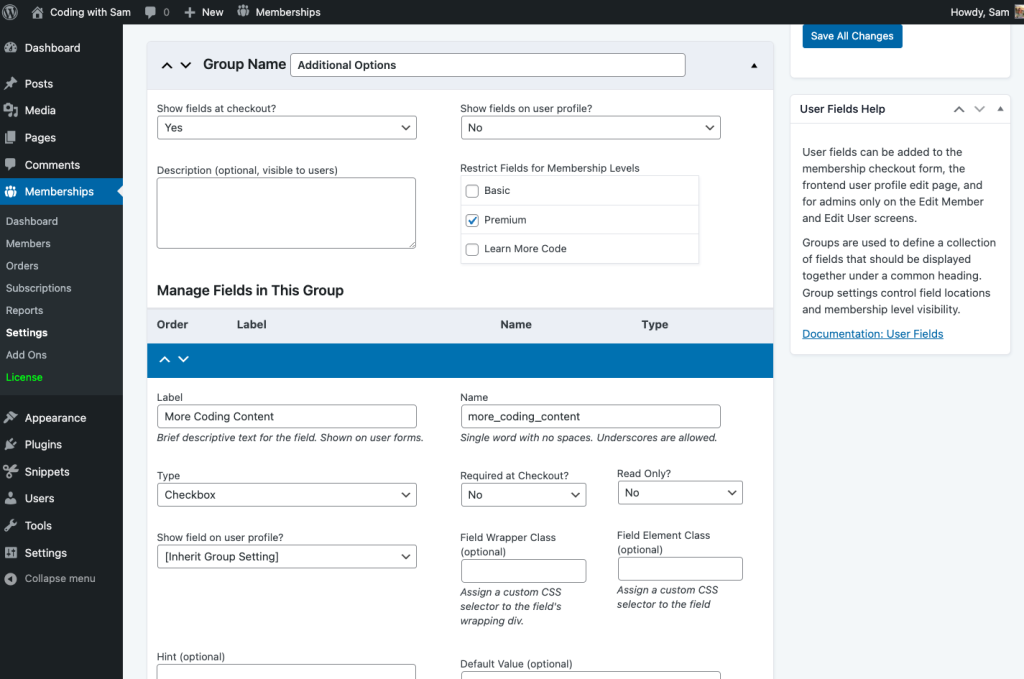
- Navigate to Memberships > Settings > User Fields.
- Create a new group. This will show as a new “card” on the checkout page.
- The group settings should be:
- Show fields at checkout?: Yes
- Show fields on user profile?: Yes (Optionally you can set this to “no” if you do not want your members to opt-in or opt-out via their Edit Profile page.)
- The group settings should be:
- Create a new field within the group that was just created. Add the following information:
- Label: This will show on the frontend. Input what you want your members to see at checkout.
- Name: This will auto-populate when the field is selected. We will need the name to customize the code. (See customizations)
- Type: Checkbox
- Require at Checkout?: No
- Read Only?: No

Step 2: Implement the Code Recipe
Now that our User Field is created, we can use the code recipe to extend the user field to let any user add a specified membership level as an option at checkout.
This code recipe also includes two separate functions:
- The first function customizes the save function allowing us to extend the user field. This will ensure that when the checkbox is marked to include the extra level, the information is stored in user meta using the appropriate user field.
- The second function confirms or denies if the membership level should be added to the user. In this function, the free membership level is added to the user if they have selected the box at checkout. Additionally, if the member updates their user profile and unchecks the box, the level will be removed.
The Code Recipe
Customizations
- Update lines 22, 36, 39 and 42 to reflect the name of the user field. In our code example, the name is
more_coding_content. - Update lines 38 and 41 to reflect the membership level ID you would like to give your members when they check the box. The level ID in the code example is
8. You can find your level IDs by navigating to Memberships > Settings > Levels.
Adding the Recipe to Your Website
You can add this recipe to your site by creating a custom plugin or using the Code Snippets plugin available for free in the WordPress repository. Read this companion article for step-by-step directions on either method.


