Cart abandonment can be a challenge for membership businesses. When potential members start the checkout process but fail to complete it, you are left questioning what went wrong—and missing out on revenue.
In this guide, we will explore what cart abandonment is and why it is important to address it for your membership site. Once you understand the basics on abandoned carts, we will show you how to create a membership cart abandonment funnel using WP Fusion and Groundhogg.
By the end of this tutorial, you will have a system that automatically follows up with potential members who abandon their carts, encouraging them to finish the process.
The Basics of Cart Abandonment
Cart abandonment occurs when a potential customer starts the checkout process but leaves the site without completing the purchase. For membership sites, this can mean losing out on recurring revenue and potential long-term customers.
Systems that address cart abandonment allow you to re-engage these users. You get a chance to remind them of the value of your membership and gently encourage them to complete their purchase.
Cart Abandonment and Your Membership Site
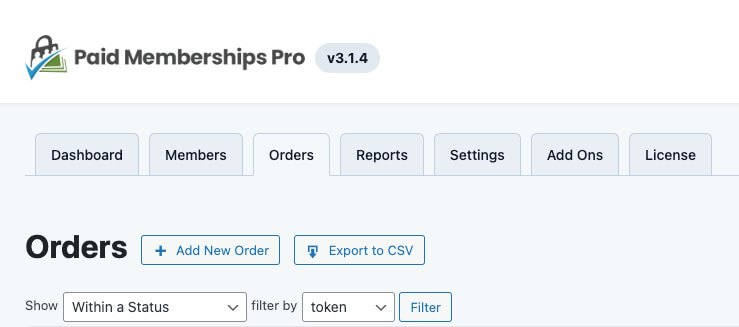
If you are using Paid Memberships Pro, you can already see how frequently people are abandoning a partial checkout. Any abandoned checkout will show as a “token” order in the Orders List.
To determine if you have any token orders:
- Navigate to Memberships > Orders
- Show “Within a Status”
- Select the “token” status
- Click “Filter” to show all orders with the token status
Addressing Cart Abandonment With an Email Sequence
There are many different ways that ecommerce stores address abandoned carts. For membership sites, implementing an email sequence is one of the most effective strategies.
So how can a membership site leverage email automation to recover lost sales? Through a smart tagging system and your favorite CRM or email marketing service (EMS). Tools you probably already have in place in your membership site or will find very simple to add.
For this guide, we have chosen to use WP Fusion to tag users who abandon their carts and Groundhogg to initiate a targeted email sequence that encourages them to complete their purchase.
What is Groundhogg?
Groundhogg is a CRM and marketing automation tool that is built right into WordPress. It provides a suite of features that allow businesses to manage customer relationships, automate marketing campaigns, and streamline communications.
Groundhogg allows you to create automated marketing funnels that can be triggered by user actions, such as form submissions, purchases, or specific tags being applied to contacts. You will create these automated funnels in the steps below.
In addition, you can send personalized email campaigns directly from your WordPress dashboard, using either pre-designed templates or custom emails tailored to your audience. You can segment and target users based on tags applied to their profiles, such as “new subscriber” or “cart abandonment”.
What is WP Fusion?
WP Fusion is a WordPress plugin that connects what happens on your website to your CRM or EMS.
With WP Fusion and PMPro, you can keep your members’ information in sync with your CRM to capture new leads, create premium member segments, record ecommerce transactions, and more.
The best part? All of this takes place directly within your WordPress site—not through a third party website.
Unlike automation through a platform like Zapier, all of your data is synced directly between the membership site and the CRM. Why is this important? It reduces the number of places that you need to ensure GDPR compliance and is in line with all modern data protection regulations.
How does WP Fusion integrate with Paid Memberships Pro?
WP Fusion integrates seamlessly with Paid Memberships Pro in a boatload of ways. From tagging new signups, enabling winback campaigns, deeper personalization, churn/dunning, and more, this automation tool is insanely powerful.
WP Fusion works with Paid Membership Pro to add customers to your CRM when they purchase a membership, and auto-enroll members when tags are applied in your CRM.
Our plugin adds several settings to Paid Memberships Pro, which you can see while editing any membership level. —via WP Fusion
Here are a few of the automations you can set up with WP Fusion and PMPro:
- Apply, remove, and link members with tags based on membership level after checkout.
- Tag contacts when a user’s membership level is canceled or expired (opening up lots of options for winback campaigns and other customer retention strategies).
- Sync the member’s approval status to your CRM as a custom field when using the Approval Process for Membership Add On.
- Tag contacts when they are within a cancellation period.
- Tag contacts when a user’s subscription payment fails (to run a “dunning” campaign).
- Sync contact data in your CRM to PMPro user fields.
Want some even better news? While this guide focuses on the Groundhogg CRM, all of these actions work with every CRM integrated with WP Fusion.
Step-by-Step Instructions: How to Create a Cart Abandonment Email Funnel
This guide assumes you have already installed and set up the following plugins:
- Paid Memberships Pro
- WP Fusion (Plus or Professional) and their Abandoned Cart Tracking addon
- Groundhogg
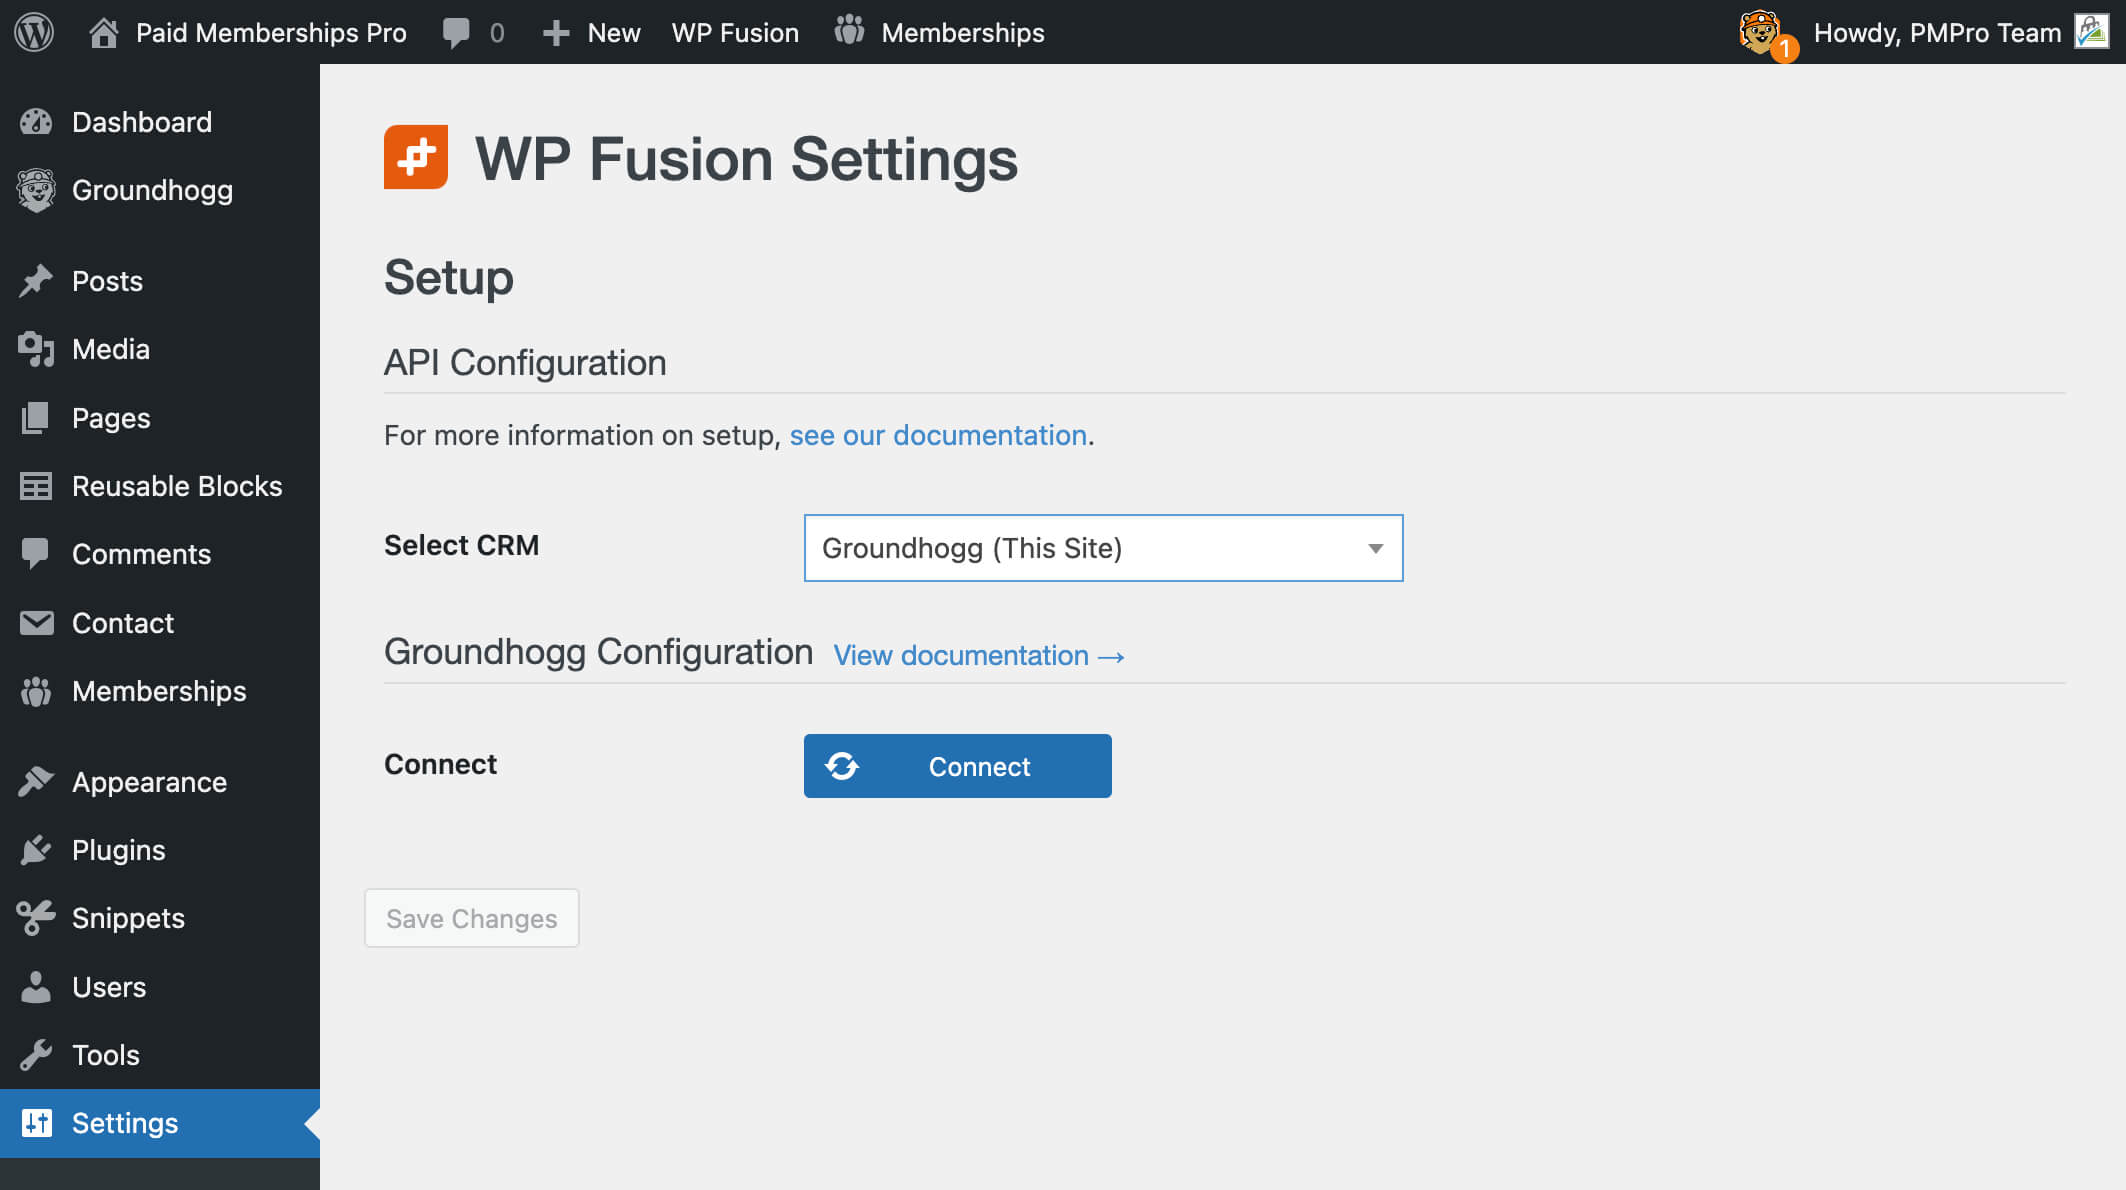
Step 1: Select Your CRM in WP Fusion
Begin by selecting Groundhogg as your CRM in WP Fusion.
- Navigate to WP Fusion > Settings in WordPress.
- Select Groundhogg as your CRM from the drop-down menu.

- After selecting Groundhogg, confirm that the connection has been established.
- Confirm that the connection between WP Fusion and Groundhogg is active.
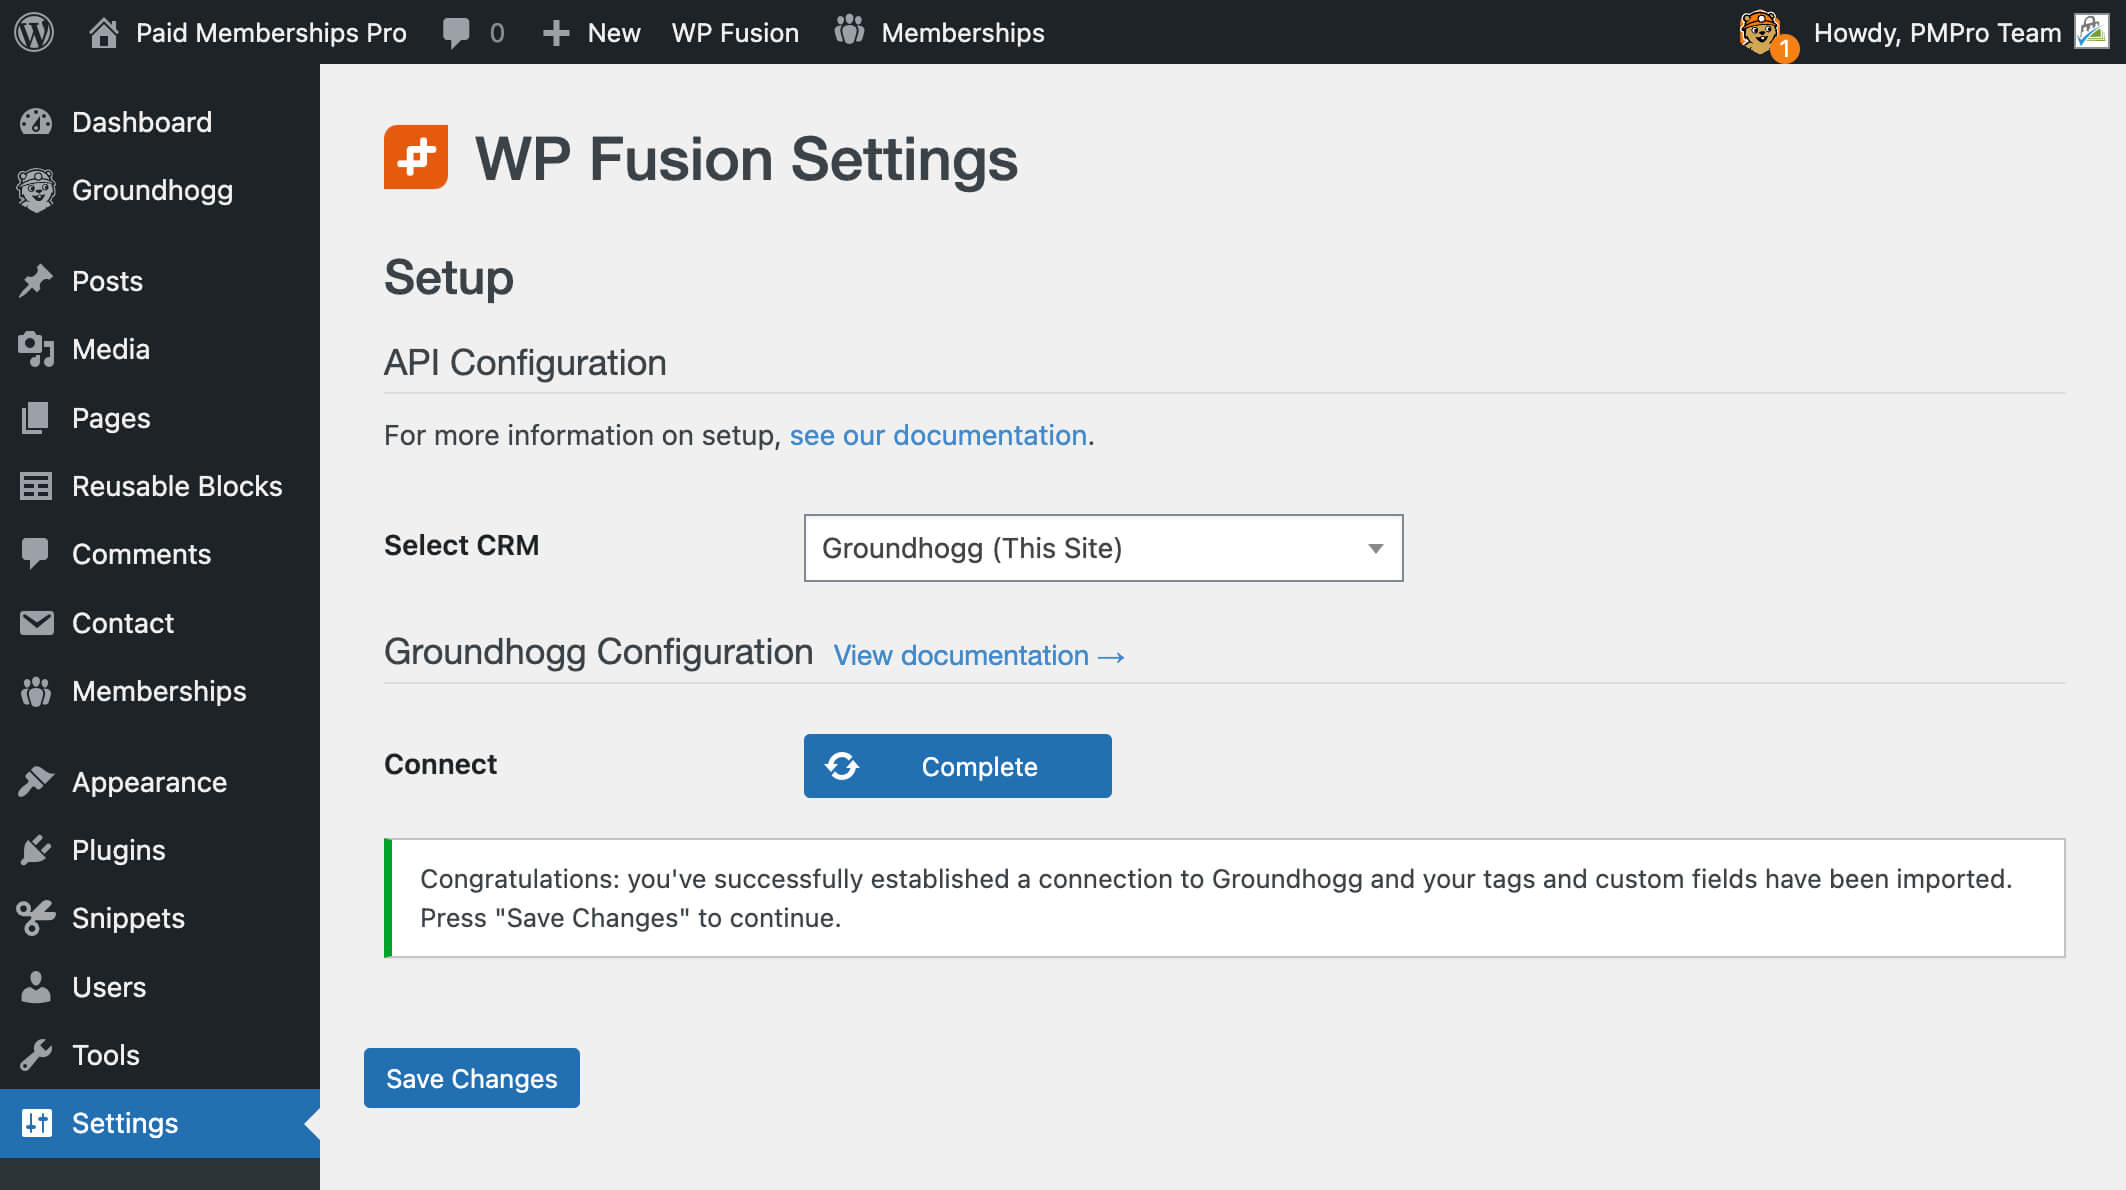
- You should see a message confirming that WP Fusion is connected to Groundhogg.
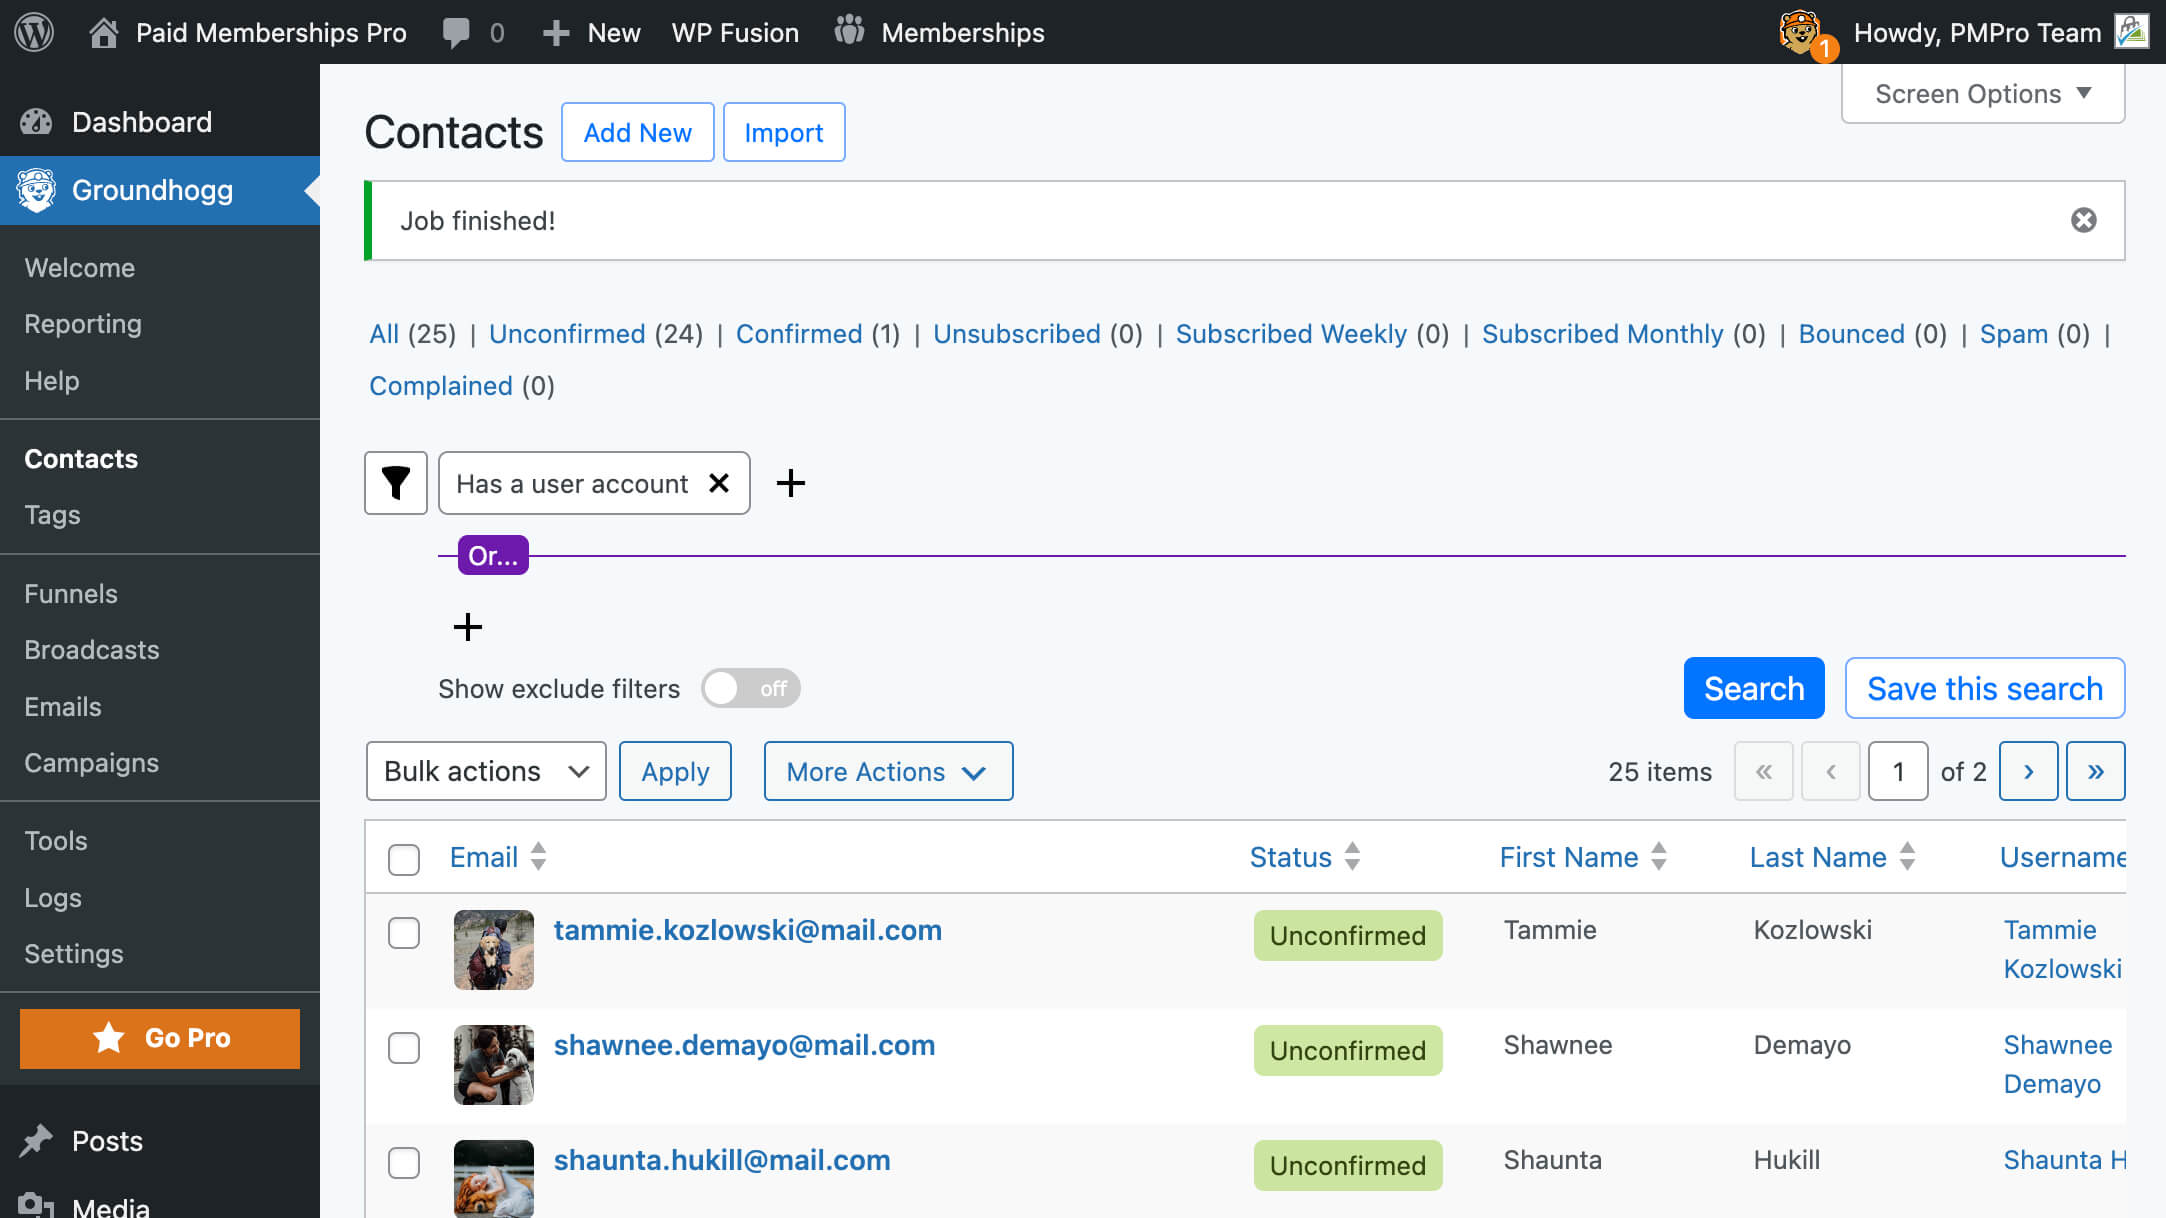
Step 2: Sync WordPress Users (Optional)
If this is a new install, you may need to sync your WordPress users with Groundhogg.
- Go to Groundhogg > Tools and select Sync Users.
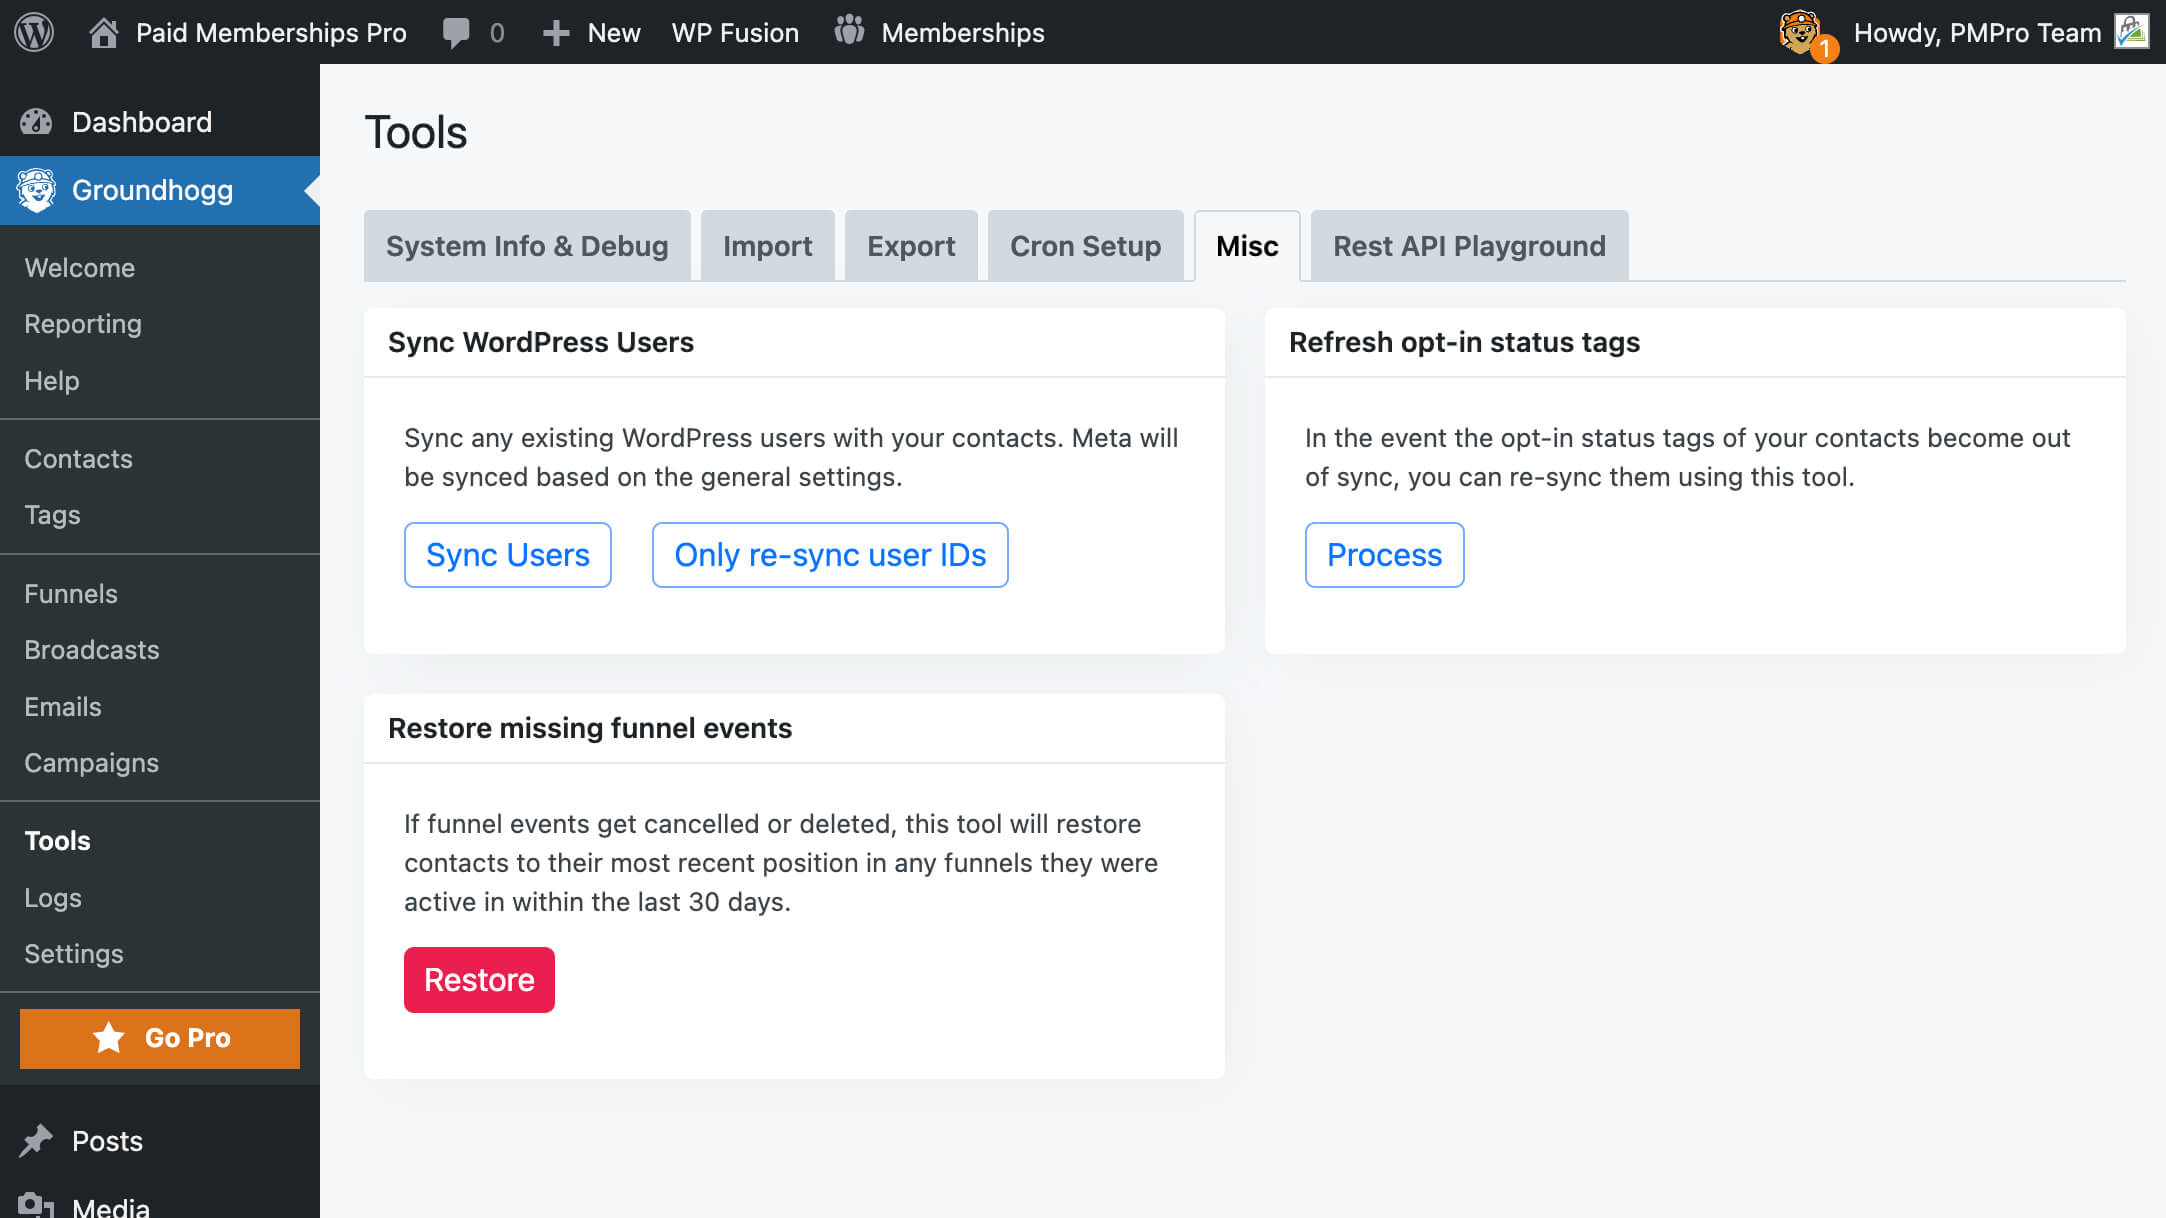
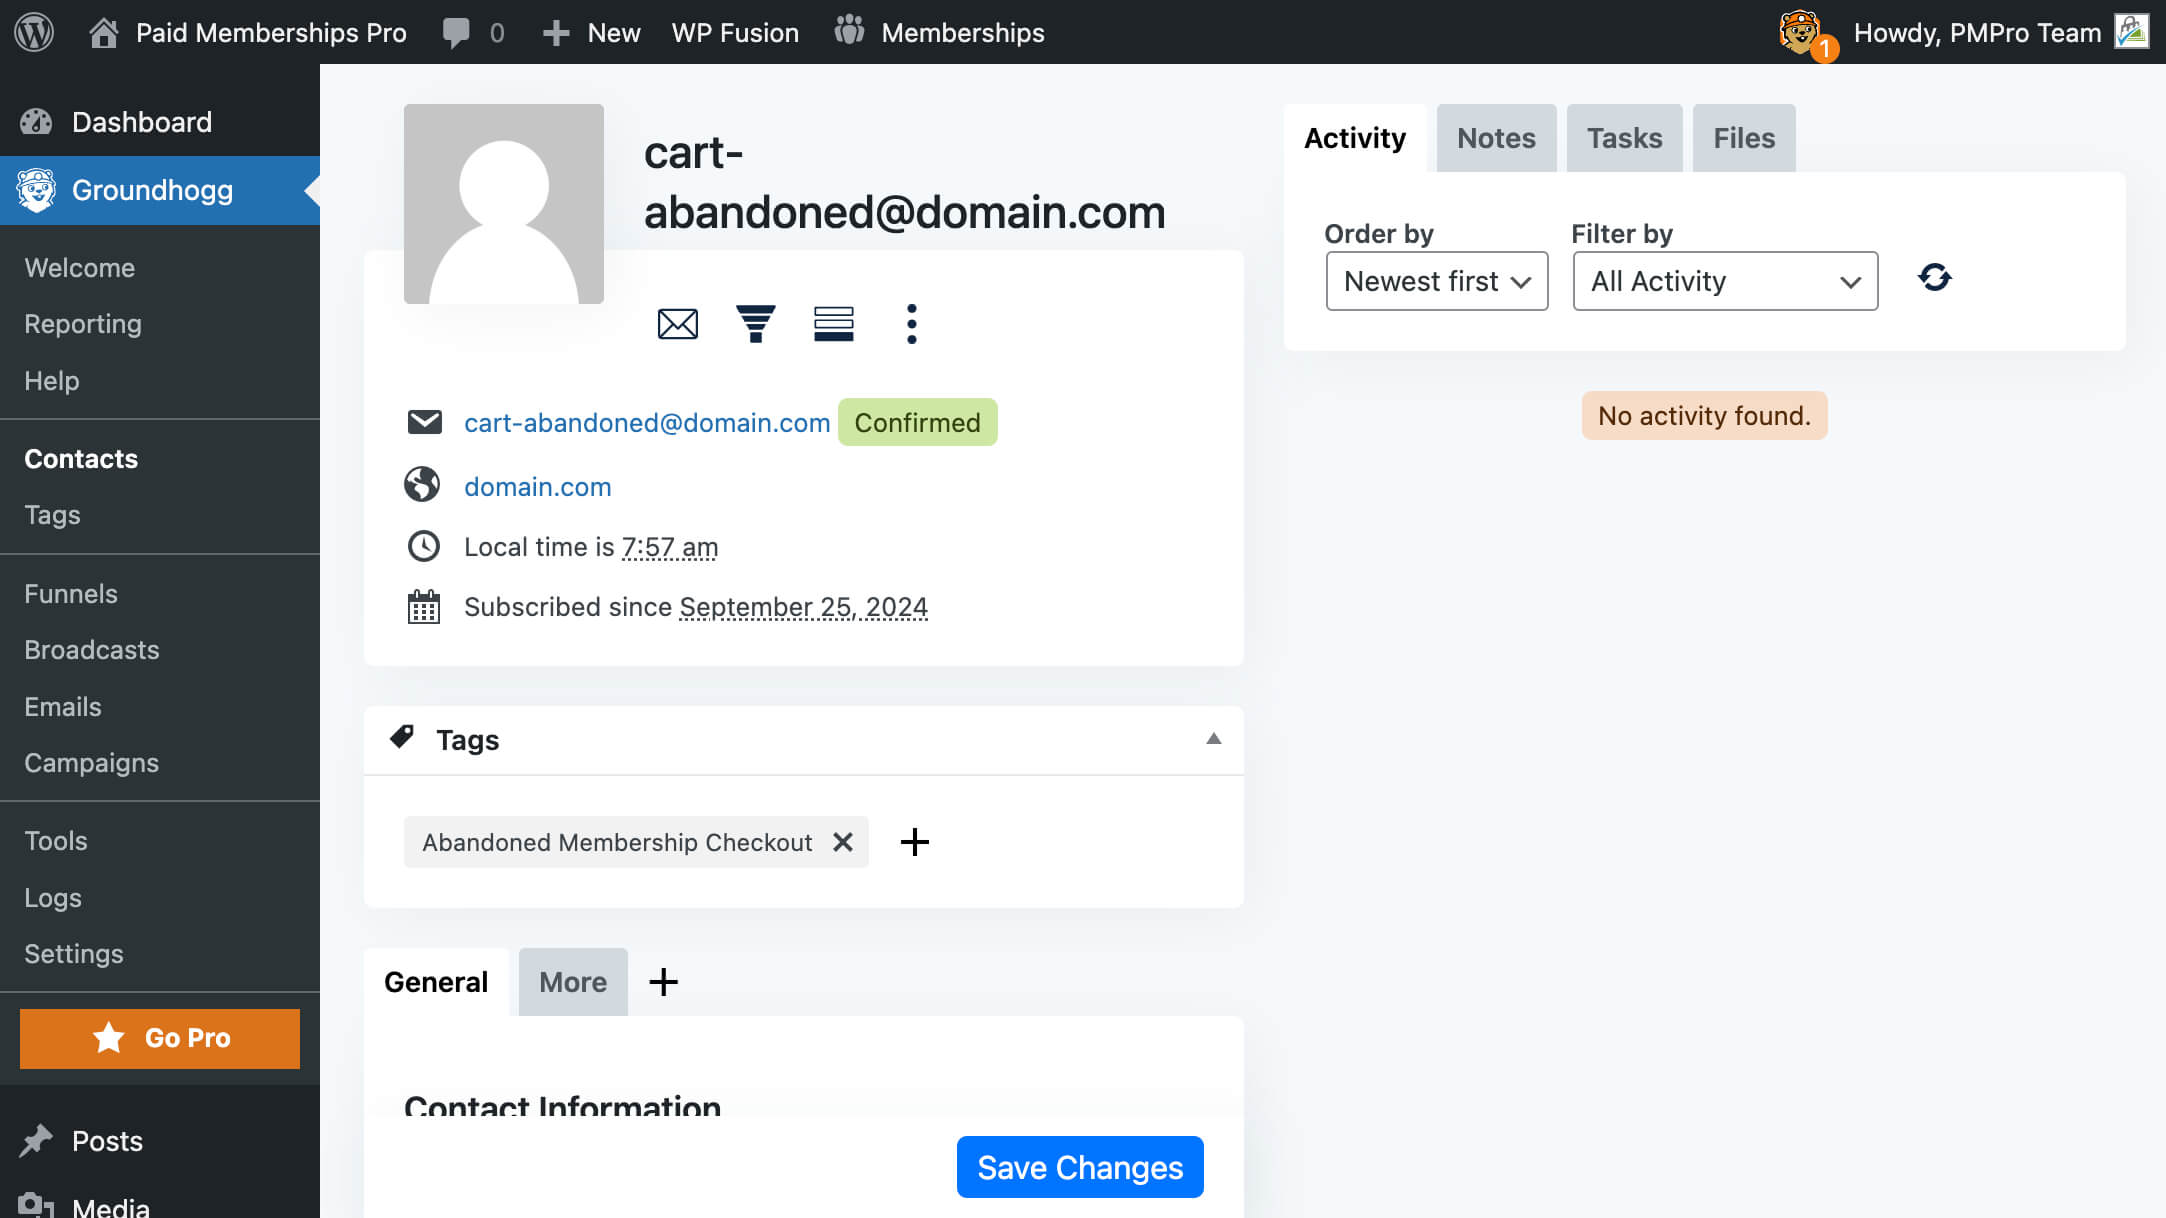
- After syncing users, confirm that the process has completed successfully. You should see a confirmation message and list of synced users on the Groundhogg > Contacts screen.
Step 3: Create a Cart Abandonment Funnel in Groundhogg
These steps show you how to set up a new Funnel in Groundhogg that initiates when people are added to a specific “tag”. We’ll assign that tag using WP Fusion later in this guide.
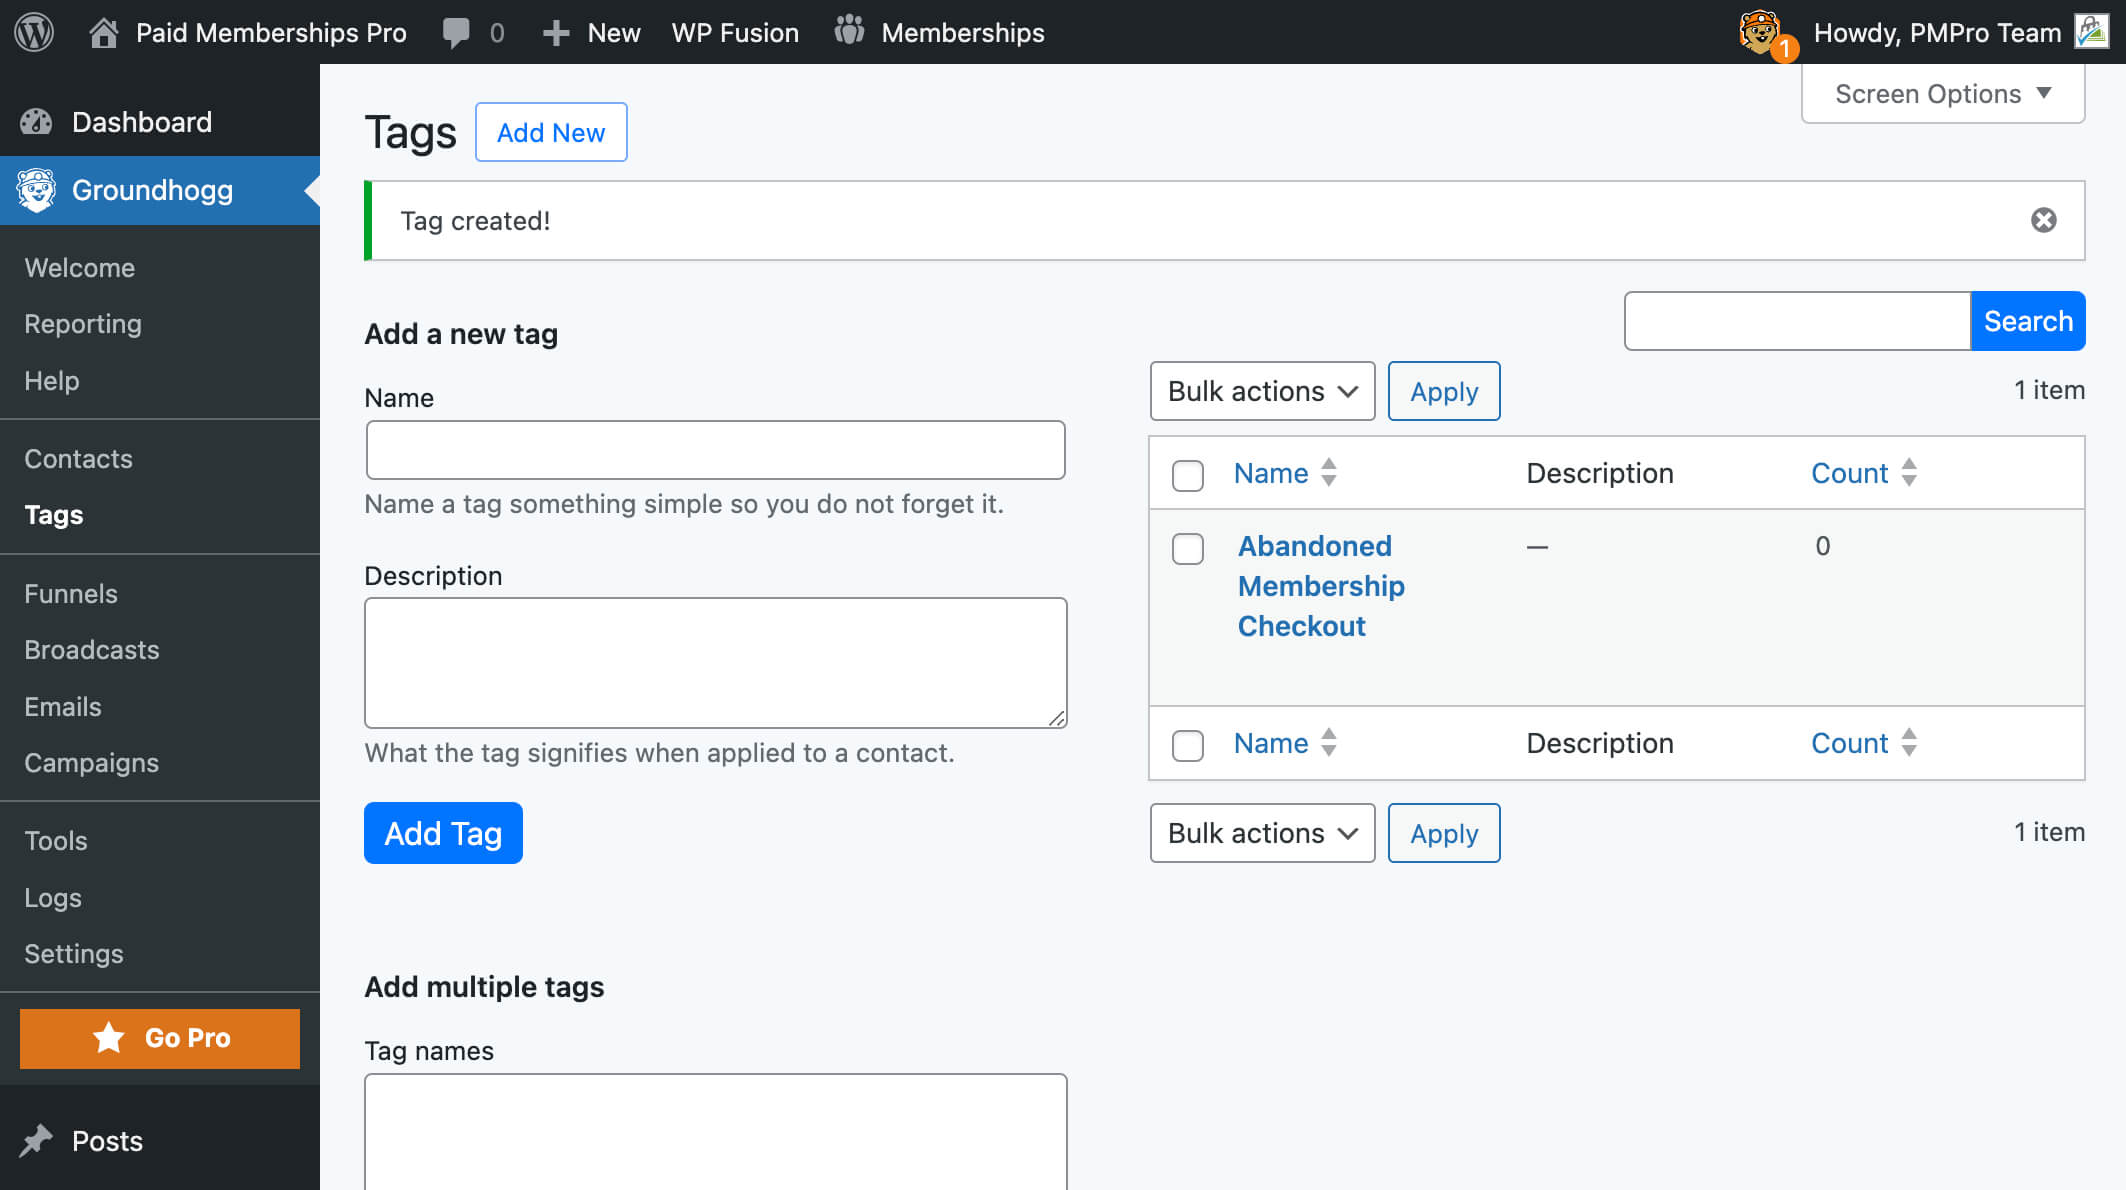
First, create a tag that will be used for tracking cart abandonment.
- Navigate to Groundhogg > Tags and create a new tag called Cart Abandonment.
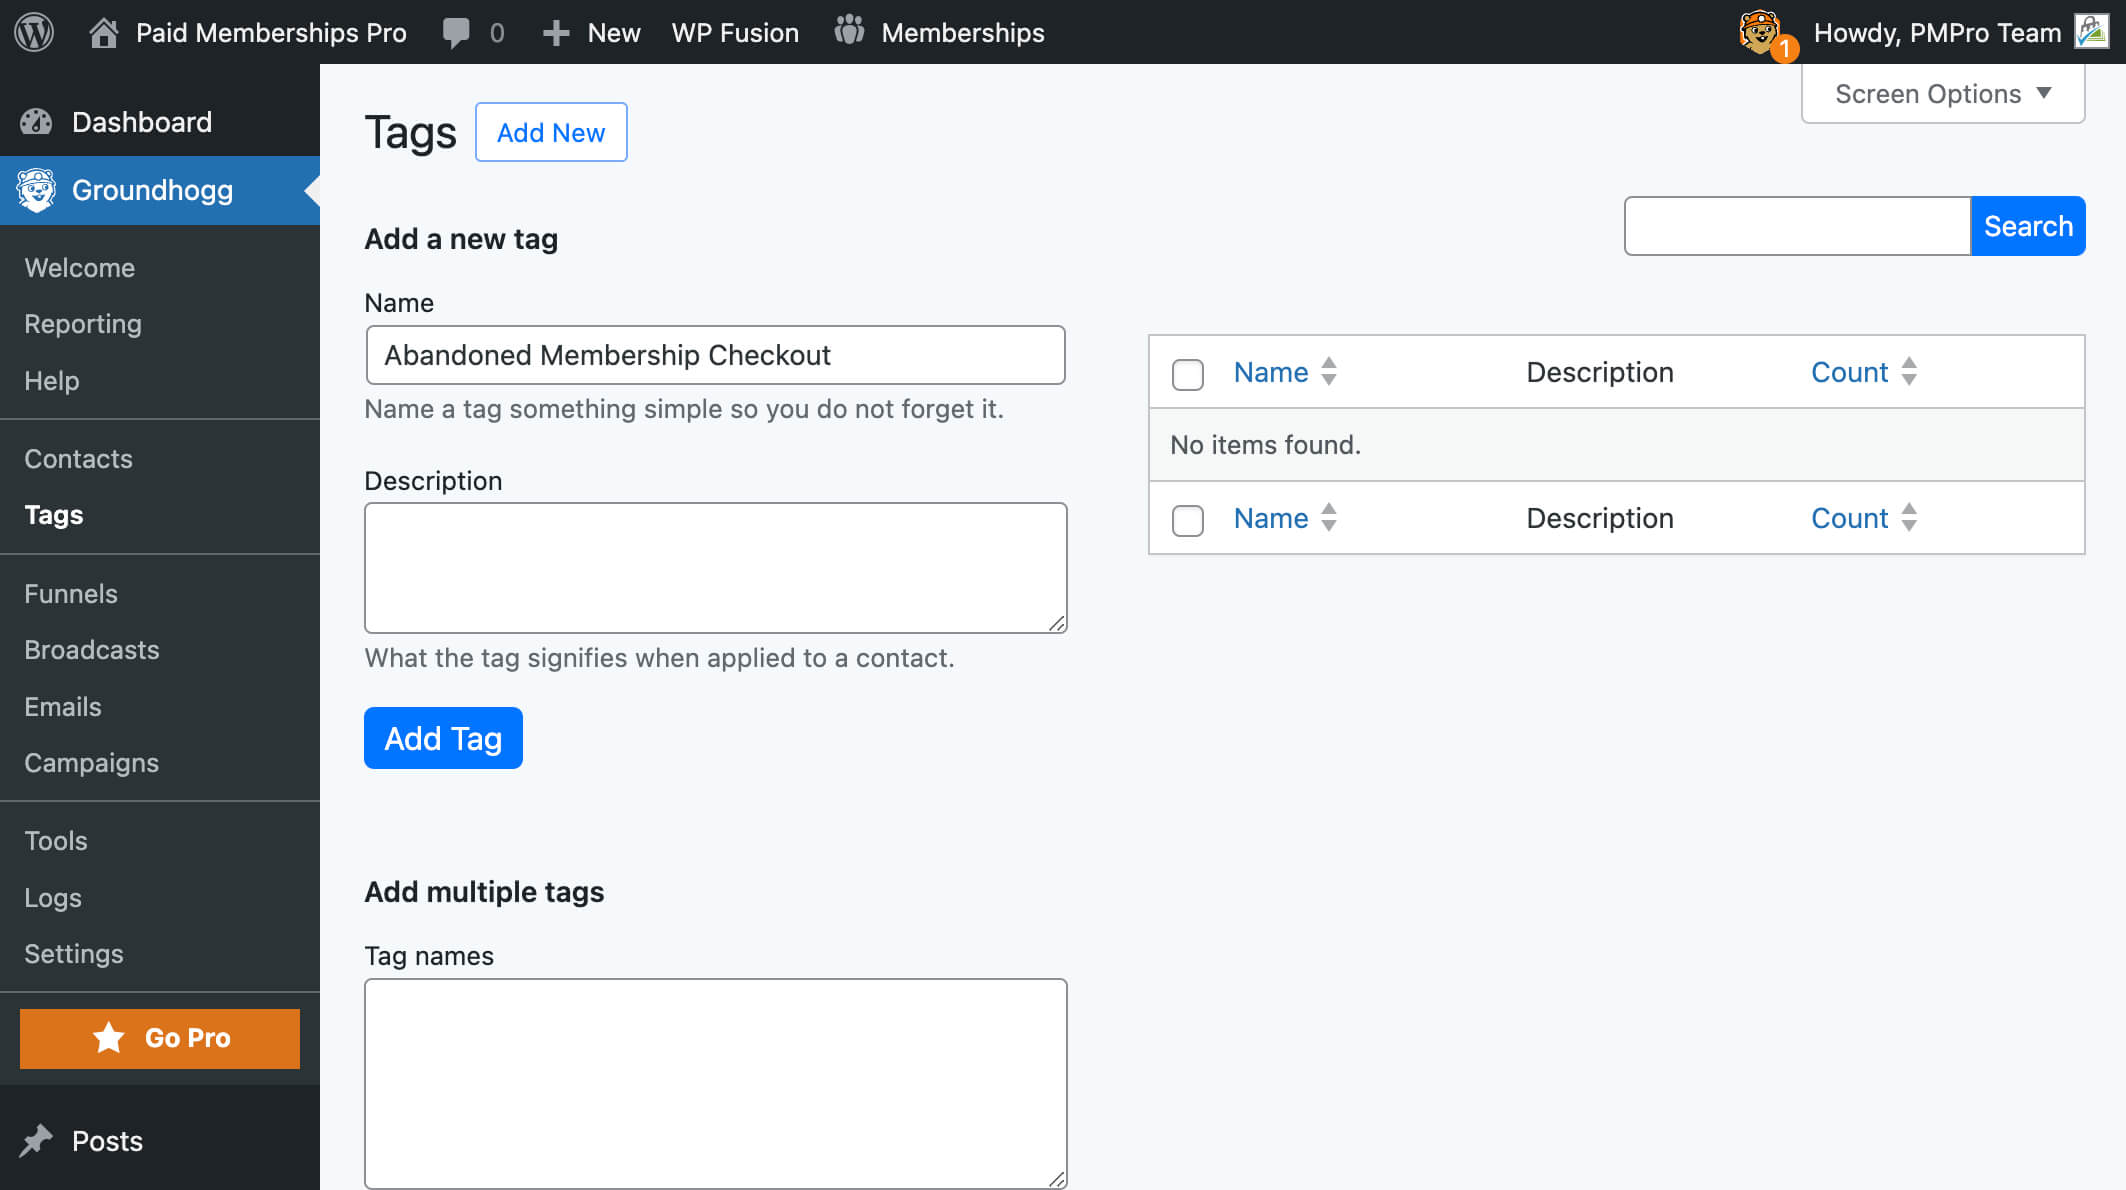
- Once the tag is created, confirm that it is ready to use. You should see your new Cart Abandonment tag listed in Groundhogg.
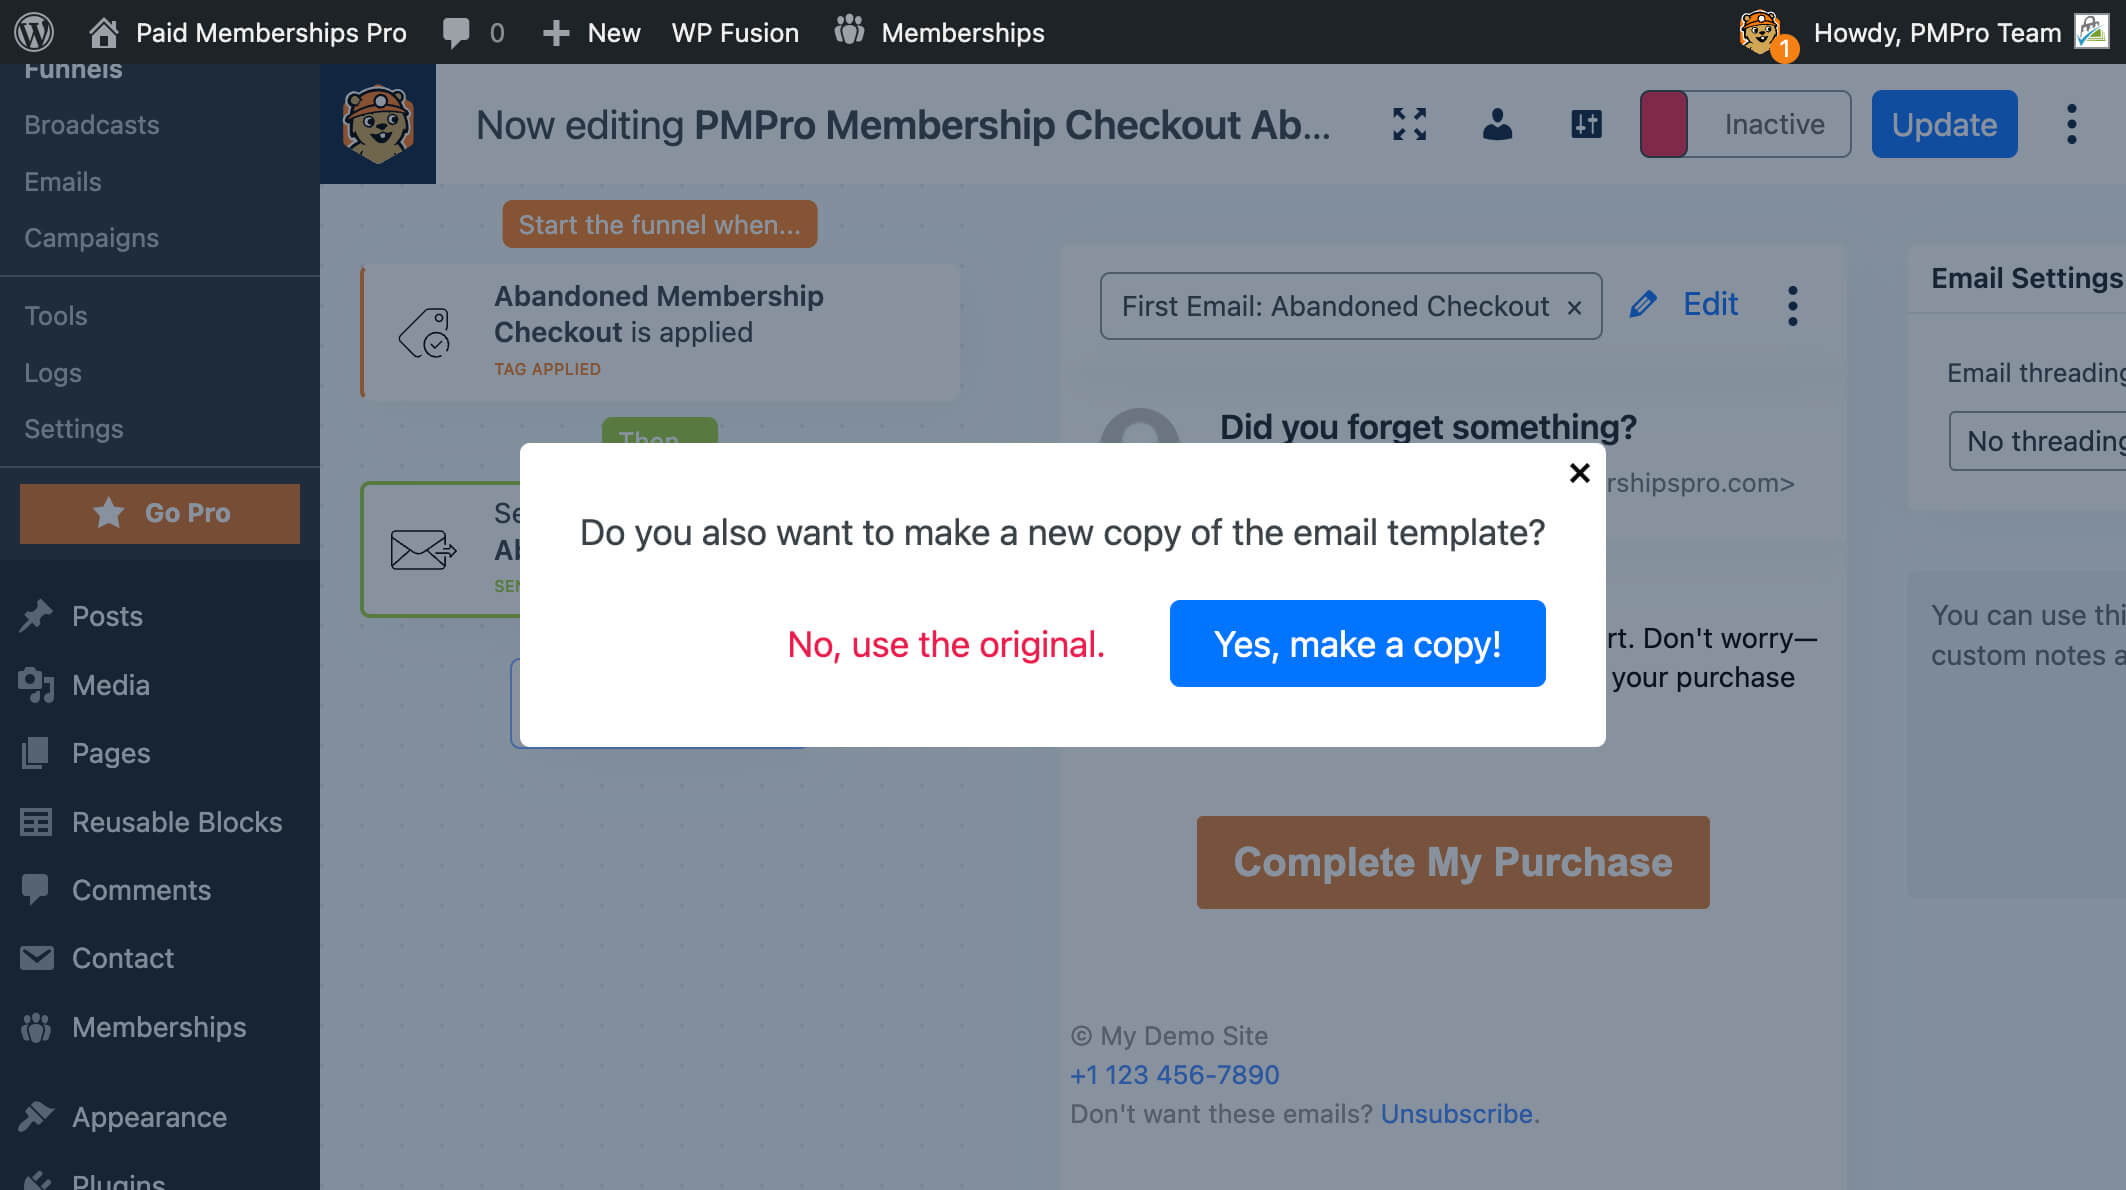
Now, create a new funnel in Groundhogg to trigger when the Cart Abandonment tag is applied.
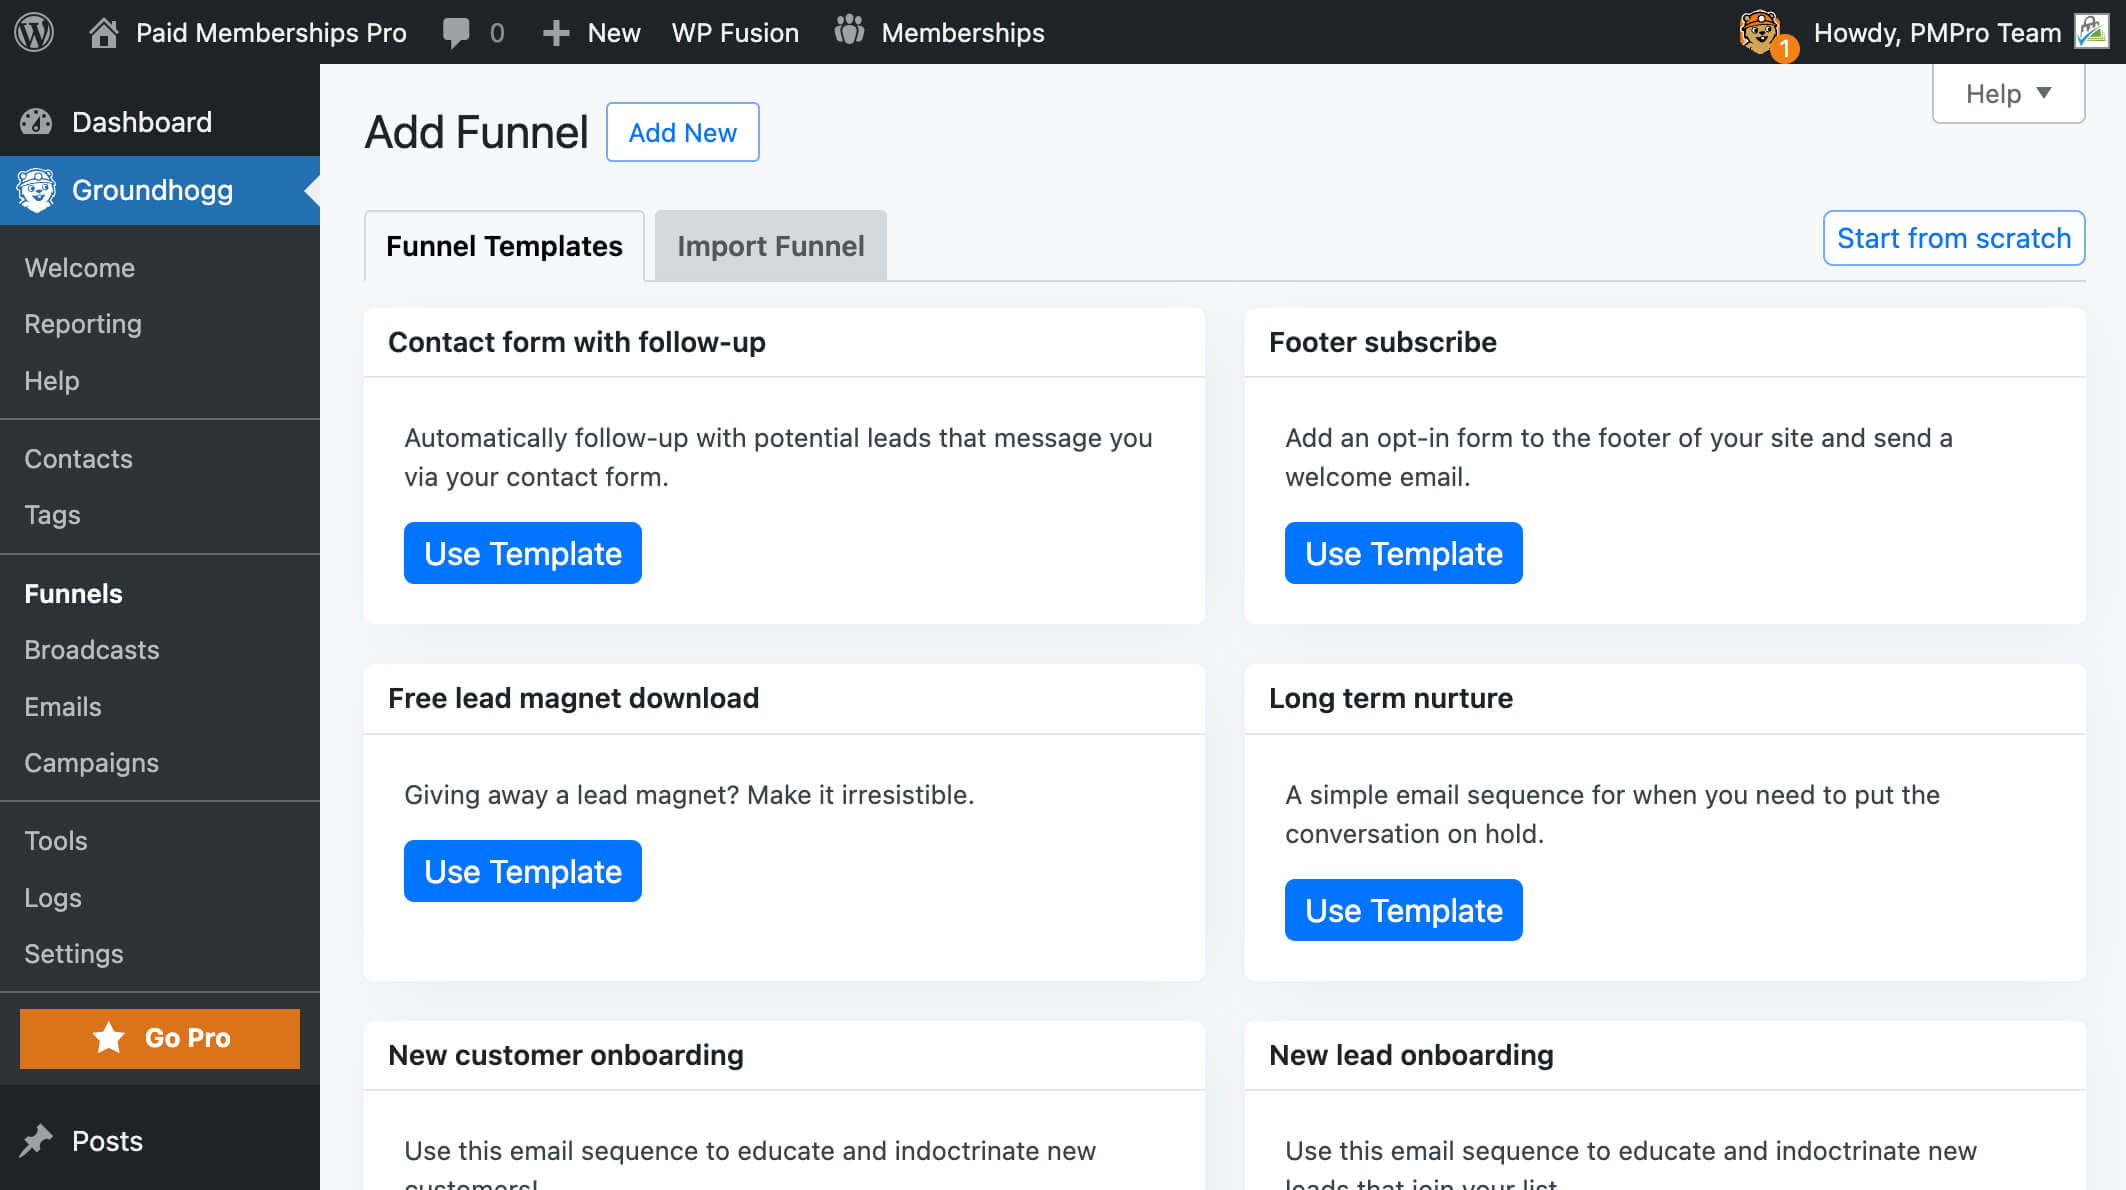
- Go to Funnels and choose to Create Funnel from Scratch.
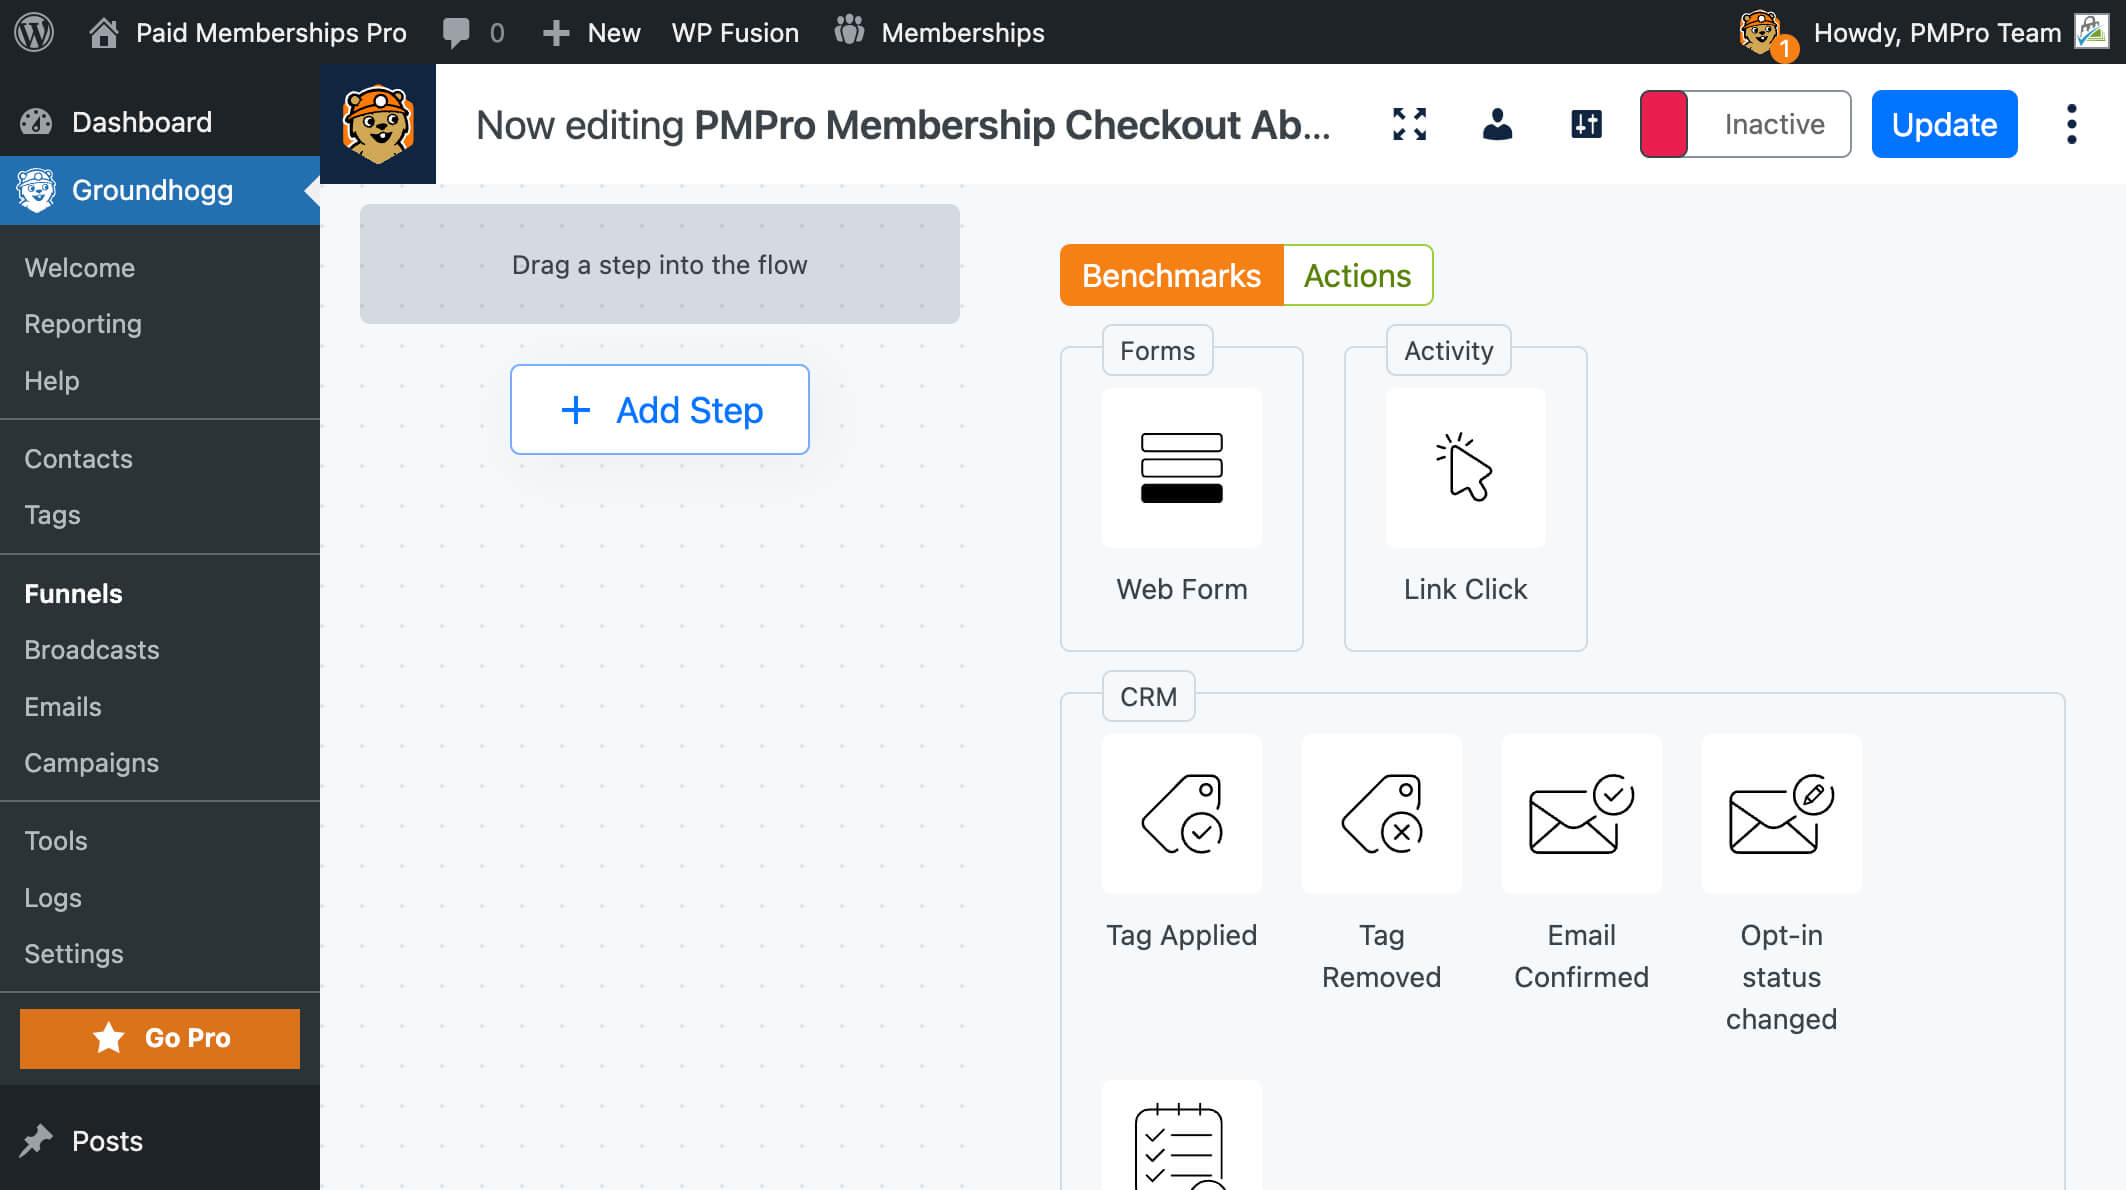
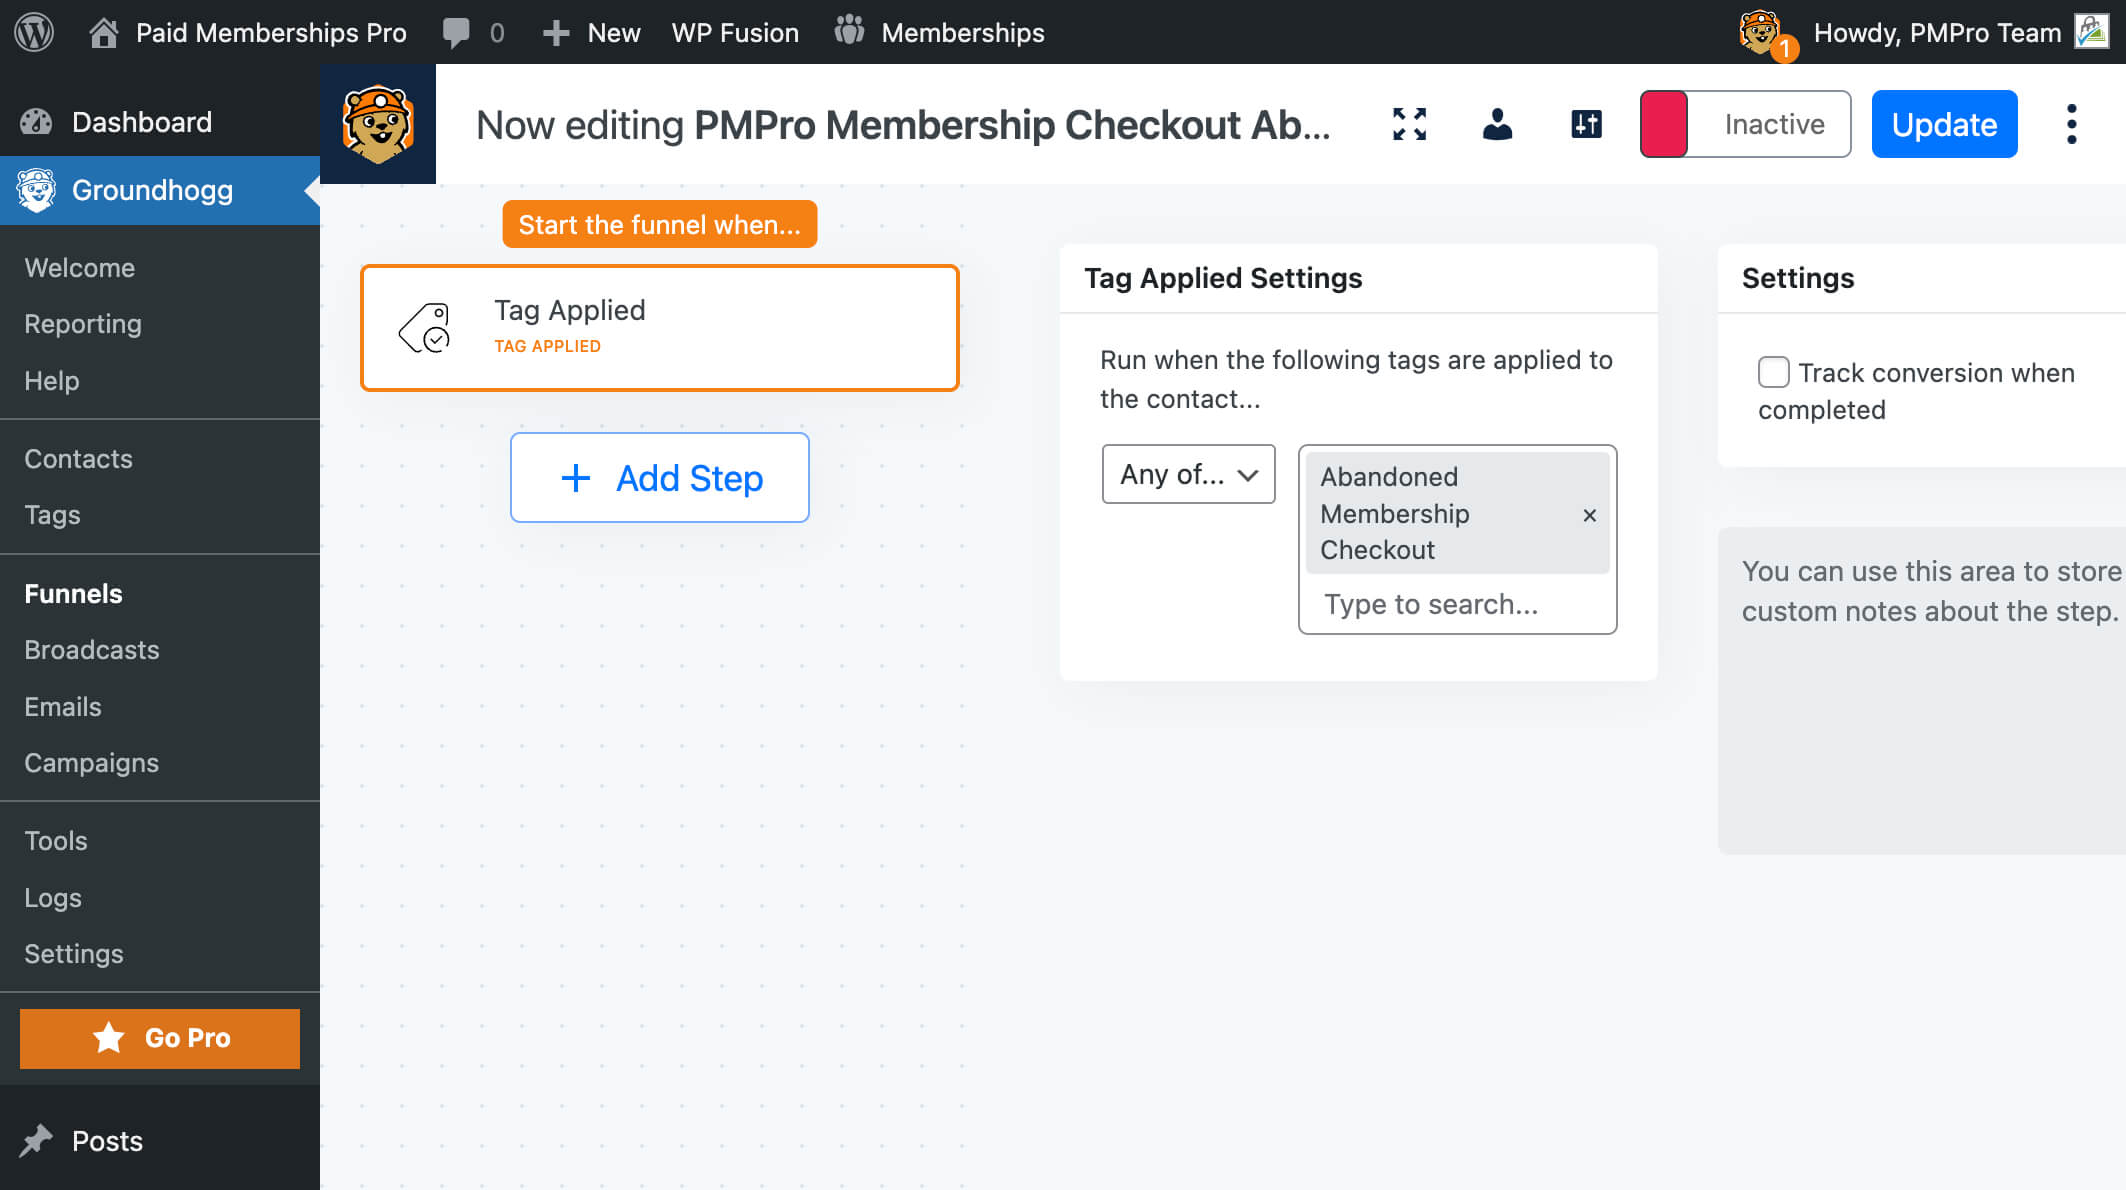
- Select Tag Applied as the funnel’s starting condition and choose the Cart Abandonment tag.
- Click Create Email and write a message encouraging users to return and complete the checkout.
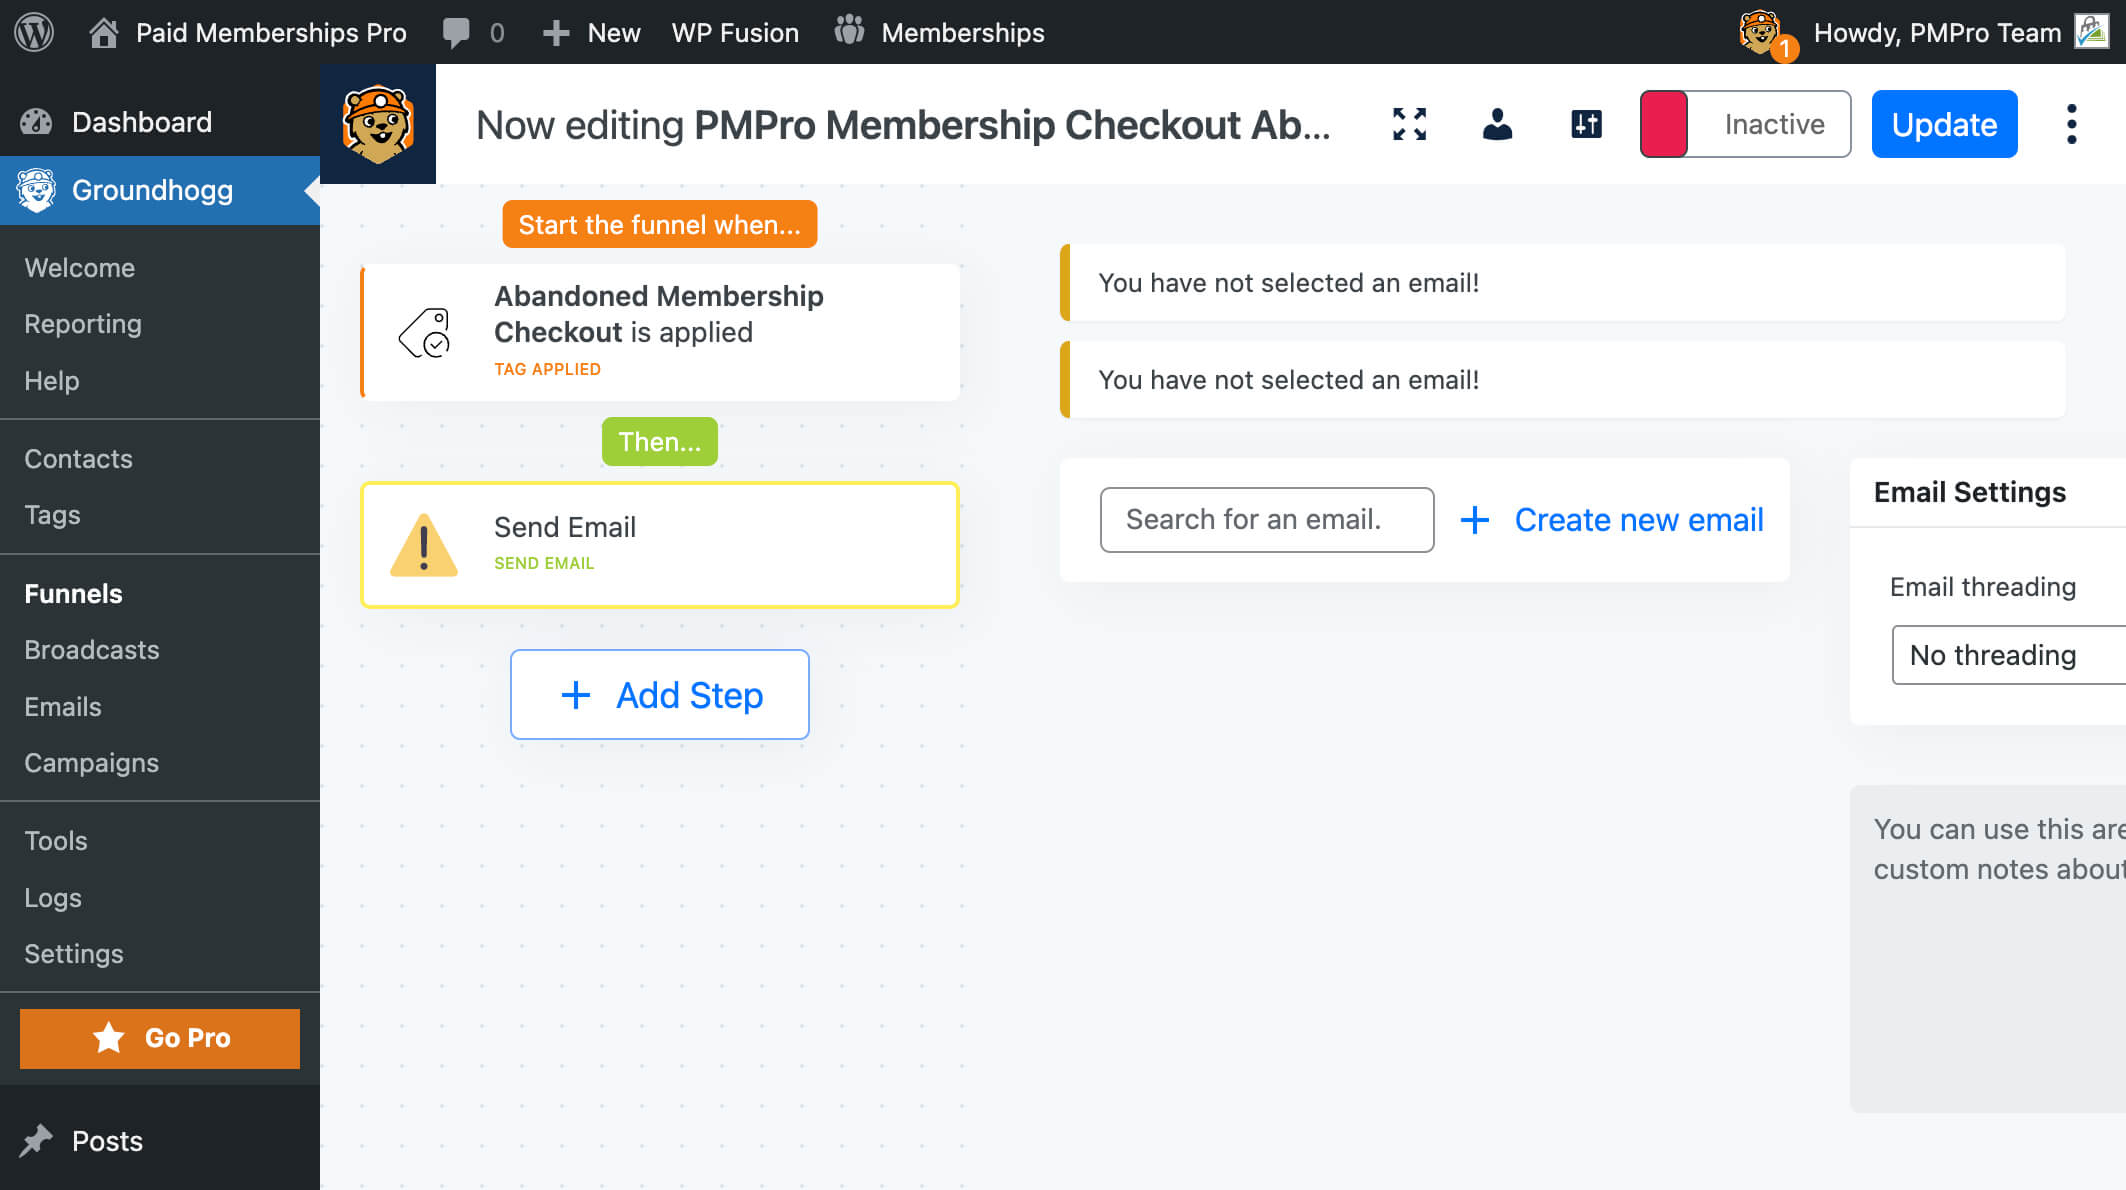
- Your email should include a direct link back to the checkout page and a clear call to action.
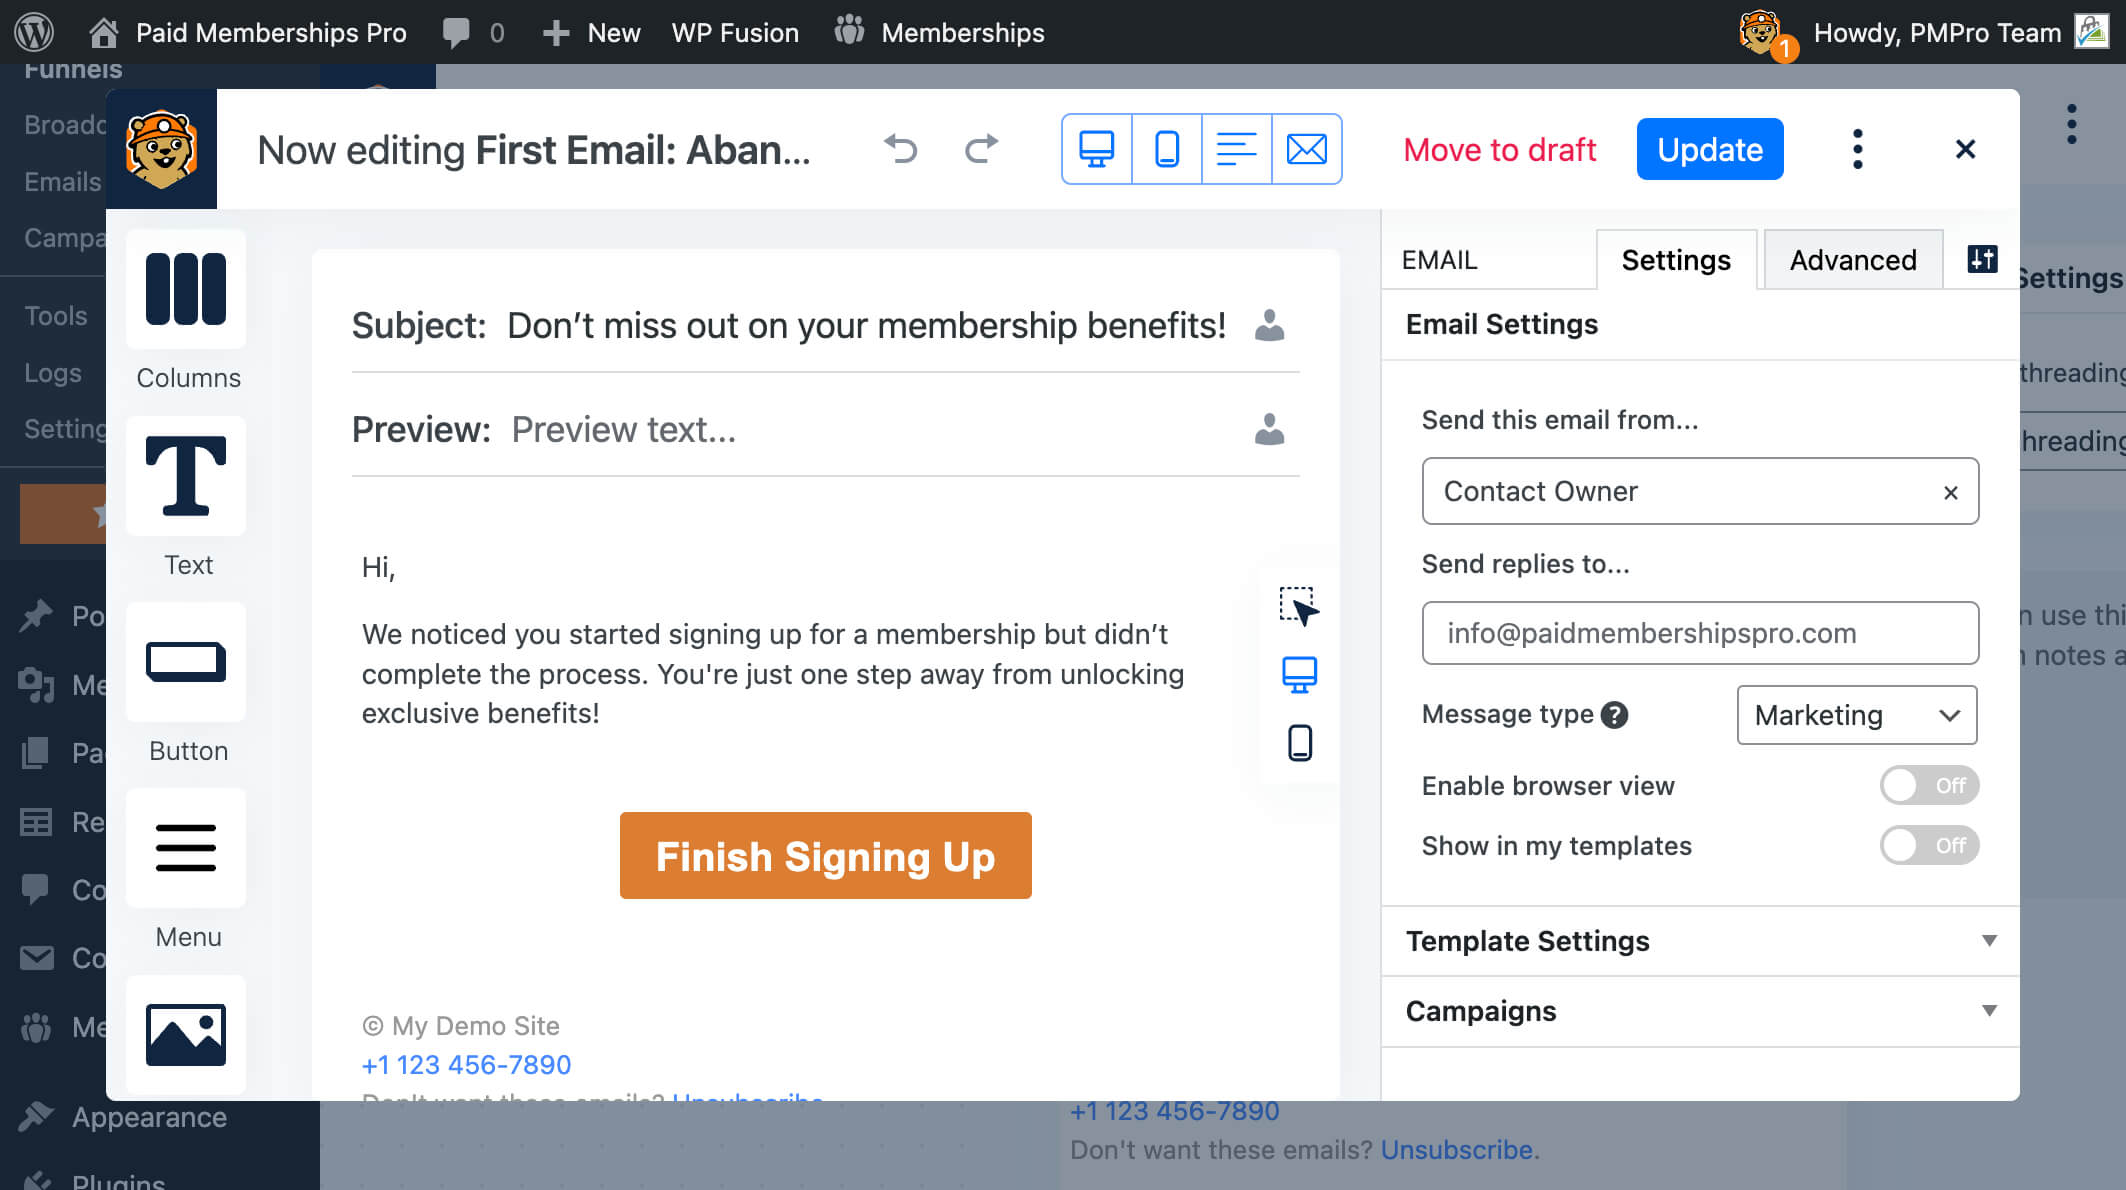
- This funnel will include three separate emails. To save time, duplicate the first email and modify it for the second and third follow-ups.
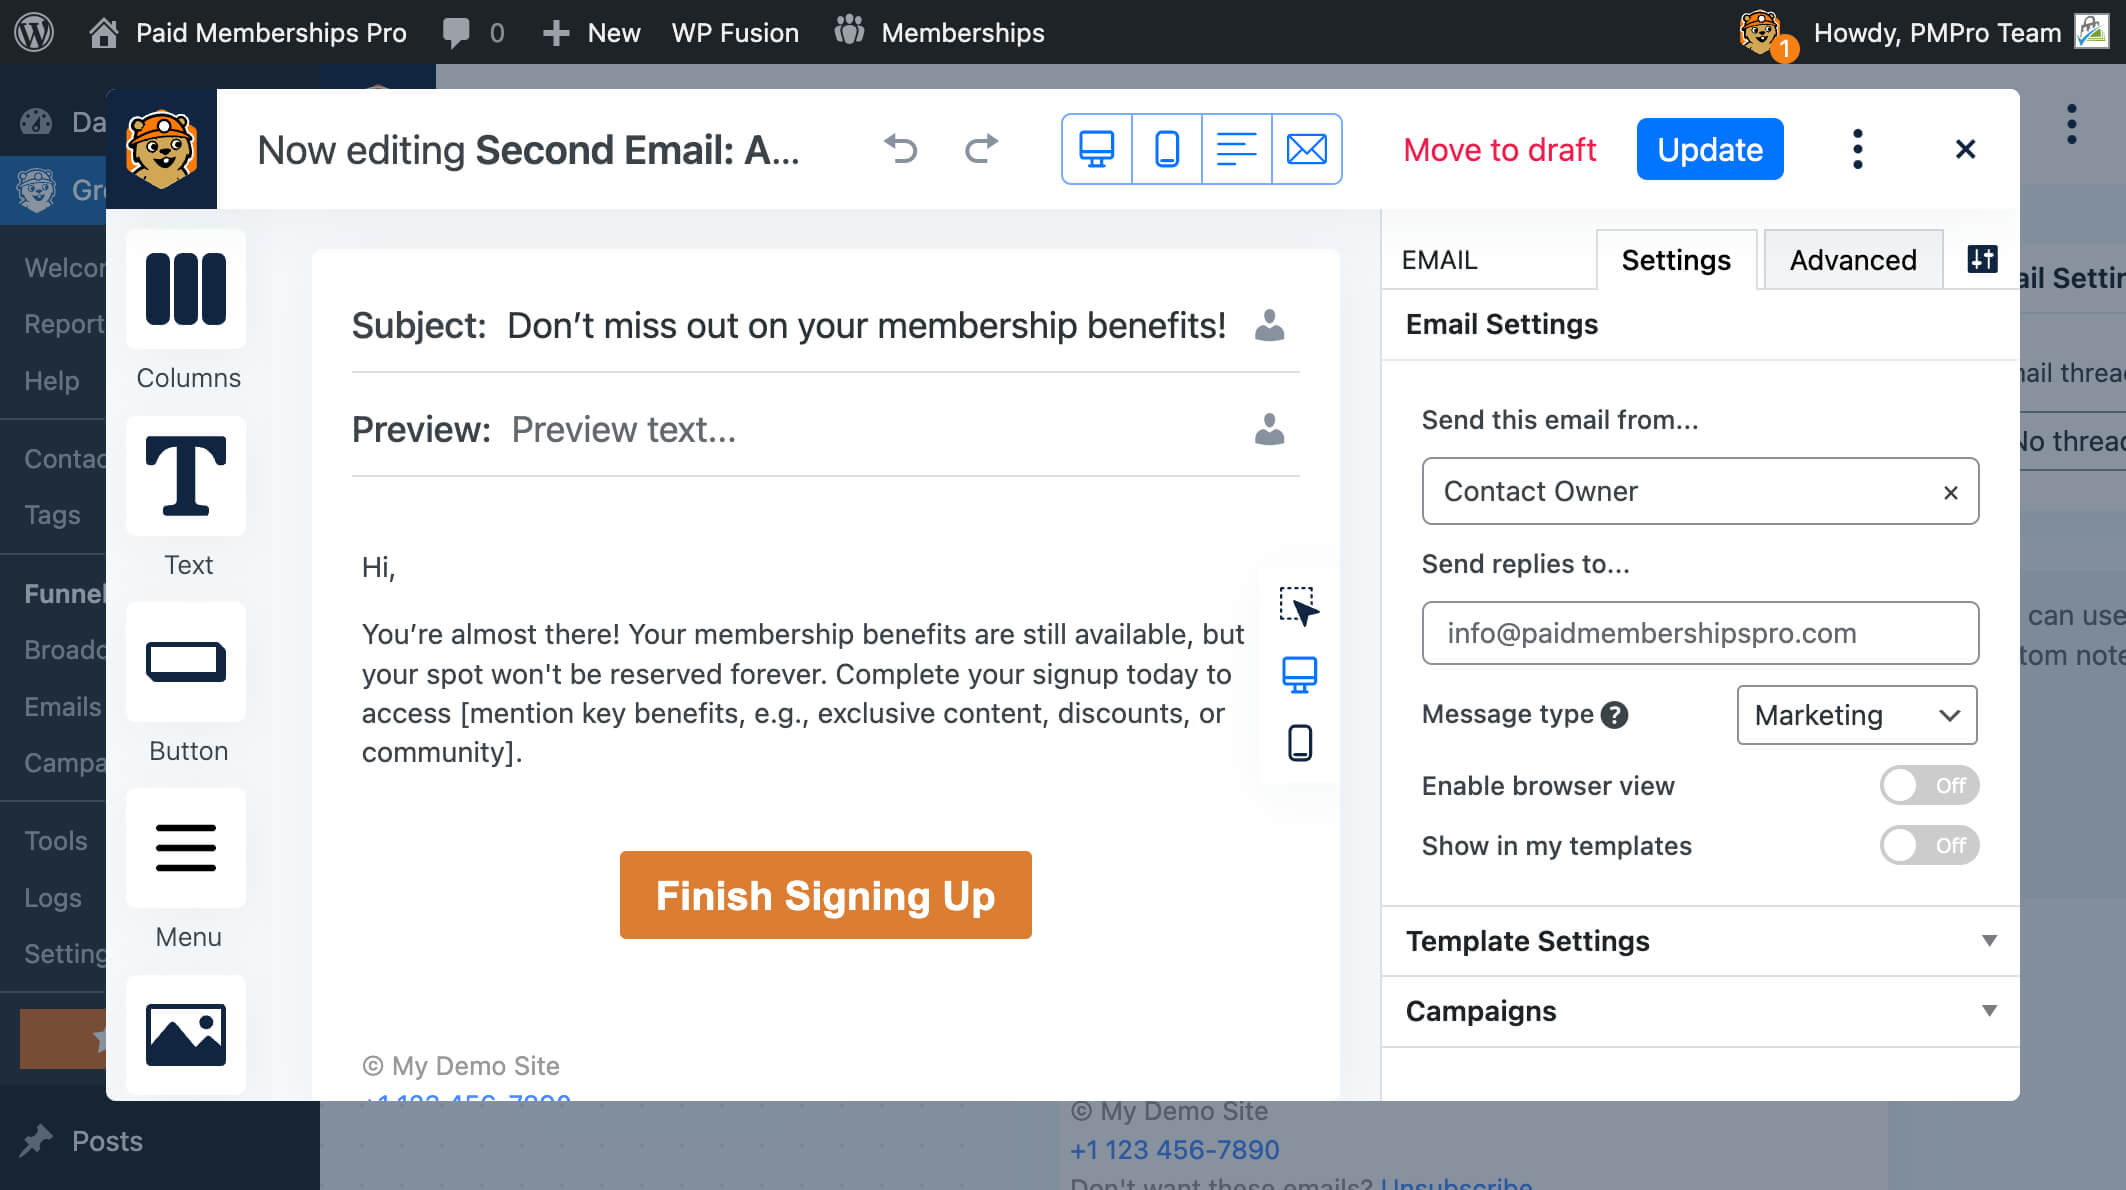
- The second email should have a different approach or urgency to re-engage users.
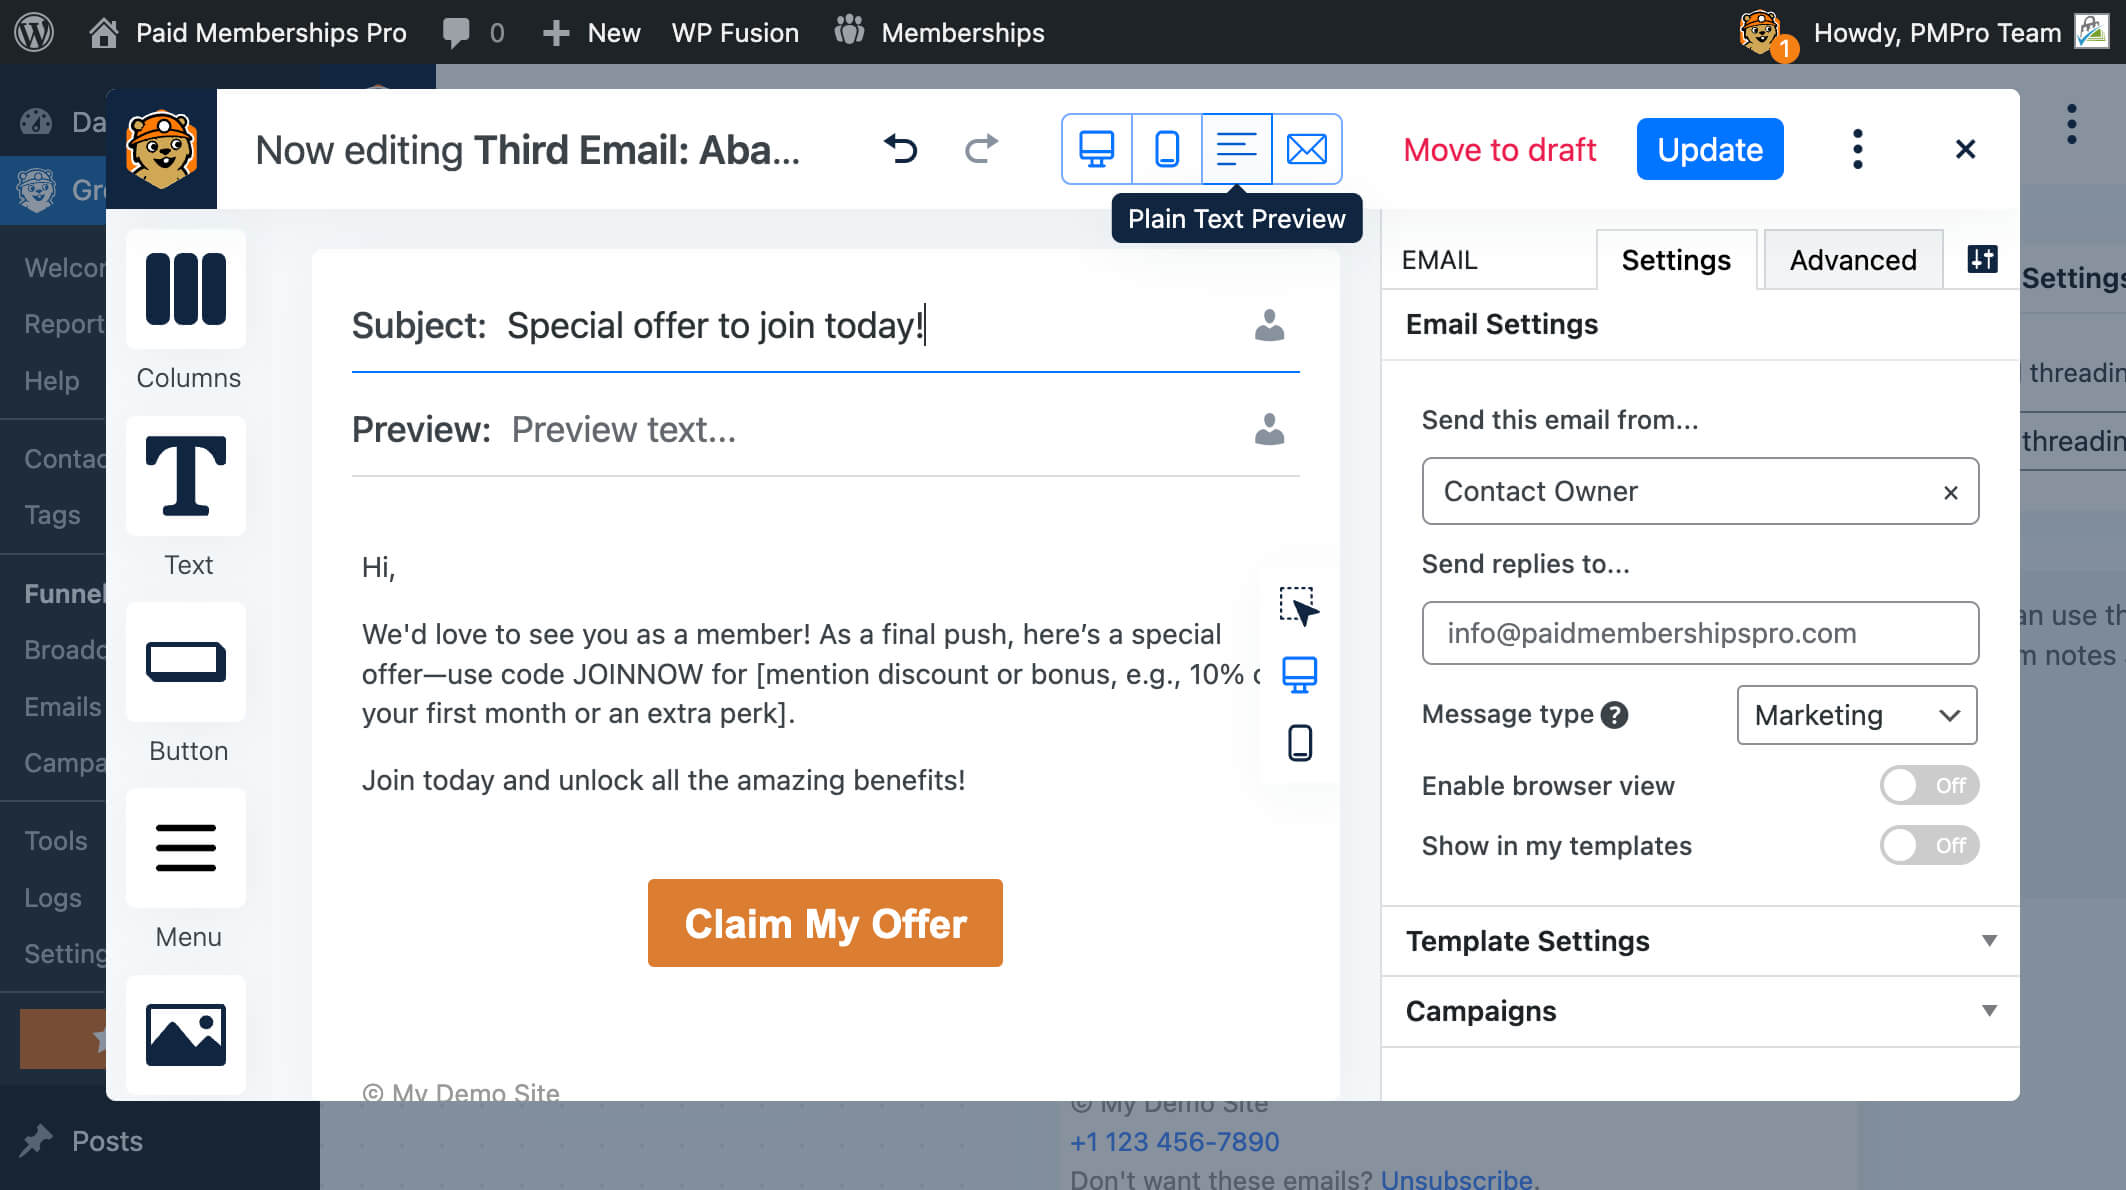
- Continue building the sequence by adding a third follow-up email.
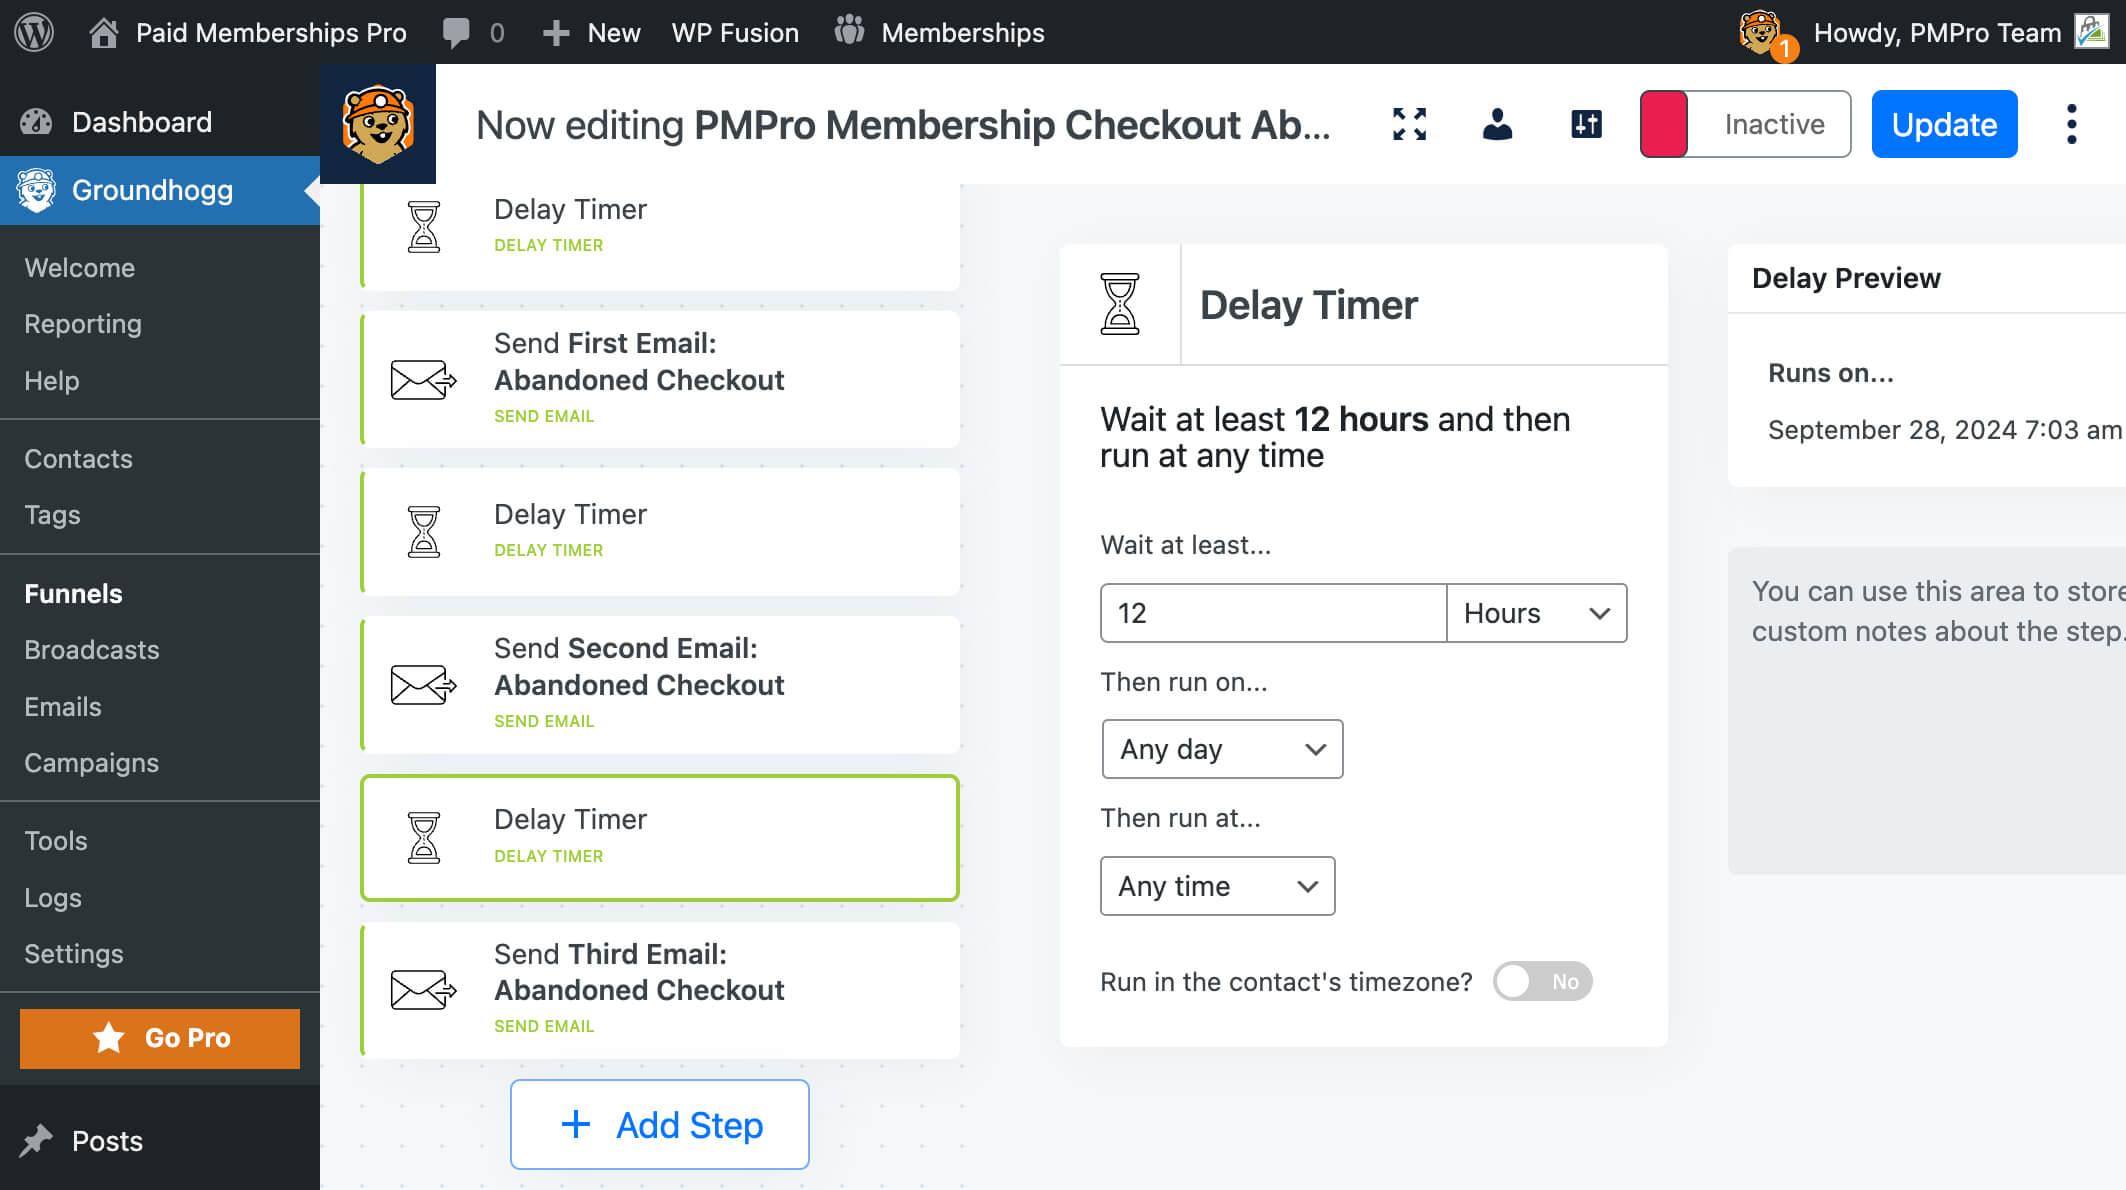
- Space out the emails by adding delays between each message in the funnel. For the first email, set a delay of 1 hour after the user abandons their cart.

- For the second follow-up email, set a delay of 11 hours. This email will send 12 hours after the cart was abandoned.
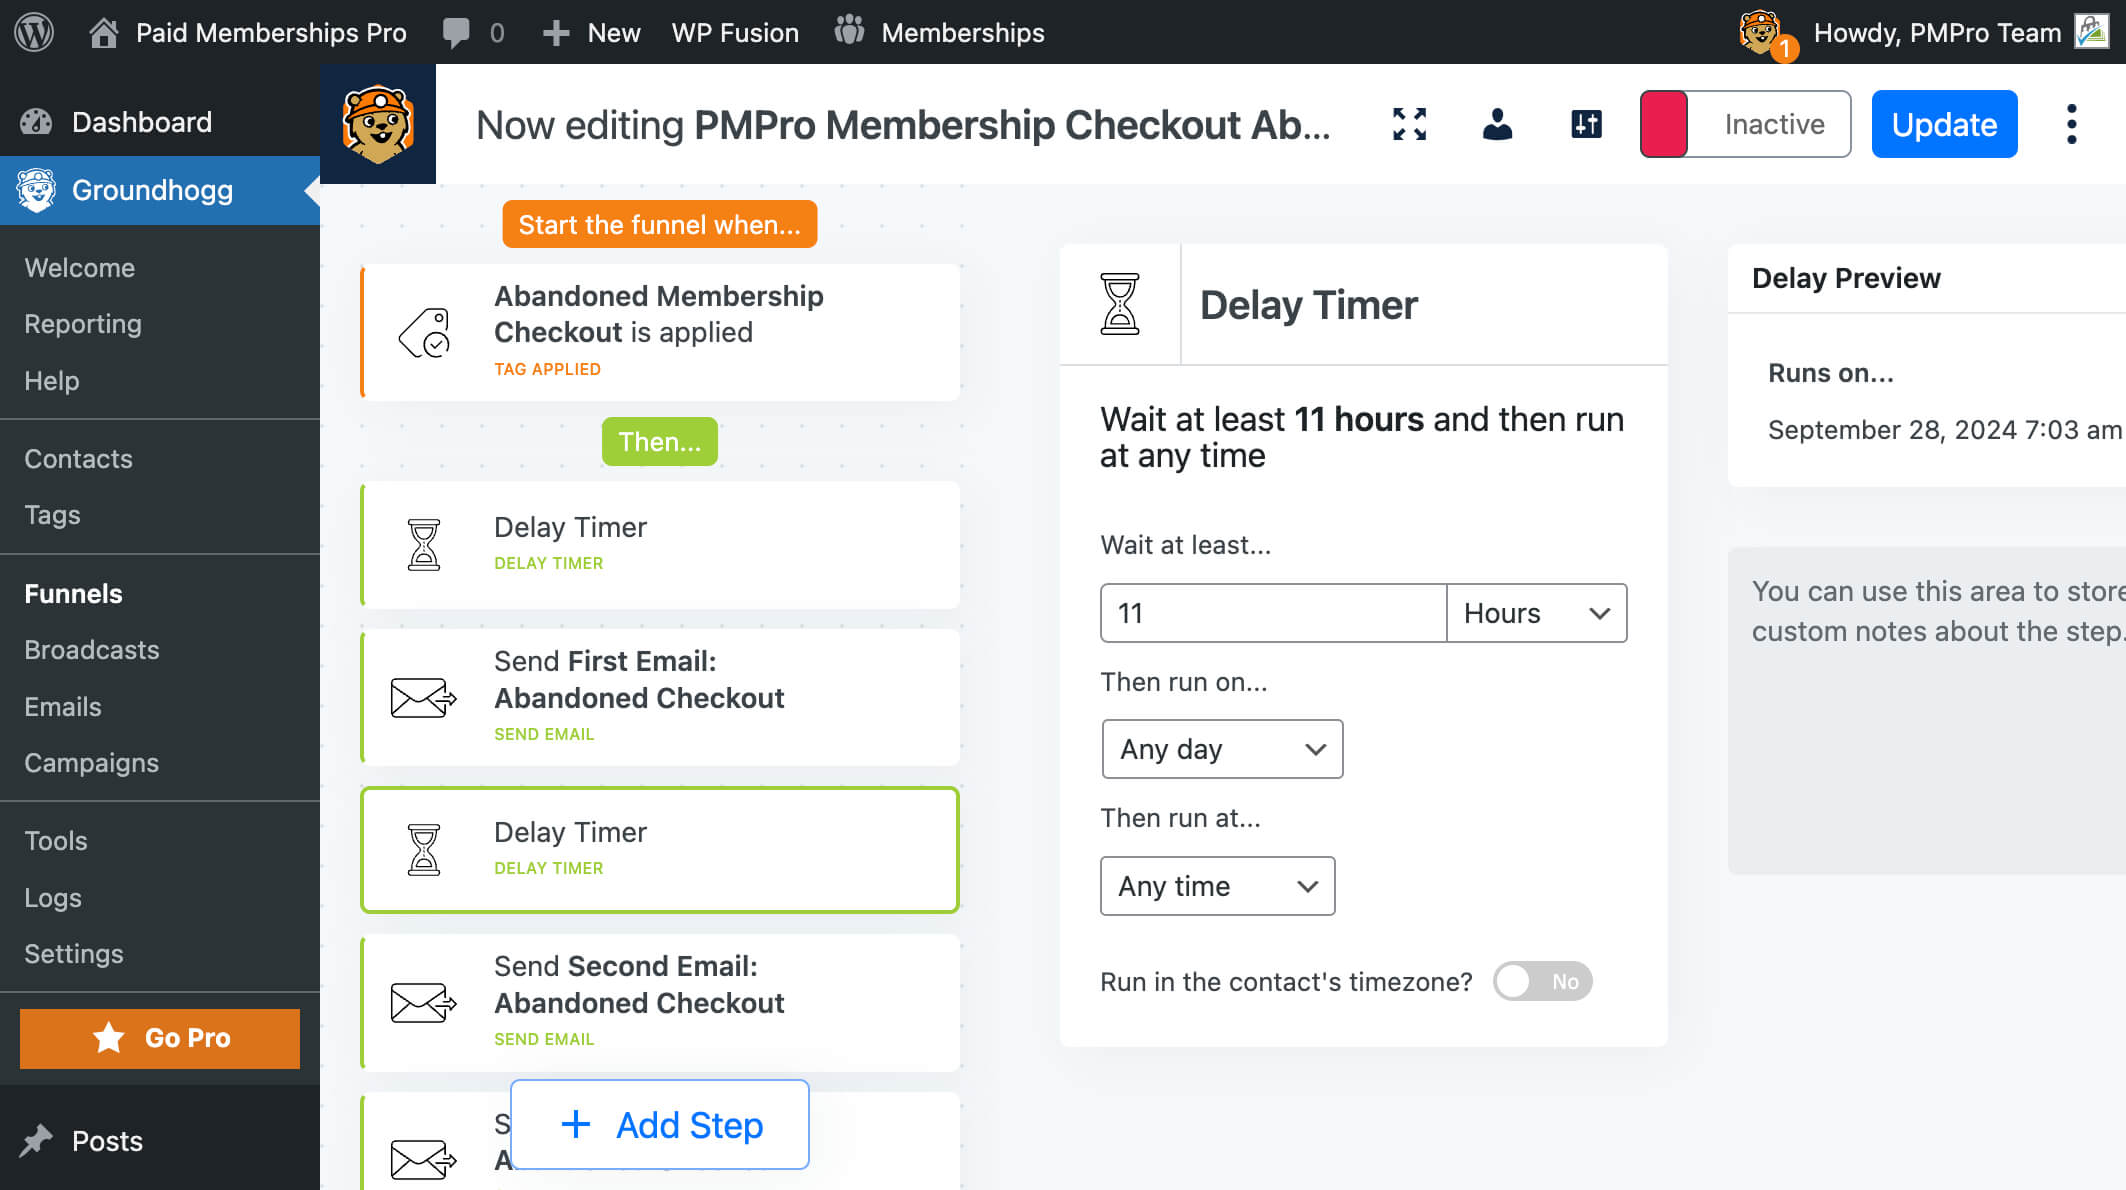
- For the final (third) follow-up email, set a delay of 12 hours after the second message.
Step 4: Configure the WP Fusion and PMPro Integration
These next steps validate that WP Fusion is correctly integrated with PMPro and shows you how to set up the abandoned cart tracking tag.
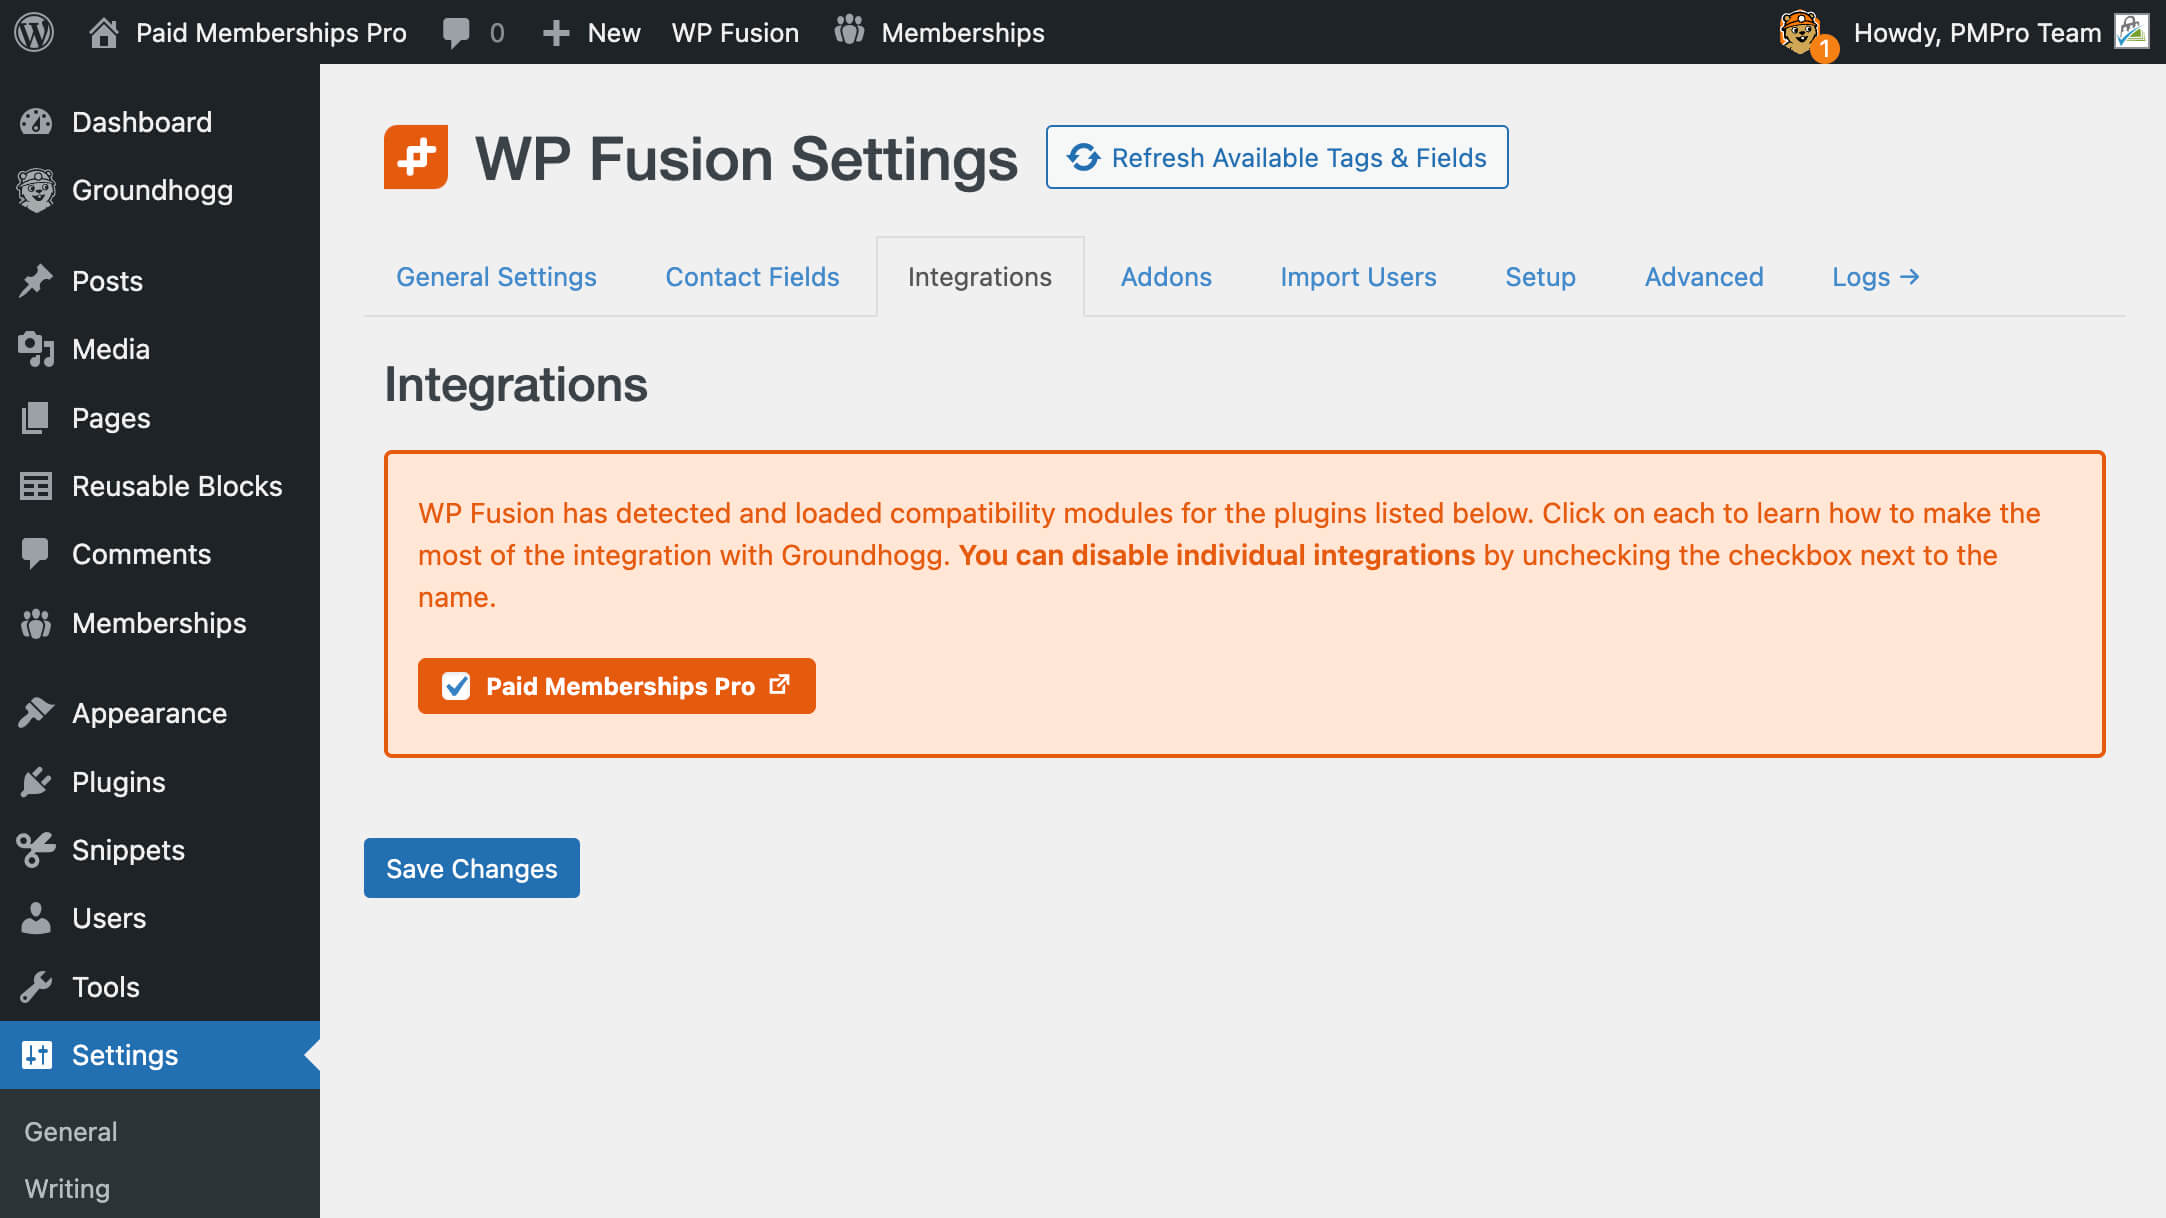
- Go to WP Fusion > Integrations and ensure the PMPro integration is enabled.
Now, set WP Fusion to apply the tag you created for people that abandon carts. This will add people to the Groundhogg funnel when visitors begin checkout then leave.
- Go to WP Fusion > Addons.
- Set your created tag in the “Apply Tags” field.
- Save Changes.

Step 5: Activate the Funnel and Test
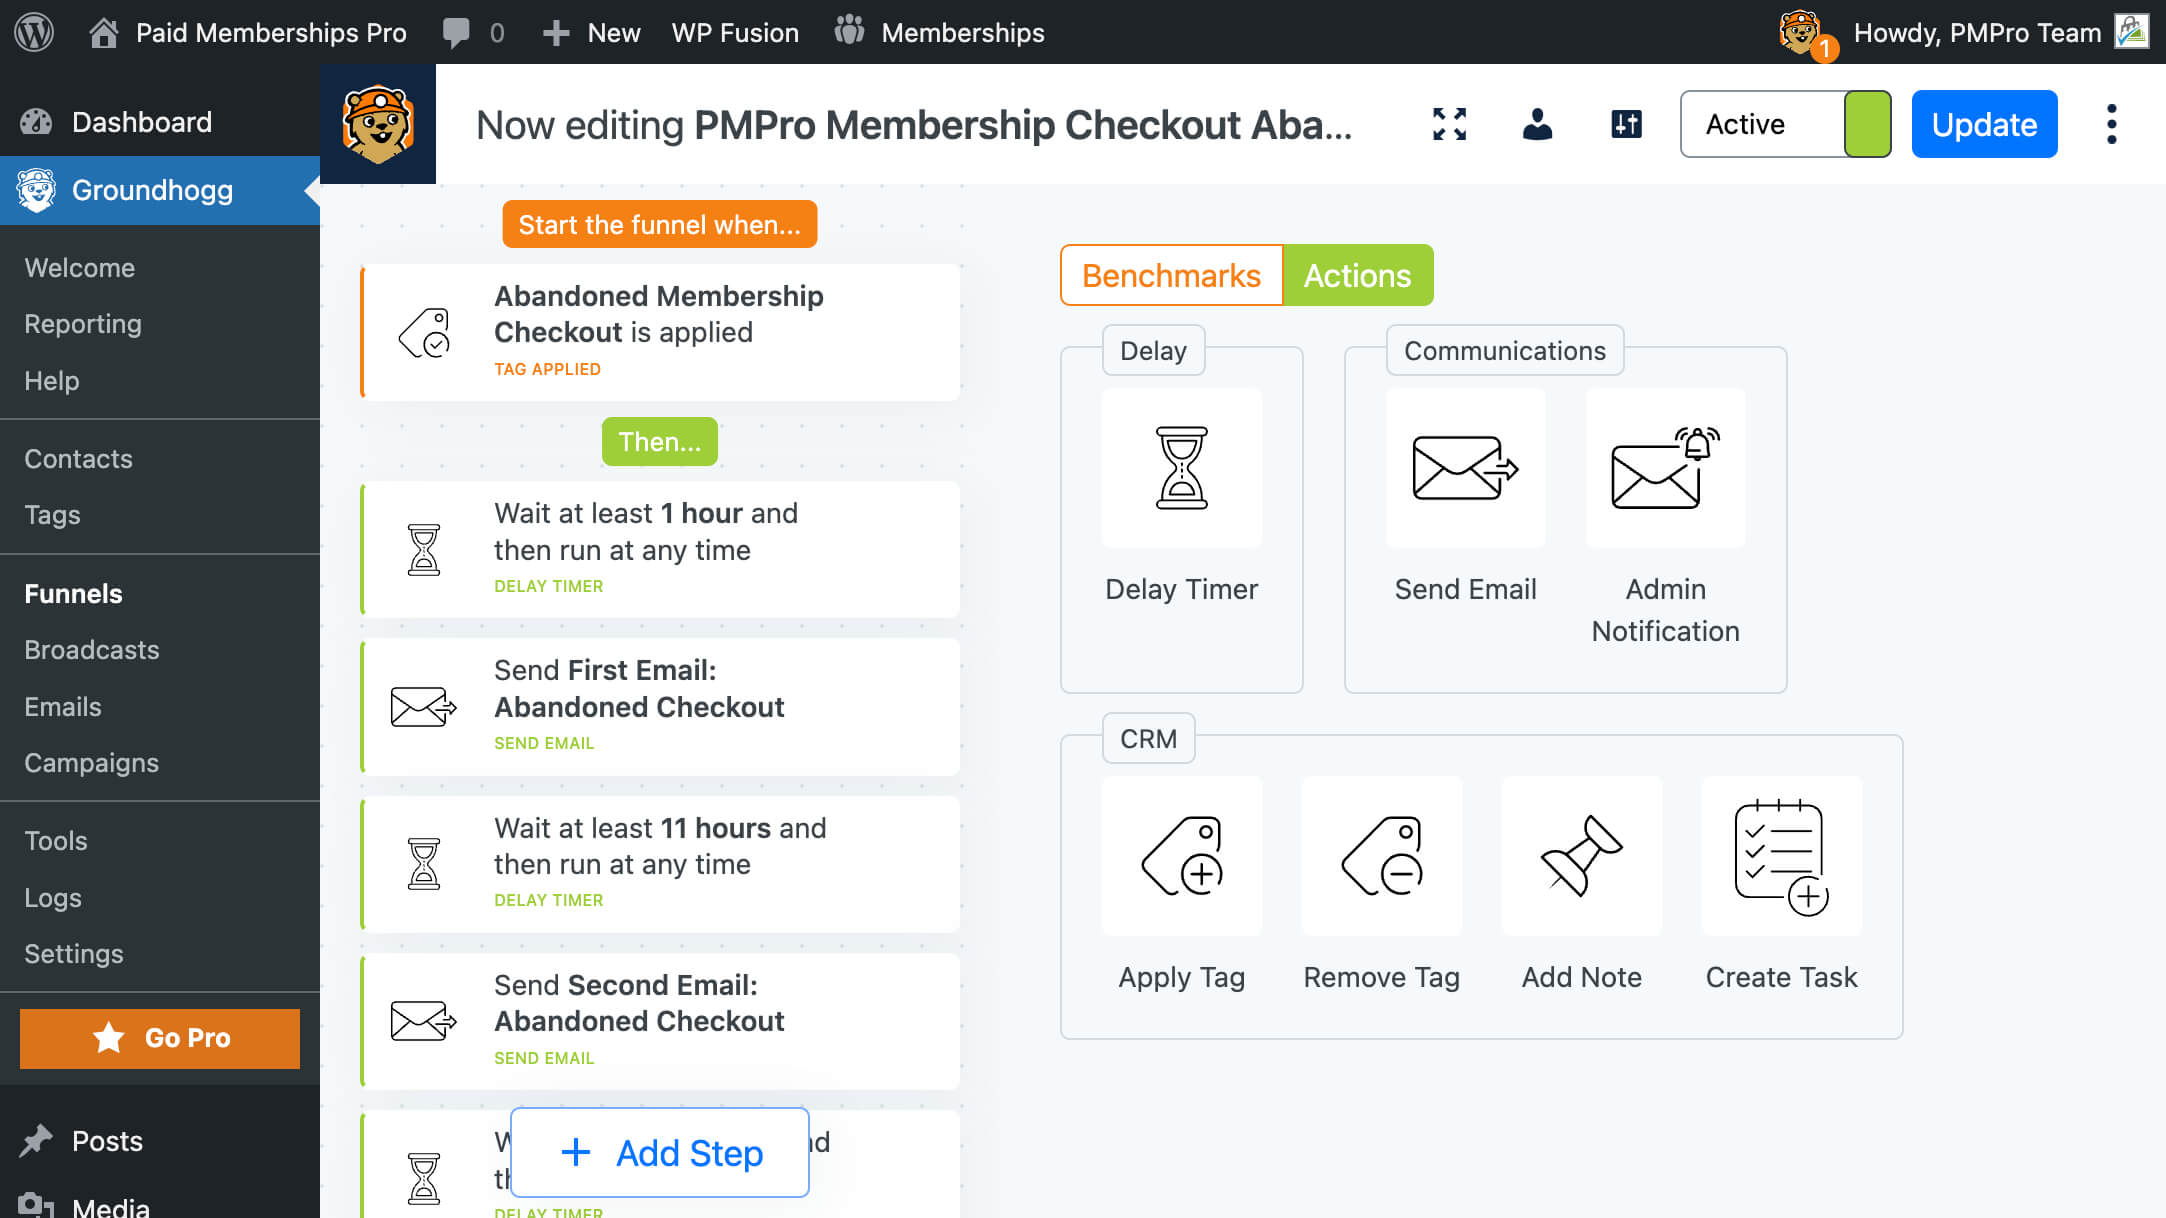
Once your funnel is built and all connections are in place, you can switch it from Draft to Active to start triggering actions.
- Navigate to Groundhogg > Funnels.
- Select the cart abandonment funnel you created in step 3.
- Toggle the status from Draft to Active.
- This will activate the funnel and ensure users are added when they abandon their cart.
You did it—your membership cart abandonment funnel is live. You can test the funnel as a new site visitor to ensure the tags and email sequence works as expected.
- Log out of your site or open your site in an incognito browser.
- Navigate through your Membership Levels page to start a membership checkout process.
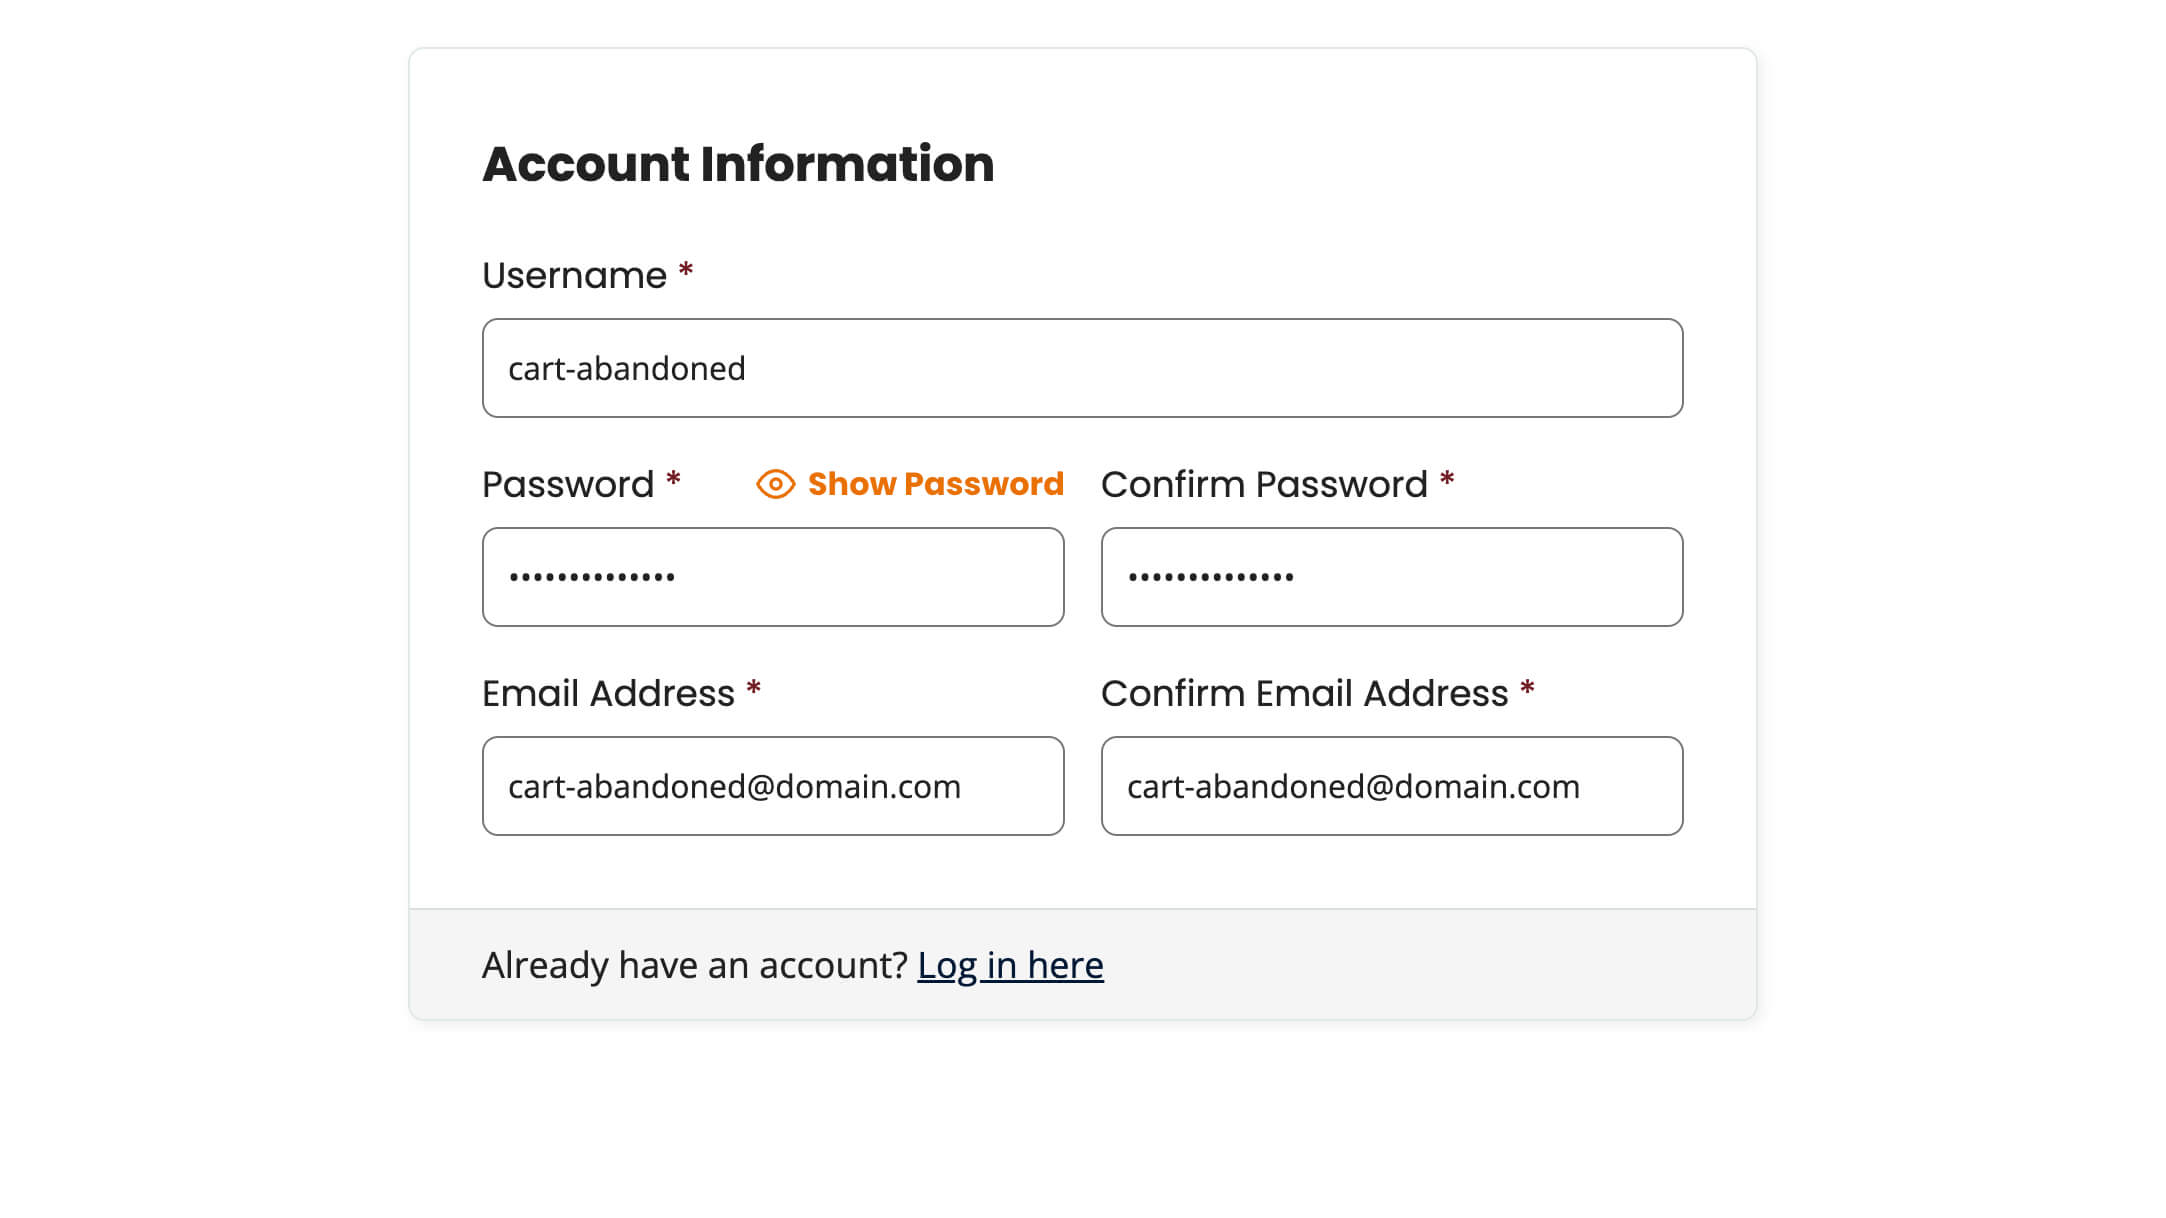
- Begin entering your data in the fields.
- WP Fusion’s Cart Abandonment addon listens to the “Email Address” field, so you must complete up to this field.
- When a visitor tabs out of that field, the logic in their addon creates a new contact with the assigned tag within your connected CRM (Groundhogg).
- Abandon checkout to test whether the funnel triggers.
- Check that new users are added to the funnel and the sequence begins when they abandon their cart.
Recover Lost Revenue with a Cart Abandonment Funnel
By setting up this membership cart abandonment funnel with Groundhogg and WP Fusion, you have put a system in place to automatically recover lost revenue.
When potential members leave without completing checkout, your funnel will re-engage them through a targeted email sequence, nudging them back to complete the membership signup process.
Not only does this help recover abandoned carts, but it also strengthens your overall marketing strategy by ensuring that no potential member slips through the cracks. Over time, you will see increased conversions, improved member retention, and more consistent revenue streams—all thanks to the smart use of automation.
Free Download: The AI-Powered Membership Site Blueprint
Download the free guide: Learn how to plan, build, and grow a membership site using AI as your strategic partner: from buyer persona to launch and beyond.


