Do you run a membership site with WordPress? Do you want to show a different main menu to signed-in members, logged-out members, and non-members, or on different pages of your website?
While most WordPress themes include some menu customization, by default, WordPress will always show the same main menu. This is where creating a conditional main menu comes in.
What is a Conditional Main Menu?
A conditional main menu is a main menu with conditional logic added. This allows you to hide or display menus based on certain conditions like user role or logged-in status.
Want to direct logged-in members to specific areas of your site, hide certain features from non-members, or direct the attention of members on a specific level to a feature that you’re trying to upsell? You can do this with conditional logic.
For example, you might want to show an upgrade link to your free users to encourage them to become paying members. Or, perhaps you want to display different menu elements on different pages, like landing pages or your contact or support page.
Creating a conditional main menu gives you the power to customize the navigation experience for everyone who visits your site. Remember, a strong member and non-member navigation structure helps your users to find what they are looking for and interact with your membership site in a meaningful way.
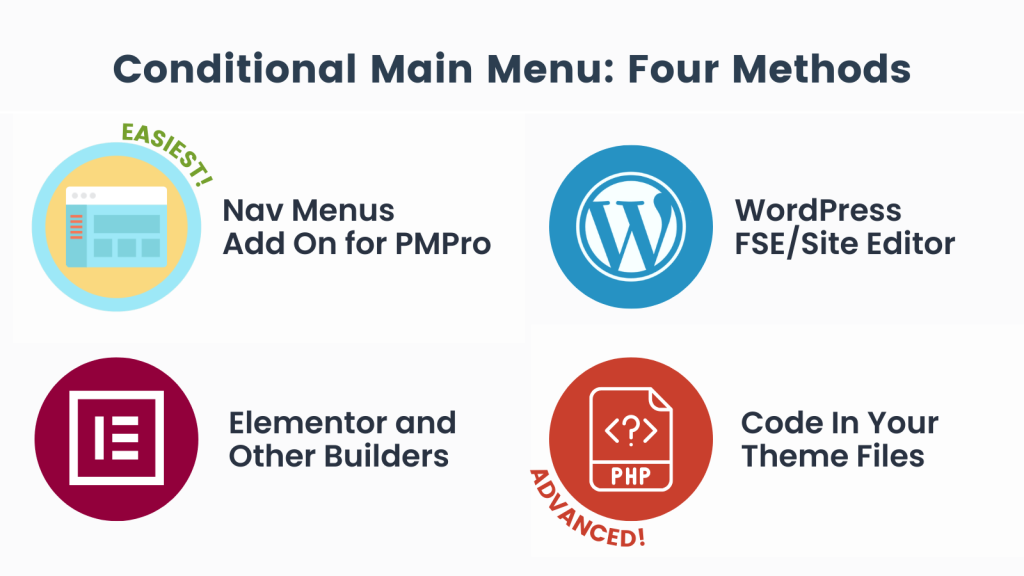
In this post, we’ll show you 4 different ways to create a conditional main menu in WordPress, including:
- Using the Nav Menus Add On for PMPro
- Creating Member-Specific Menus with the Site Editor (WordPress FSE)
- Managing Menu Conditions with Elementor or Another Page Builder
- Editing Your WordPress Theme or Child Theme Menu Locations (Advanced)
Common Main Menu Elements by User Type
Logged In Members
When your members are logged in, they should have easy access to:
- Their account, so they can manage their membership and see payment history
- Primary features of your membership, such as a:
- Post category for members only
- Video gallery
- Member directory
- Course
- Discussion forum
- Support, if they need it
Logged Out Members & Non-Members
When it comes to logged out members and non-members, it should be easy for them to navigate to:
- The member login
- Your pricing page
- Your newsletter signup
- Any other primary landing pages that highlight features and benefits of your membership
- Free resources, such as:
- Your blog
- A public view of a limited directory
- Other lead magnets that help potential members get to know your product and brand
You can even get so granular that you create custom menu experiences for each membership level.
When it comes to customizing your nav menus for different types of users, there are endless possibilities—you can make your menus as simple or complex as you want them to be.

Enhance your WordPress membership site with menus that adapt to your users’ needs. Whether you’re welcoming new visitors or guiding loyal members, conditional menus let you create a seamless and personalized navigation experience.
—Maxi Rico, Software Developer at Paid Memberships Pro
How to Create a Navigation Menu in WordPress
Before you can add a conditional main menu to your site, you’ll need to create your desired navigation menus in WordPress. Once you have all of the different menus you want, you can then determine how (and to whom) they are displayed by applying conditional logic.
To create a new nav menu in WordPress:
- From the WordPress dashboard, navigate to Appearance > Menus. There, you’ll see your existing default nav menu.
- Next, click Create a new menu and add a name for your menu. Click Create Menu. You might decide to create a menu for free users, paid users, logged-in users, other user roles, or even post categories.
- From the list of pages, select or drag and drop the page(s) you want to add to your menu, then select Add to Menu.
- Click Save Menu to save the changes.
For more information, refer to the WordPress Menu User Guide.
How to Make Your Main Menu Conditional: 4 Methods
The four conditional main menu methods below are specifically crafted for membership sites built with Paid Memberships Pro.
1. How to Create a Conditional Main Menu with the Nav Menus Add On
The Nav Menus Add On helps you easily swap navigation menus based on the current user’s membership level and logged in status.
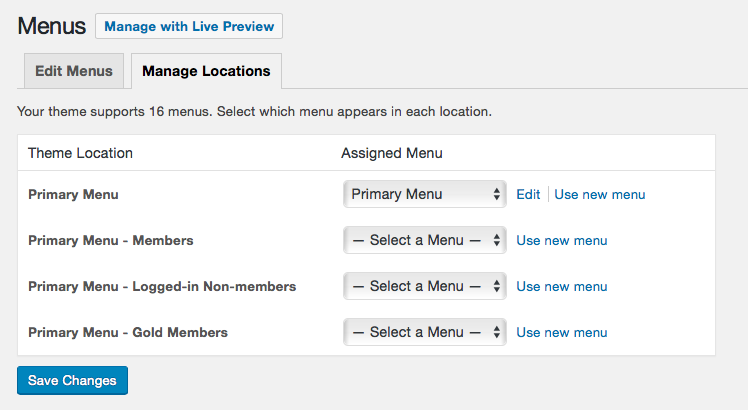
This plugin duplicates every registered navigation menu defined by your theme (using the wp_nav_menus hook) and creates a members-only version. This means you can create a unique navigation menu that replaces the default menu shown for non-members.
You can customize menus even further with level-specific navigation menus.
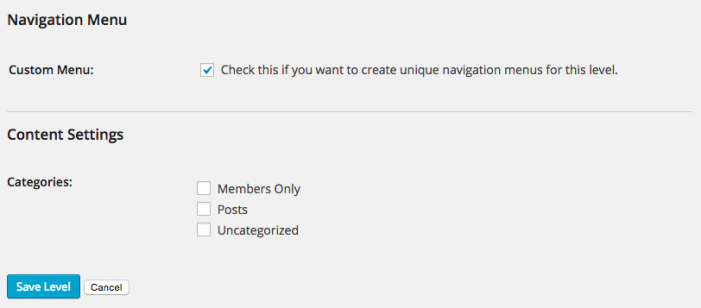
View more docs and download the Nav Menus Add On »
Video: Set Up the Nav Menus Add On
2. How to Create a Conditional Main Menu with the Site Editor (FSE)
If your theme supports the WordPress Site Editor (FSE), such as the Twenty Twenty-Three theme, you can create conditional menus within the Site Editor. The steps below show you how to use the membership required block to insert to different navigation menus in the header template part.
To create a conditional menu within the Site Editor:
- First, create each unique navigation menu you need to show based on the membership level or logged in status of the current user. Navigate to Appearance > Menus to create each conditional menu. Follow the steps in the How to Create WordPress menus section above.
- Now, open the Site Editor and go to Template Parts.
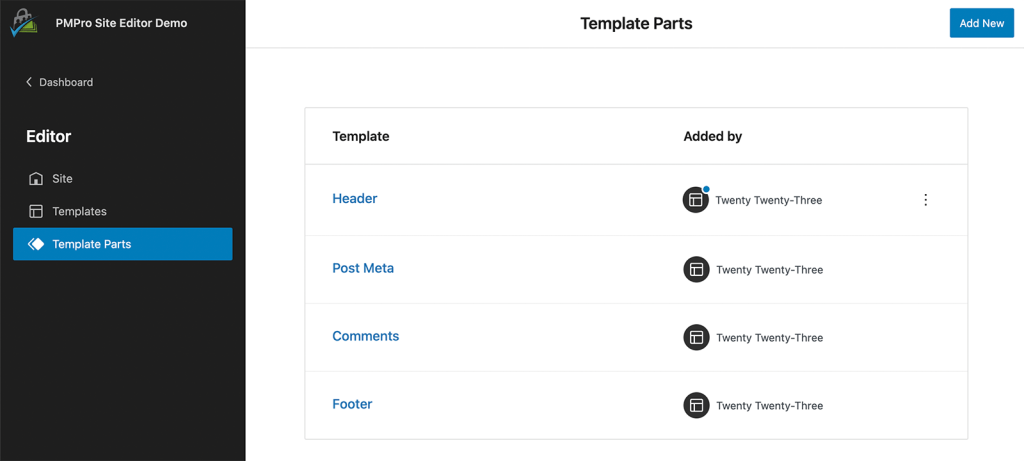
- Edit your site header (usually named “Header” or similar).
- Insert the Membership Required block:
- In the Membership Required block settings, select one or more membership levels that you want to show this unique menu to. Or, select “Non-Members” to show a menu for non-members.
- Within the Membership Required block wrapper, insert a new Navigation block.
- In the Navigation block settings, select the menu that you’d like to show for the condition (public, members only, etc.)
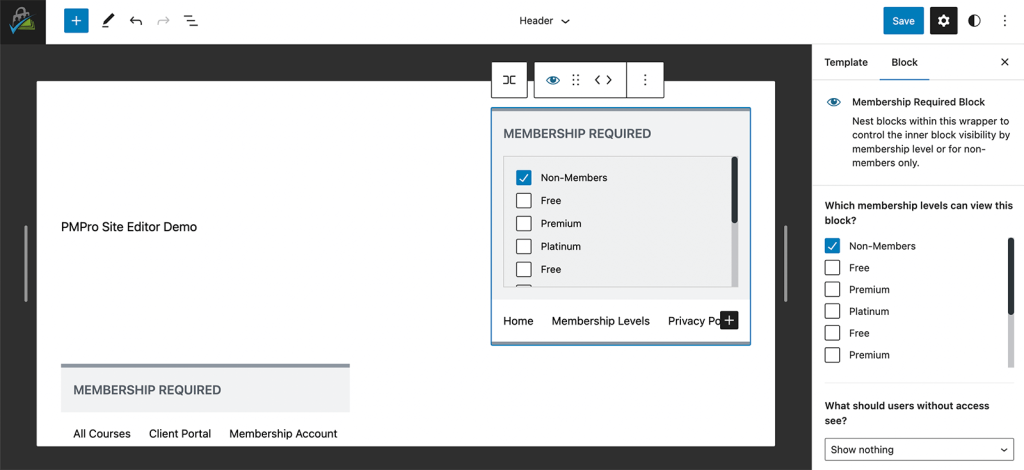
- Repeat step 4 for each unique condition and menu to display.
- Save and publish your site changes.
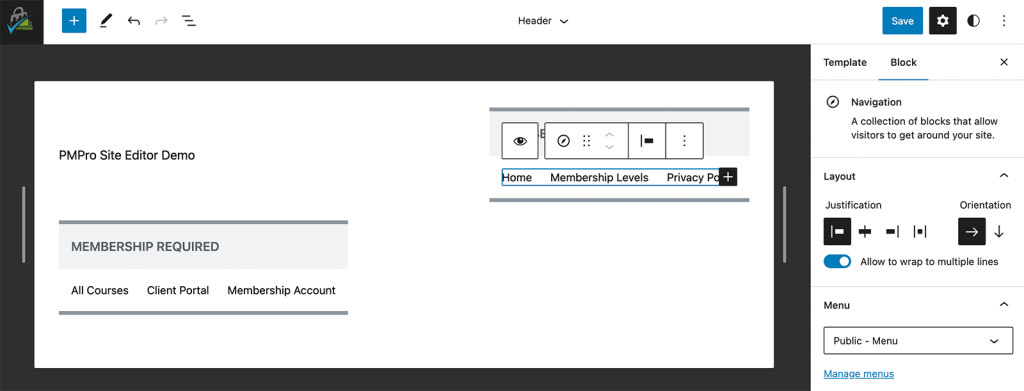
You can preview the menu conditions by visiting your site as a non-member or as a member with each unique level requirement.
Video: Set Up Conditional Menus with Site Editor
3. How to Create a Conditional Main Menu with Elementor and Other Site Builders
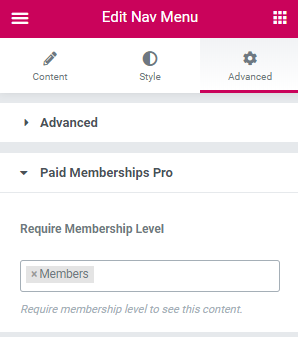
These same steps will be very similar with any page builder that integrates PMPro, such as Elementor, Divi, and Beaver Builder. If your Elementor theme uses default WordPress menu locations, you can also use the Nav Menus Add On just as described in option 1 above.
If you are creating a custom header within Elementor Pro or your Elementor theme does not support WordPress menu locations, you have to take a different approach.
In this case, you can use the Elementor Nav Menu element and adjust advanced settings to require a membership level to view the content.
We wrote a complete post on how to customize the Elementor nav menu widget by membership level. Check that guide for the step-by-step instructions on how to customize menus with Elementor and Paid Memberships Pro.
4. How to Create a Conditional Main Menu by Editing Your WordPress Theme
If you’re a developer creating a custom WordPress theme for your membership site, these steps demonstrate how to use the pmpro_hasMembershipLevel function to show a conditional menu.
Remember that if you need to customize a premium or third-party theme, you should first create a child theme to preserve updates in your parent theme.
Step 1: Register the Members Navigation Menu
In your active child theme’s functions.php file, add the following code:
function mytheme_register_my_members_menu() {
	register_nav_menu( 'primary-members', __( 'Primary Menu - Members', 'theme-slug' ) );
	register_nav_menu( 'primary-nonmembers', __( 'Primary Menu - Non-Members', 'theme-slug' ) );
}
add_action( 'after_setup_theme', 'mytheme_register_my_members_menu' );
Duplicate the register_nav_menu line for every new menu location needed, such as a conditional footer menu. You could also create a unique menu location for each membership level on your site.
Step 2: Edit Your Theme’s header.php File
The code below replaces your theme’s wp_nav_menu code. If there are special attributes declared in your theme’s existing wp_nav_menu code, you should mirror those for the new member/non-member menus. See this guide from the WordPress developer resource area on the wp_nav_menu function for additional information.
//is there a user to check?
if ( is_user_logged_in() && function_exists('pmpro_hasMembershipLevel') ) {
	//check level
	if ( pmpro_hasMembershipLevel() ) {
		wp_nav_menu( array( 'theme_location' => 'primary-members' ) );
	} else {
		wp_nav_menu( array( 'theme_location' => 'primary-nonmembers' ) );
	}
} else {
	wp_nav_menu( array( 'theme_location' => 'primary-nonmembers' ) );
}
Step 3: Create the Members and Non-Members Custom Menus
- In the WordPress admin go to Appearance > Menus.
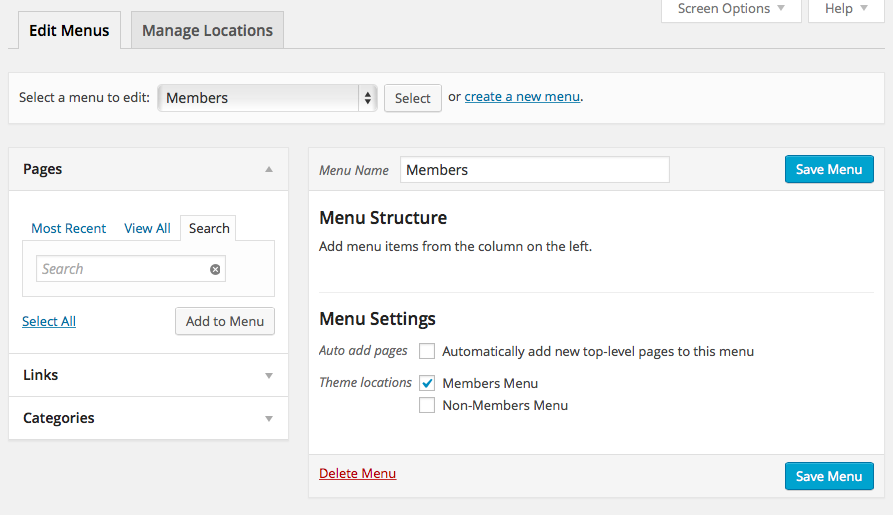
- Click the “create a new menu” link to add a new “Members” menu.
- Add menu items to this menu, check the “Primary Menu – Members” Theme Location under “Menu Settings”, and click Save Menu.
- Click the “create a new menu” link to add a new “Non Members” menu.
- Add menu items to this menu, check the “Primary Menu – Non-Members” Theme Location under Menu Settings, and save the menu.
A Couple of Best Practices to Consider
- Always test your changes. Regardless of the method you use, be sure to navigate to your site both as a member and a non-member to verify that everything is working as intended.
Want to preview your site as a member or non-member without ever having to log out of your administrator account? We share a few methods for previewing your site as different membership levels in this post. - Log in and log out should be priorities. One of the best ways to improve your member experience is to make it quick and easy to log in and log out of your site. Check out our post Best Practices for Member Log In and Log Out to learn more about optimizing these processes.
You can also use the Log In Widget for Paid Memberships Pro, which allows you to:
- Display a “Welcome” message when logged in.
- Display a “Log Out” link in the widget
- Display the “Log In Widget” menu. Customize this menu per level using the Nav Menus Add On. Assign the menu under Appearance > Menus.
- Remember that whatever changes you make to your main menu, you may also want to apply to other menus, such as mega menus, slide out menus, drop down menus, and mobile menus.
For example, a lot of themes have a separate “menu” for mobile menus that you may have to update, potentially using a different method than was used to update the main menu.
If you have questions about working with menus or conditional logic, our support team is happy to help.
FAQs on WordPress Menus and Members-Only Menus
A conditional main menu is a navigation menu that displays different items based on user roles or logged-in status.
A conditional main menu helps you direct different users to the most important pages in your site. A conditional menu helps you hide features from non-members and highlight features to logged in members.
Use the Nav Menu widget within Elementor, adjust advanced settings to require a specific membership level, and customize menus for each membership level.
No, you don’t need to be a developer. Many methods, such as using the Nav Menus Add On or Site Editor, are user-friendly and do not require coding skills.
In Conclusion
Customizing your main menu to the needs of different types of users—as well as your own goals and preferences—makes for a better experience for everyone. It not only points your users where you want them to go; It also helps them find what’s most useful to them.
But these menu strategies don’t just apply to your main menu. You can apply them to your sidebar navigation, mobile menu, internal pages, and footer as well.
Ready to launch your own membership site? Paid Memberships Pro gives you a complete set of tools to bring your membership business to life.
Already a PMPro user? Upgrade to a Standard plan to get immediate access to the Nav Menus Add On along with 19 other premium Add Ons.
