The first step to setting up Paid Memberships Pro is creating a Membership Level. Visit our full documentation page about Membership Level setup for more information.
Create a New Membership Level
On the WordPress dashboard, go to Memberships > Settings > Membership Levels. From here you can create a new level or level group or edit existing levels and level groups.
Set Up Membership Level Groups
With Paid Memberships Pro, a single user can hold multiple membership levels at one time. For this reason, you must assign levels to Level Groups. Level Groups are used to define how different levels relate to each other.
Each Level Group has specific permissions related to the levels within, specifically:
- Users can only choose one level from this group (the classic tiered membership access), or
- Users can choose multiple levels from this group (for “a la carte” or Add On memberships that charge a one-time payment or set up a separate recurring subscription).
Add a Level Group
- From the WordPress admin, navigate to Memberships > Settings > and select Levels.
- Click + Add New Group.
- Name Your Group: Assign a name to your level group. This name is shown on your Membership Levels page (if you are using the default membership levels page shortcode or block).
- Enable Multiple Selections Per Member: Check the box “Allow users to choose multiple levels from this group” if you want to allow members to hold multiple membership levels simultaneously within the same group. If your level group is for tiers of access, do not check this box.
- Save Settings.
Select a Membership Level Template
Paid Memberships Pro has level settings for almost any type of level you can imagine. The plugin includes level templates for the most common types of levels our user research revealed including:
- Free: no payment, never expires
- One Time: one initial payment at checkout with expiration
- Monthly or Annual: recurring subscription that charges the same amount at checkout and per period until the user cancels
- Lifetime: one initial payment at checkout with no expiration
- Trial: a free period of membership that begins charging the recurring membership after one period
- Advanced: the complete Add Membership Level screen with all options expanded

When creating a new level, select a template from the list that best fits the type of level you need.
Note: Even though you may have chosen a template to set up your level, you can still access every individual level setting if, for example, you decide to change your one-time payment level to recurring later.
Membership Level Settings
Depending on the type of level template that was selected, this screen will have slightly different settings activated. For example, selecting the “Advanced” level template will show you all settings, including expiration settings and more.
General Information
- Name: The name of your Membership level (public).
- Group: Assign the Membership Level to a Level Group.
- Description: Optional content shown on the checkout page.
- Confirmation Message: Optional content shown on the checkout confirmation page and can be included in the confirmation email.
Billing Details
- Initial Payment: This is what is charged at checkout (e.g. $10).
- Recurring Subscription: Check if your level has a recurring payment.
- Billing Amount: The amount to be billed one cycle (day(s), week(s), month(s), year(s)) after the initial payment.
Advanced Level Billing Settings
These are the less-used settings that you may need to create a more complex level.
- Billing Cycle Limit: The total number of recurring billing cycles for this level, including the trial period (if applicable) but not including the initial payment. Set to zero if membership should charge subscription payments indefinitely. At the end of the last cycle, billing will stop, but the user will still have their membership level access unless you also set an expiration below.
- Custom Trial: Check if your level has a custom trial period. (Optional; Trial Payment and Trial Period)
- Trial Billing Amount: The amount (can be zero for free trial) and number of cycles to be billed (day(s), week(s), month(s), year(s)) after the initial payment.
Expiration Settings
- Membership Expiration: Check this to set when membership access expires.
- Expires In: Set the duration of membership access. Note that the member’s recurring subscription (if any) will be canceled when the membership expires.
Content Settings
- Categories: Select categories to bulk protect posts. You can control whether non-members see posts in archives or shown excerpts using this guide. If you have any Categories that should be locked down for members, you can check them off at the bottom of the edit level page.
- Single Posts: Add or edit a single post to protect it.
- Single Pages: Add or edit a single page to protect it.
- Other Content Types: PMPro can protect other content types such as a Custom Post Type, Course, Community, Directory, Podcast, and more.
Other Settings
- Disable New Signups: Disables new signups / checkouts and hides the level from default “Membership Levels” page.
Other settings may also appear in this section if you are using any of our Add Ons or third-party integrations.
Important: At least one membership level must be open to signups (“Allow Signups” = Yes) or your customers will be redirected to your membership levels page when they try to register or checkout.
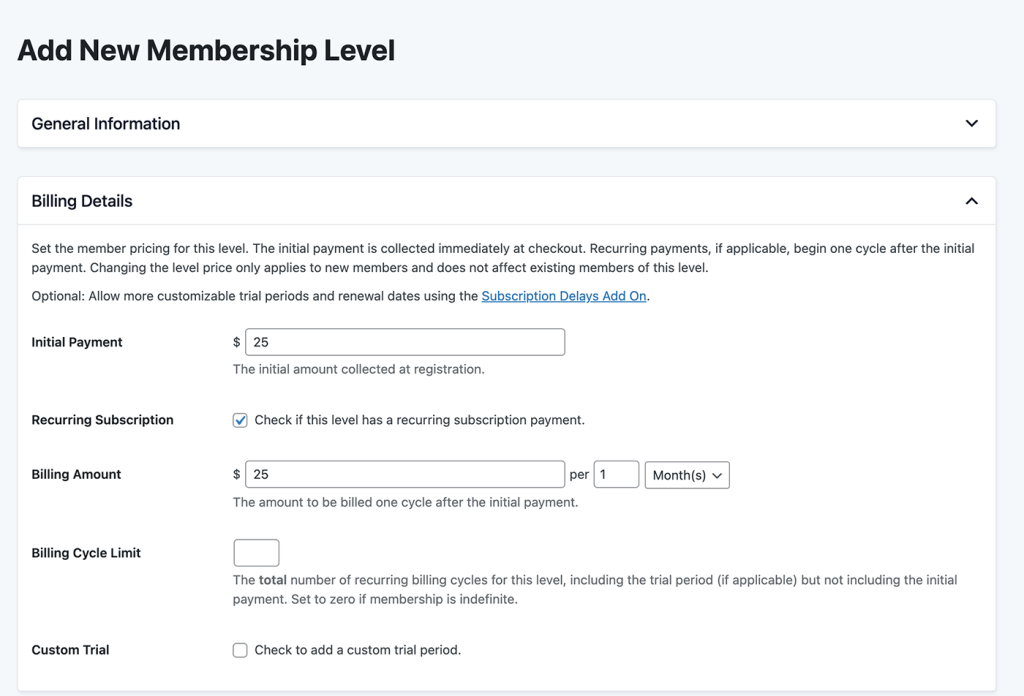
Example: $25 Monthly Membership
- Click + Add New Level.
- Select the Monthly template.
- General Information
- Name: The name of your Membership level (public).
- Level Group: Select which Level Group the level should be included in.
- Description: Optional content shown on the checkout page.
- Confirmation Message: Optional content shown on the checkout confirmation page.
- Billing Details: In this tutorial we are creating a $25/month plan.
- Initial Payment: The amount charged at checkout. Enter
25. - Recurring Subscription: Check the box to set up a recurring payment.
- Billing Amount: The amount to be billed one cycle (day(s), week(s), month(s), year(s)) after the initial payment. Enter
25per1Month.
- Initial Payment: The amount charged at checkout. Enter
- Content Settings: Select categories to bulk protect posts. Any post in a restricted category is protected for members of this level. You can control whether non-members see posts in archives or are shown excerpts using this guide. If you have any Categories that should be locked down for members, you can check them off in the “Categories” setting. Note: the site admin does not automatically have access to protected content.
- Save Level.
Read more documentation on Membership Levels »
Video: Initial Membership Level Setup
Last updated on October 1, 2024

