Our Mailchimp Add On for Paid Memberships Pro synchronizes the member’s level name and level ID for improved list targeting, building list groups and segments based on level.
If you were using this Add On prior to version 2.0, this information would not be in place for existing subscribers.
Here are instructions to update your Mailchimp list with Membership Level Name and Level ID fields for existing members.
The Downside of Separate Lists For Each Membership Level
In short, the reason most people choose to have a single list in Mailchimp is due to pricing. In MailChimp, you pay per member, per list. If you have a single member in two distinct lists, you will be billed as if they are two separate subscribers. Having a single list with properly tagged subscribers with merge fields is less expensive.
In my opinion, it’s also a bit simpler to manage your entire membership in a single list. I know many people have more than one business that’s managed via a single Mailchimp account. Switching to a merge field/tag-based approach streamlines your account to one list per business line.
Once you have everyone in a single list, you can use Mailchimp segments to target unique groups with your email broadcasts.
Clean Up Your Mailchimp List Data
The first thing to consider is whether you will use multiple lists to manage members by level or a single list for all members.
If you choose to have separate lists for each level, skip to the next section below for instructions on updating your existing member data via MailChimp import.
How to Set Up Your Master List
 First, export all of your Mailchimp lists. Just like taking a backup of your WordPress site data and files, this step is a safeguard to make sure you don’t *accidentally* delete subscribers. Refer to Mailchimp’s instructions on exporting a list here.
- If you don’t already have a master list, add one by clicking “Create List” from the “Lists” dashboard in MailChimp.
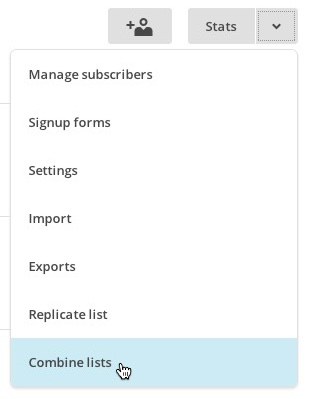
- For each list you want to merge to the master, click the list’s dropdown icon on the “Lists” dashboard page and select “Combine Lists”.
- Use the dropdown menu to choose the name of your master list and check any groups you want to add these subscribers to.
- Repeat this process for each of the lists you want to combine with your master list.
- When you’ve combined all of your lists, remove your cleaned and unsubscribed addresses.
Read more about combining lists in this guide via Mailchimp »
After you have completed the “Combine Lists” process and have all members in one list, you should update your settings in your site’s WordPress admin under Settings -> PMPro Mailchimp. Make sure that your members are all added to the Master List.
Export Your Members List in PMPro
- If you are running our MailChimp Add On v2.0 or higher, navigate to Settings > PMPro Mailchimp.
- Click on the “export your members list…” link, and choose the list to export.
- This will export a CSV file with the headings “email”, “PMPLEVEL”, and “PMPLEVELID” (note that you MUST use these field names in your Mailchimp account).
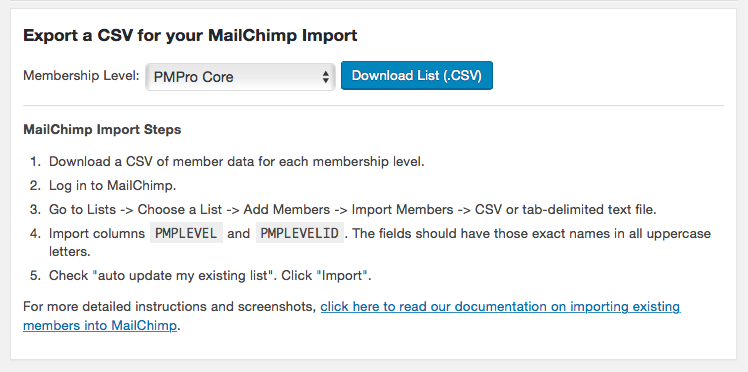
Alternatively, you can use the export link on the Memberships > Members List page in the dashboard.
- Navigate to Memberships > Members List
- Select to export all members OR export a filtered view of members by level.
- Then, open the file in your preferred spreadsheet editor and prepare the list for import into Mailchimp using appropriate merge fields:
- Remove all columns EXCEPT
email,membership_level, andmembership_level_id. - Change the column names to match the image below:
email,PMPLEVEL,PMPLEVELID. - Save and export the file as CSV.
- Remove all columns EXCEPT

Update Mailchimp Lists with Membership Merge Fields
This is the final step in the process where you import the merge fields / membership data into your Mailchimp account. And luckily once this process is complete, you will never again have to go through these steps.
- Log in to Mailchimp.
- Click on the “Lists” link in the menu, then choose the list to import to.
- Click on “Add Subscribers” in the submenu, then choose “Import Subscribers”.
- Note that existing subscribers will not be “duplicated” and members that have unsubscribed will not be resubscribed.
- You are simply updating your list subscribers with the new merge field data.
- Choose “CSV or tab-delimited text file”. Click next.
- Choose the CSV file to upload. Check the box that you understand your plan will be upgraded if you import more subscribers than your current plan allows.
- Confirm that all columns are “matched”.
- If columns are not matched, you may need to create a
PMPLEVELand/orPMPLEVELIDmerge field. - The fields should have those exact names in all uppercase letters.
- You may also need to update the merge tags under Lists > Settings > List fields and |MERGE| tags to
PMPLEVELandPMPLEVELIDas well.
- If columns are not matched, you may need to create a
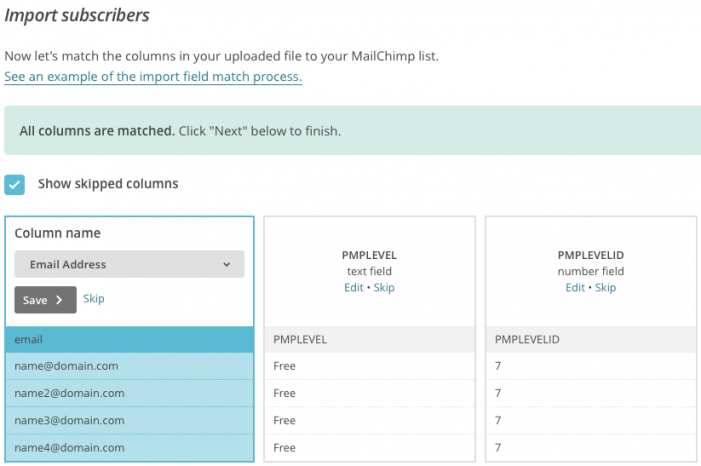
- Click next.
- Under “Categorize the imported subscribers as:”, choose “Subscribed”. If you import a subscriber who has already unsubscribed from your list earlier, they will still be considered unsubscribed after import and won’t be emailed.
- Check “auto update my existing list”. This is needed so Mailchimp will import the merge fields for existing subscribers.
- Click “Import”.
Mailchimp will queue up your import and send you an email when the process is complete.
Some Final Things To Remember
- If you import a subscriber who is already on your list, it won’t count as an additional subscriber. The primary reason to import the
PMPLEVELandPMPLEVELIDfields is so that you can create segments and groups based on those merge fields (instead of storing separate lists for each level). - When you are finished, you may move into a higher tiered plan if you import subscribers who weren’t on your list already, but you should be able to keep the size of your lists smaller by using merge fields instead of individual lists.
- There may be a slight increase in list members due to any number of reasons they initially failed to be added to MailChimp or for members that existed prior to when you added the MailChimp Add On to your website.
So what can I do with all this new information?
Your list contains a lot of information about your subscribers, including when they signed up, where they’re located, and details about their interests and preferences. With MailChimp, you can use this information to target and filter subscribers into what we call “segments,” and send campaigns that are customized to their interests.
via MailChimp
